
If your master bedroom feels a little flat, wall molding is my favorite way to make it look custom without a full renovation. I’ve built a lot of these feature walls over the years, and the right pattern behind the bed can turn the whole room into a cozy, high-end retreat.
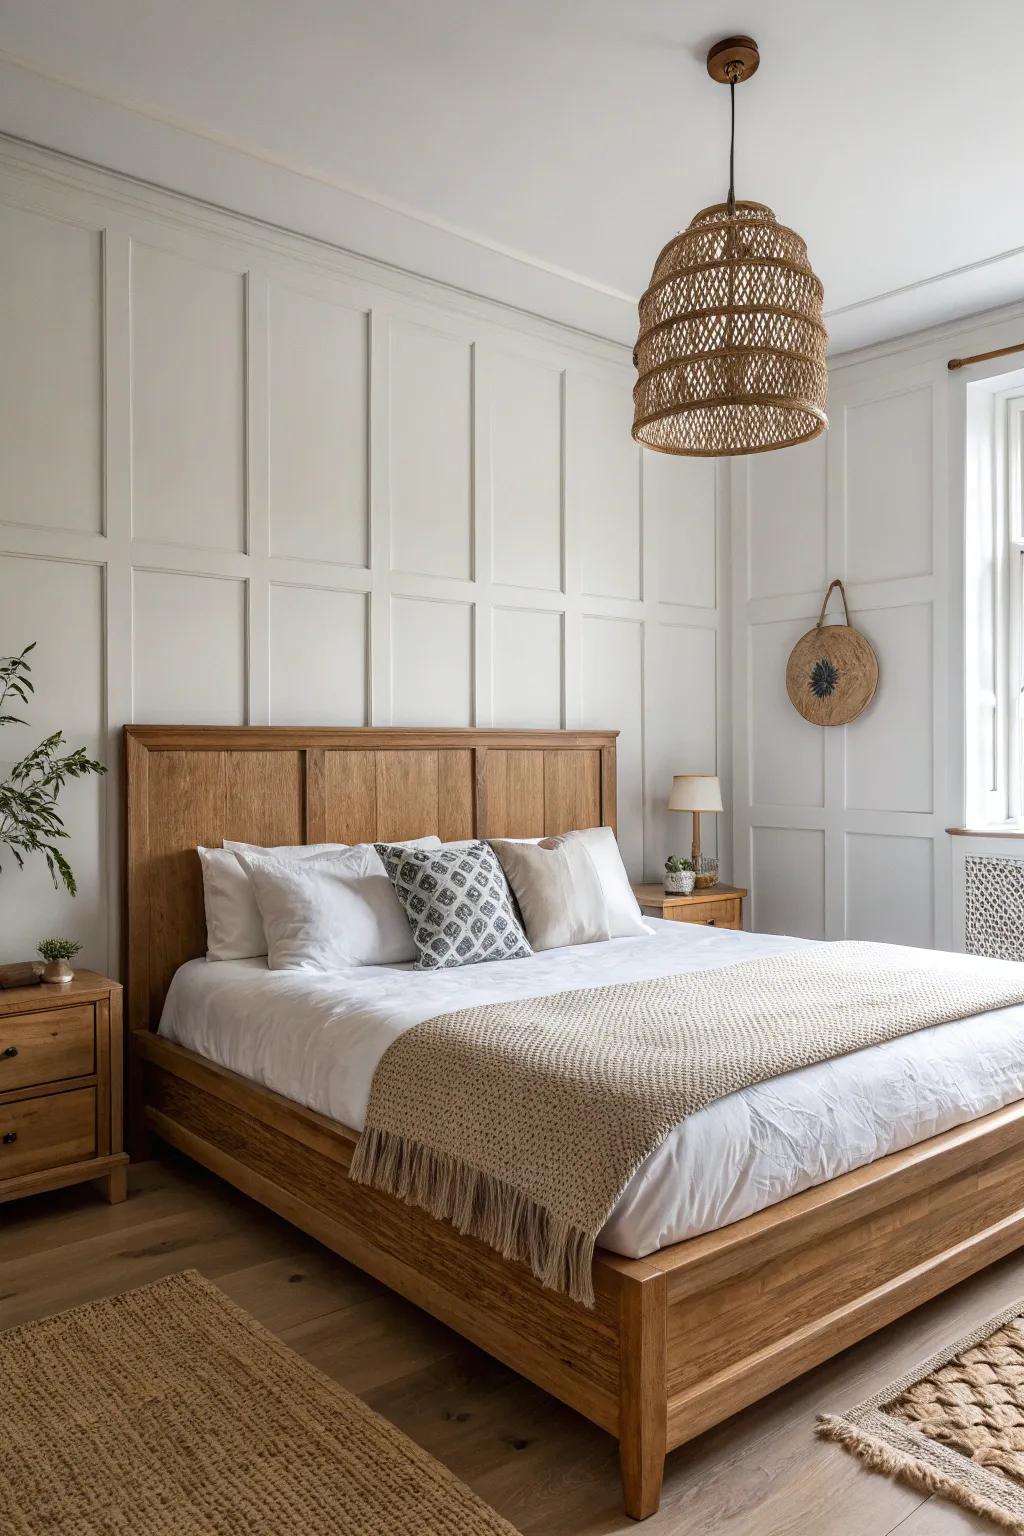
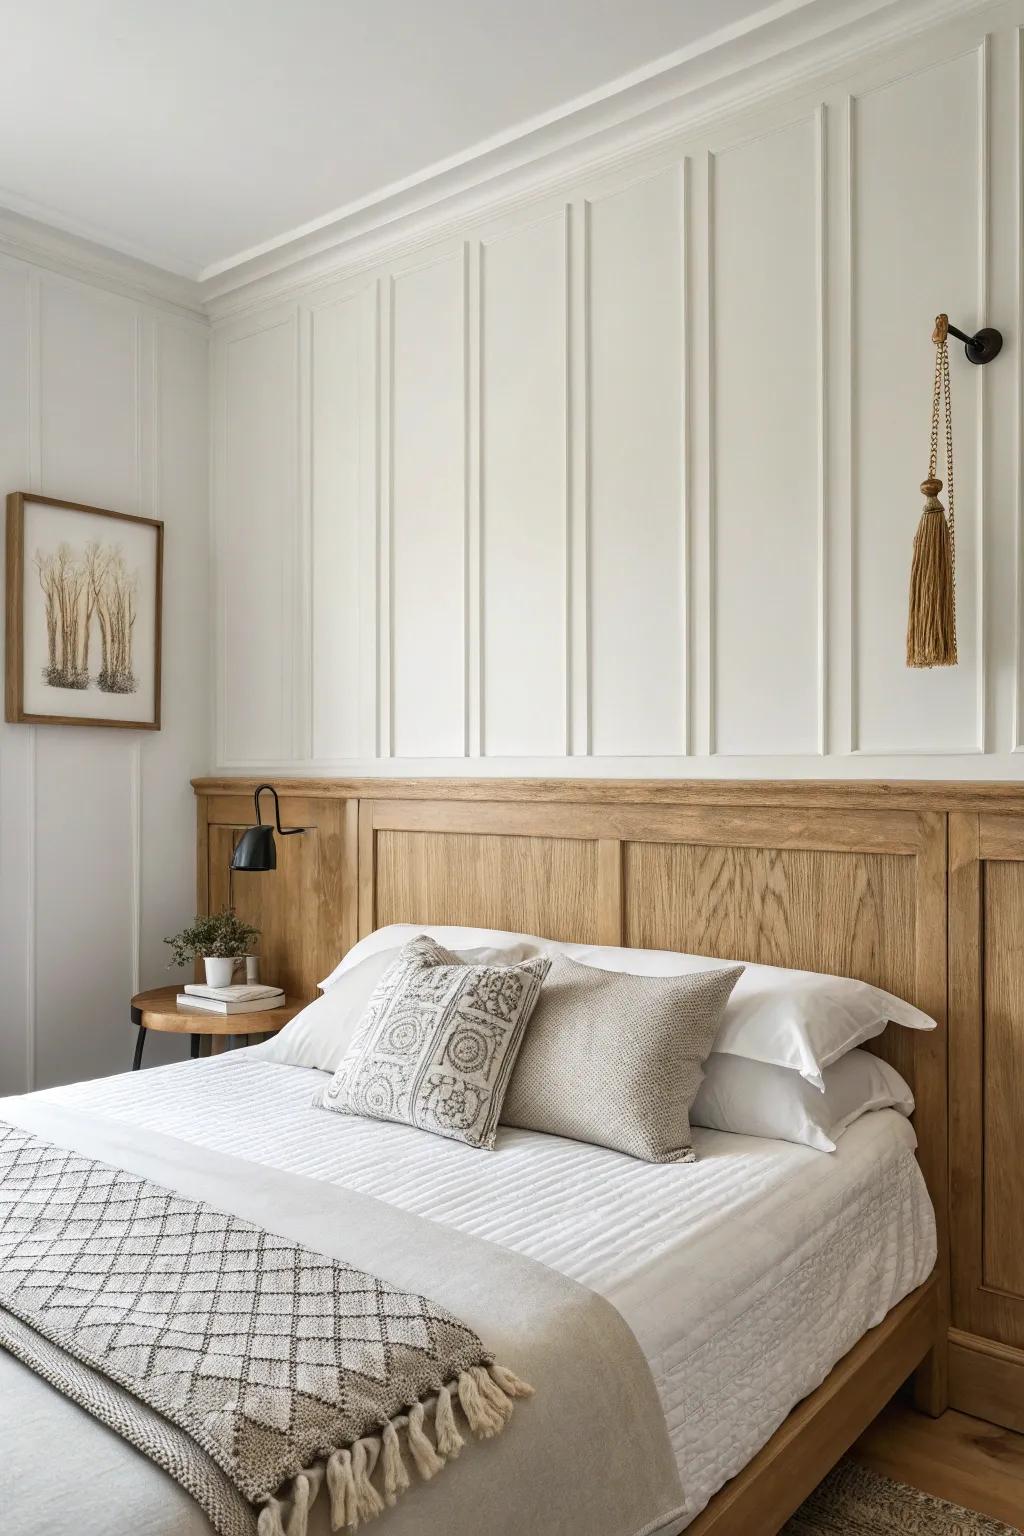
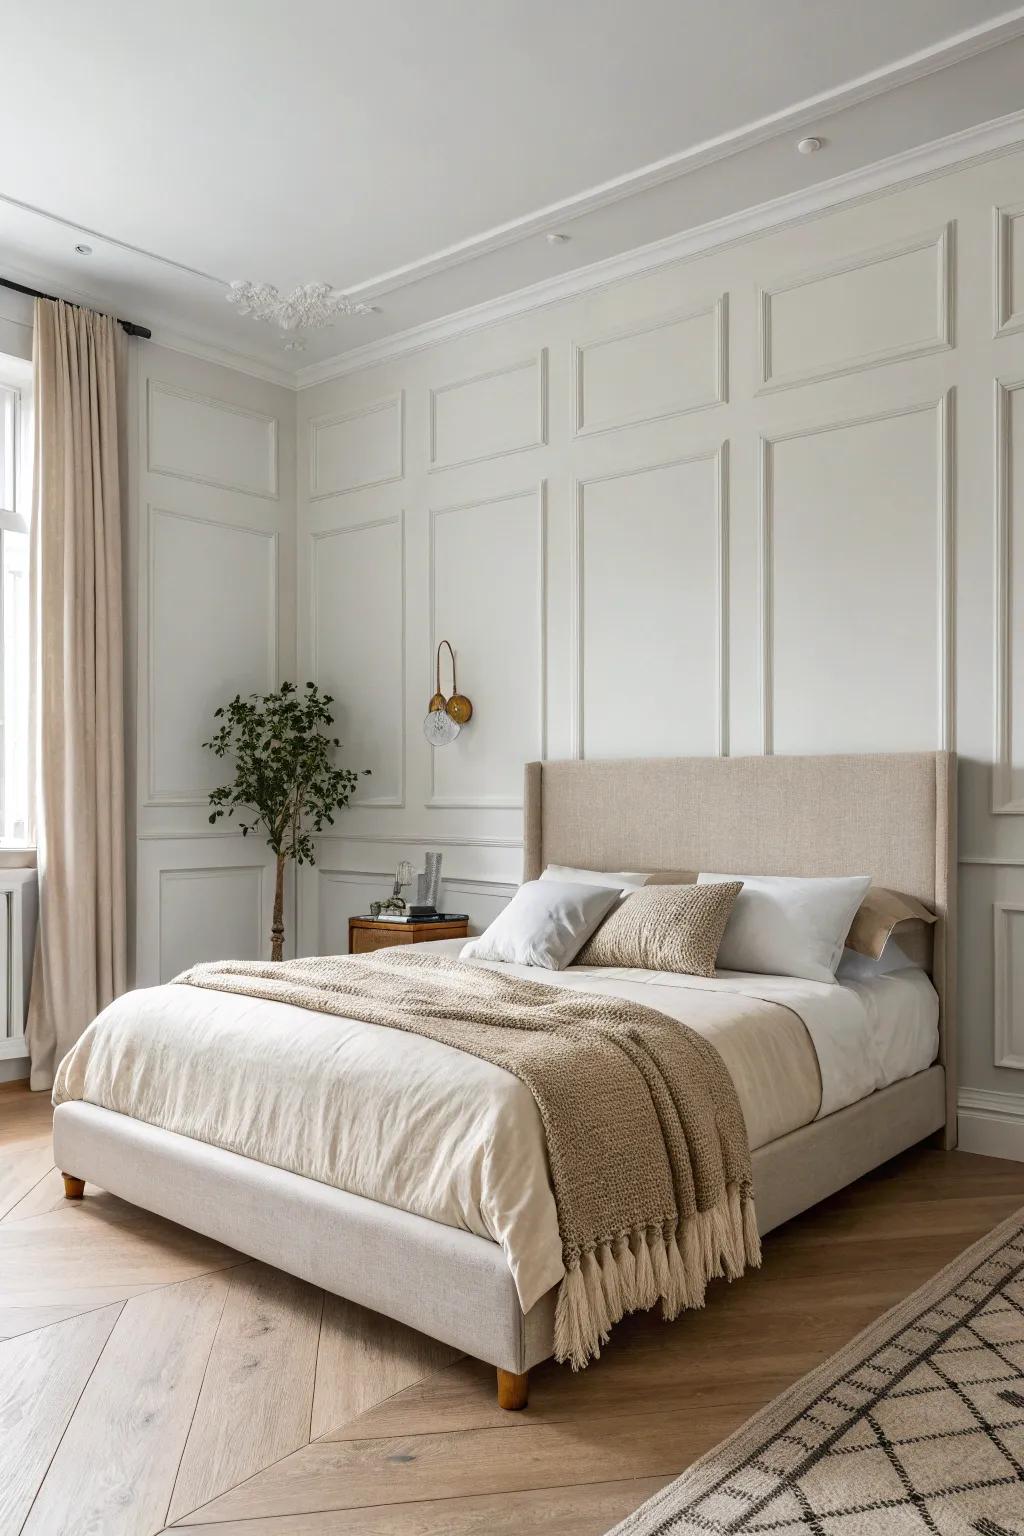
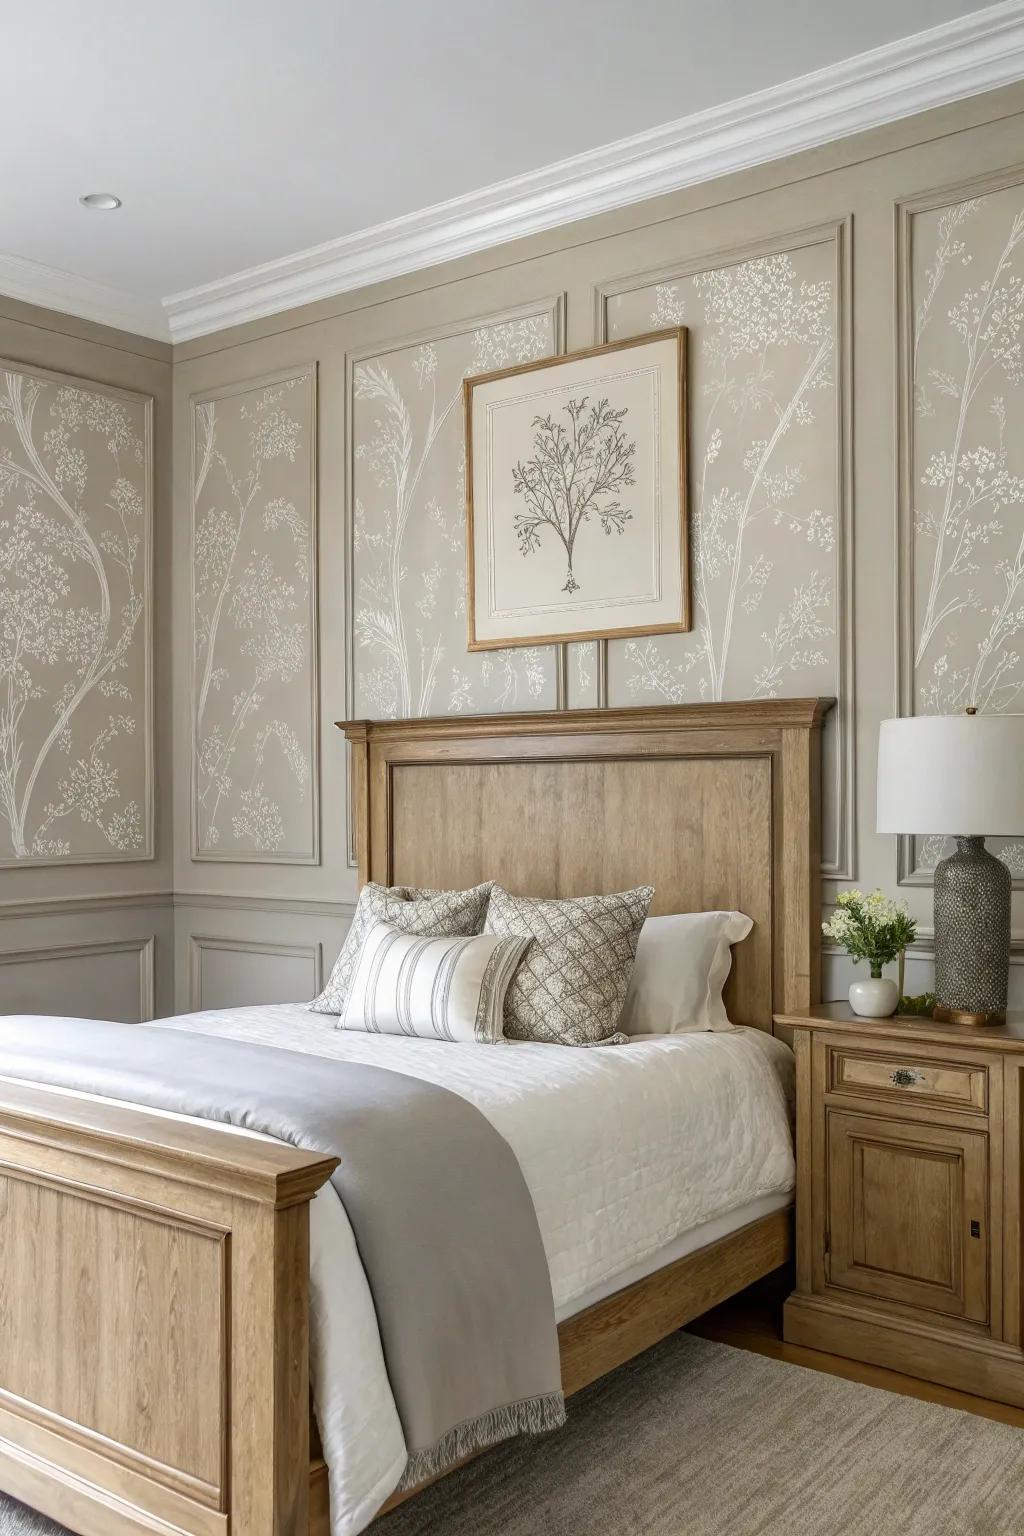
Symmetrical Layout With Sconce Backplates
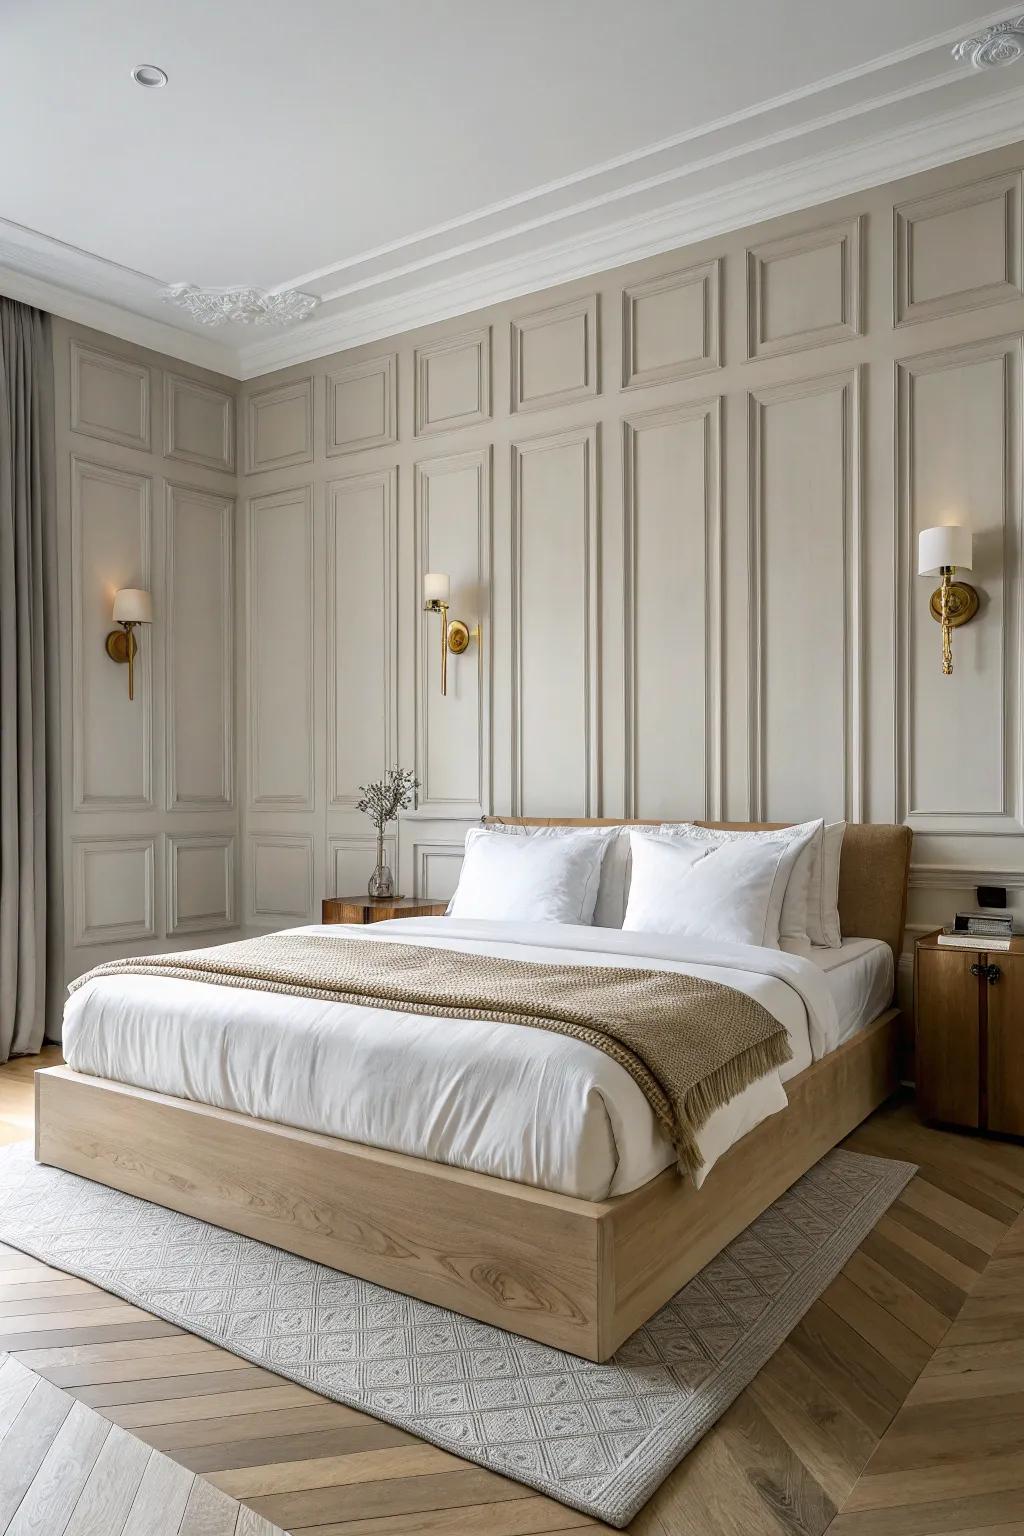
Design the molding so your lights land inside the panels, and it looks so intentional—especially with wall sconces flanking the bed. I’ve done this on a master bedroom feature wall, and it made the whole setup feel balanced and boutique.
A few helpful options:
- Pre-Primed Wall Molding Kits: Create this elegant paneled look effortlessly by ordering pre-cut molding kits ready for painting and installation.
- Brass Wall Sconces with Linen Shade: Install classically designed brass sconces within your molding frames to add warm, boutique-style symmetry to your bedroom.
- Solid Wood Platform Bed Frame: Anchor your symmetrical design with a minimalist wood platform bed that complements the traditional wall texture beautifully.

Classic Picture Frame Molding Grid
When I want that instantly elegant look, I go for picture frame molding in clean rectangles centered behind the bed. I’ve found that keeping the spacing consistent makes even a basic wall feel like tailored architecture.
Products that could assist:
- Pre-Primed Wall Batten Molding Strips: Create that tailored grid look easily with pre-primed strips ready for installation and your favorite paint color.
- Laser Level and Tripod: Ensure your geometric grid is perfectly straight and evenly spaced for a professional, expensive-looking finish.
- Construction Adhesive & Caulk Gun: Secure your molding strips firmly to the wall for a durable hold before nailing and finishing.


Board and Batten Behind the Bed

A board and batten layout gives that modern farmhouse structure without making the room feel busy. I’ve installed it floor-to-ceiling and loved how it makes the bed look more grounded and centered.
A few choices to try:
- Brad Nailer Kit: Secure your batten strips effortlessly with a reliable brad nailer, essential for clean, professional-looking wall installations.
- Paintable Wood Wall Paneling Kit: Create the structured grid look quickly with pre-cut molding strips ready for priming and your chosen paint color.
- Laser Level Tool: Ensure perfectly straight vertical and horizontal lines for a symmetrical and polished finish on your accent wall.
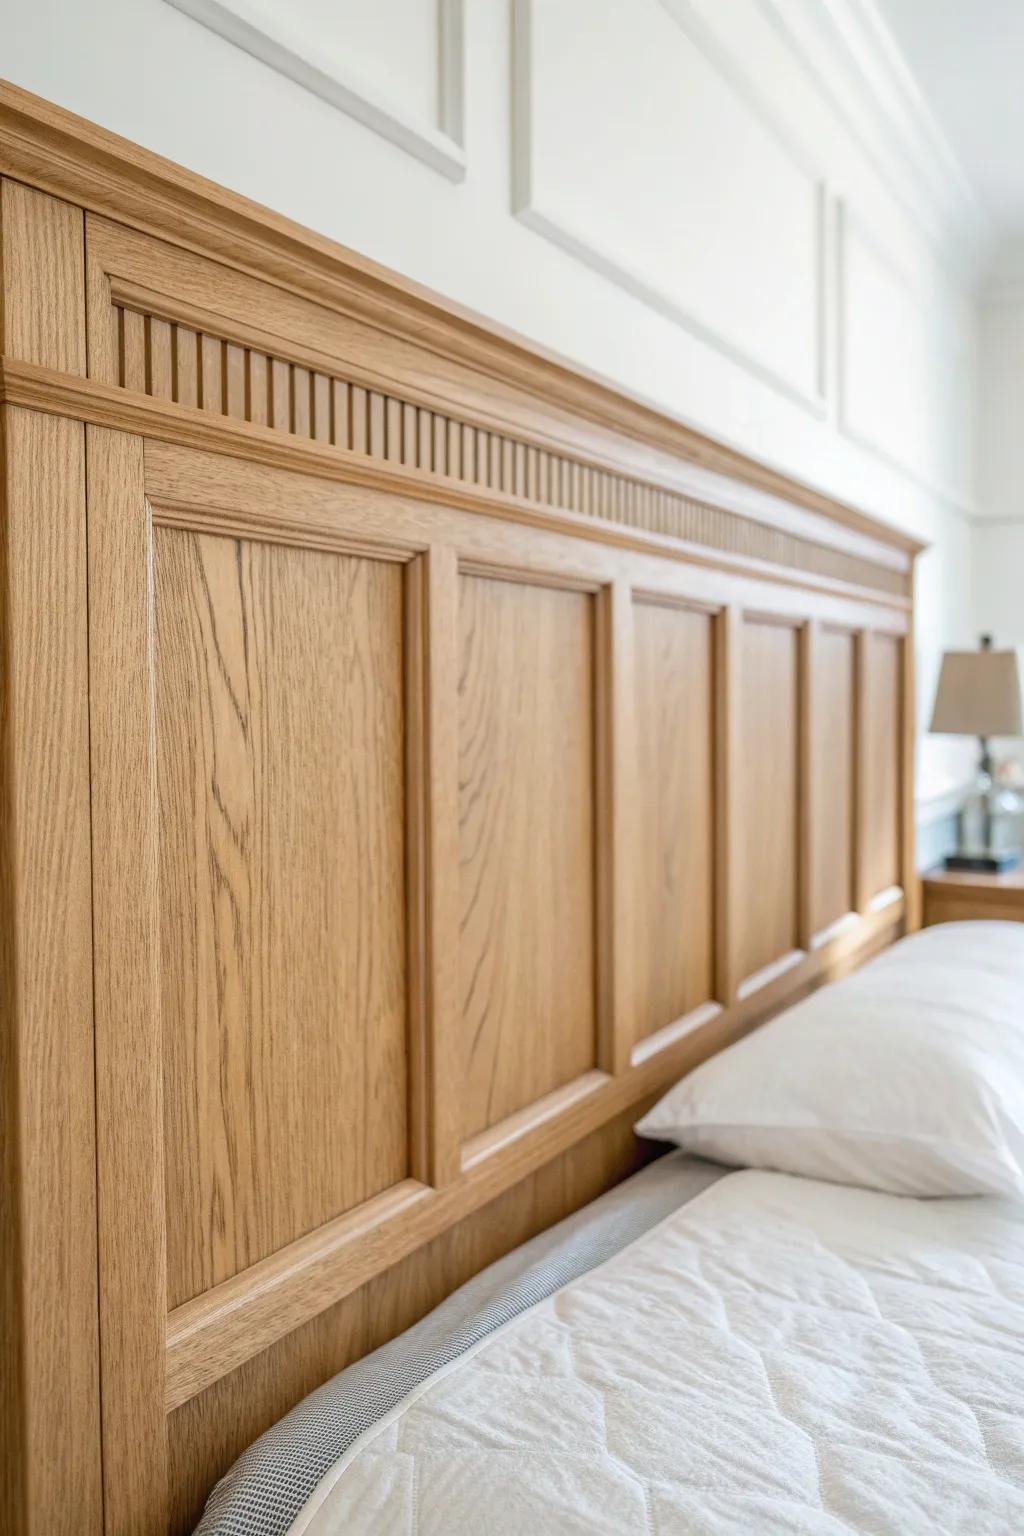
Tall Wainscoting With a Cap Rail
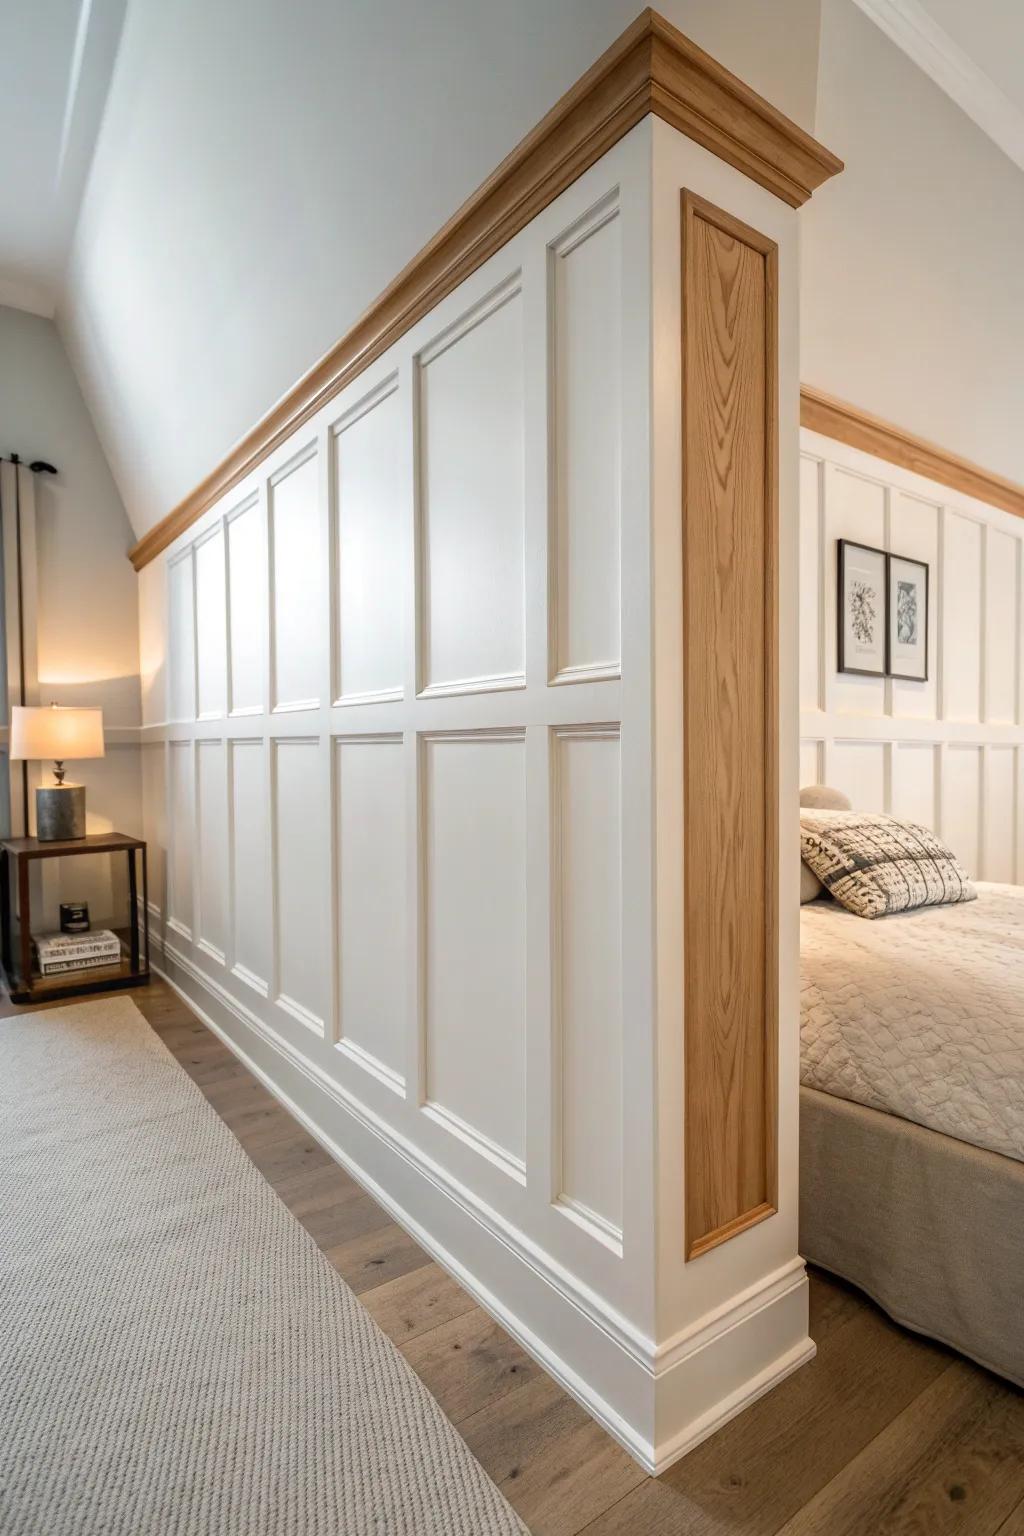
For a more traditional vibe, I like tall wainscoting topped with a simple cap rail that runs behind the nightstands. I’ve used this trick when the ceiling feels high, and it makes the whole master bedroom look more proportioned.
You might give these a try:
- Pre-Primed Wainscoting Panel Kit: Create elegant wall dimensions effortlessly with ready-to-assemble kits that simplify the installation of traditional recessed paneling.
- Hardwood Moulding Cap Rail: Finish your tall wainscoting with a sturdy wood cap rail to define the transition and add architectural depth.
- White Interior Paint & Primer: Achieve a cohesive look by painting your new paneling with a durable, high-quality white paint for a crisp finish.
Two-Thirds Height Panel Molding
A two-thirds height molding treatment hits that sweet spot between cozy and airy, especially on the master bedroom headboard wall. I’ve done this when I didn’t want to commit to full height, and it still gave me that built-in look.
Check if these fit your needs:
- Primed Pine or MDF Screen Molding: Create those crisp vertical lines easily; simply cut to length and paint to achieve the classic batten look.
- Paintable Wood Wall Paneling Sheets: Install these smooth panels behind your molding strips to ensure a flawless, professional finish on textured walls.
- Laser Level and Tripod Tool: Ensure your vertical molding strips are perfectly straight and evenly spaced for that high-end custom carpentry appearance.
Monochrome Moody Molding Wall
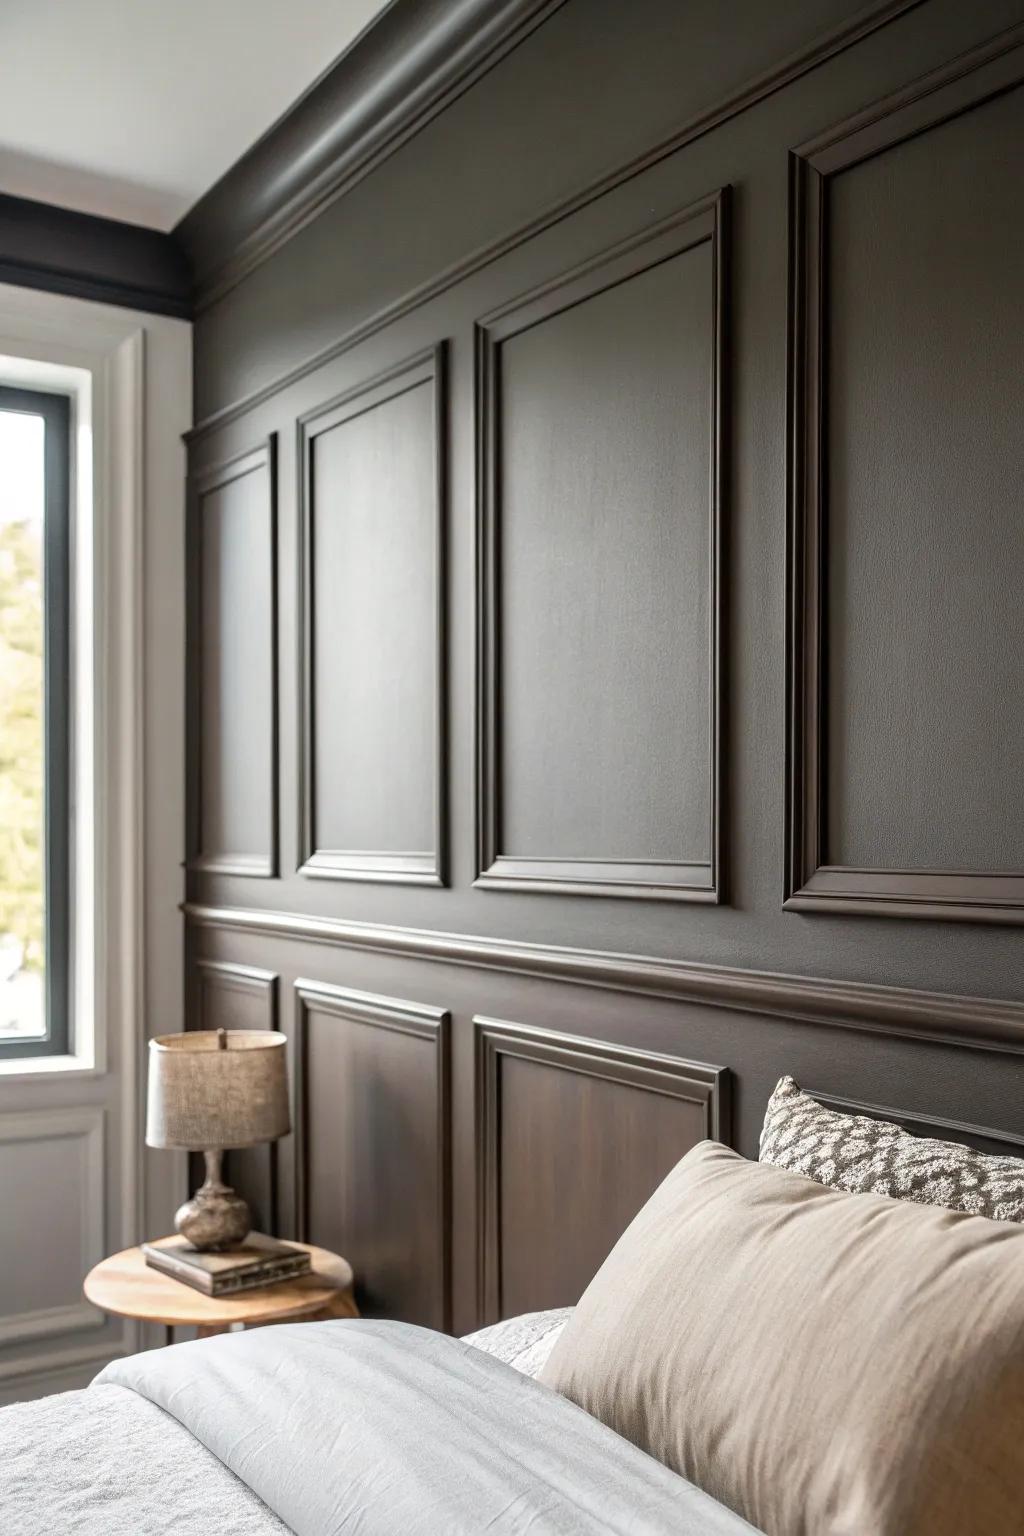
Painting the wall and trim the same color is my favorite way to get that moody monochrome depth without visual clutter. I’ve done this behind a bed with soft linens, and the contrast makes everything look more luxe.
Some ideas to consider:
- Pre-Cut Picture Frame Molding Kits: Achieve professional-looking wall panels easily by using ready-to-assemble molding frames for instant architectural character.
- Matte Dark Interior Paint: Create that deep, monochromatic moody aesthetic with a rich, dark paint color in a sophisticated matte finish.
- Natural Linen Duvet Cover Set: Soften the heavy wall molding with breathable, textured linen bedding for a balanced and luxurious bedroom retreat.
Bright White Molding With Shadow Lines

If you love bright and clean, crisp white-on-white molding creates gorgeous shadow lines all day long. I’ve used a slightly wider trim for this, and it makes the master bedroom feel fresh but still detailed.
Some handy options:
- Primed Picture Frame Wall Molding Kit: Create elegant shadow lines easily with pre-cut kits ready for your bright white paint finish.
- Interior Satin White Paint: Achieve that crisp, clean look by selecting a high-quality satin paint that resists scuffs beautifully.
- Laser Level Tool: Ensure your wide trim pieces are perfectly straight and symmetrical for a professional-looking installation.
Nested Frames for Extra Depth
Layering a smaller rectangle inside a larger one creates nested frame molding that feels like custom millwork. I’ve tried it behind a king bed, and it added depth without needing any heavy paneling.
Consider these options:
- Decorative Wood Trim Molding: Create elegant nested layers on your wall or headboard using versatile wood molding tailored for custom framing projects.
- Rope Twist Molding Trim: Replicate the intricate detailed look of this headboard by adding textured rope twist accents to your frame designs.
- Miter Saw Box Kit: Ensure your nested frame corners are perfectly angled and professional-looking with this essential tool for precision cutting.
Floor-to-Ceiling Panels With Crown Tie-In
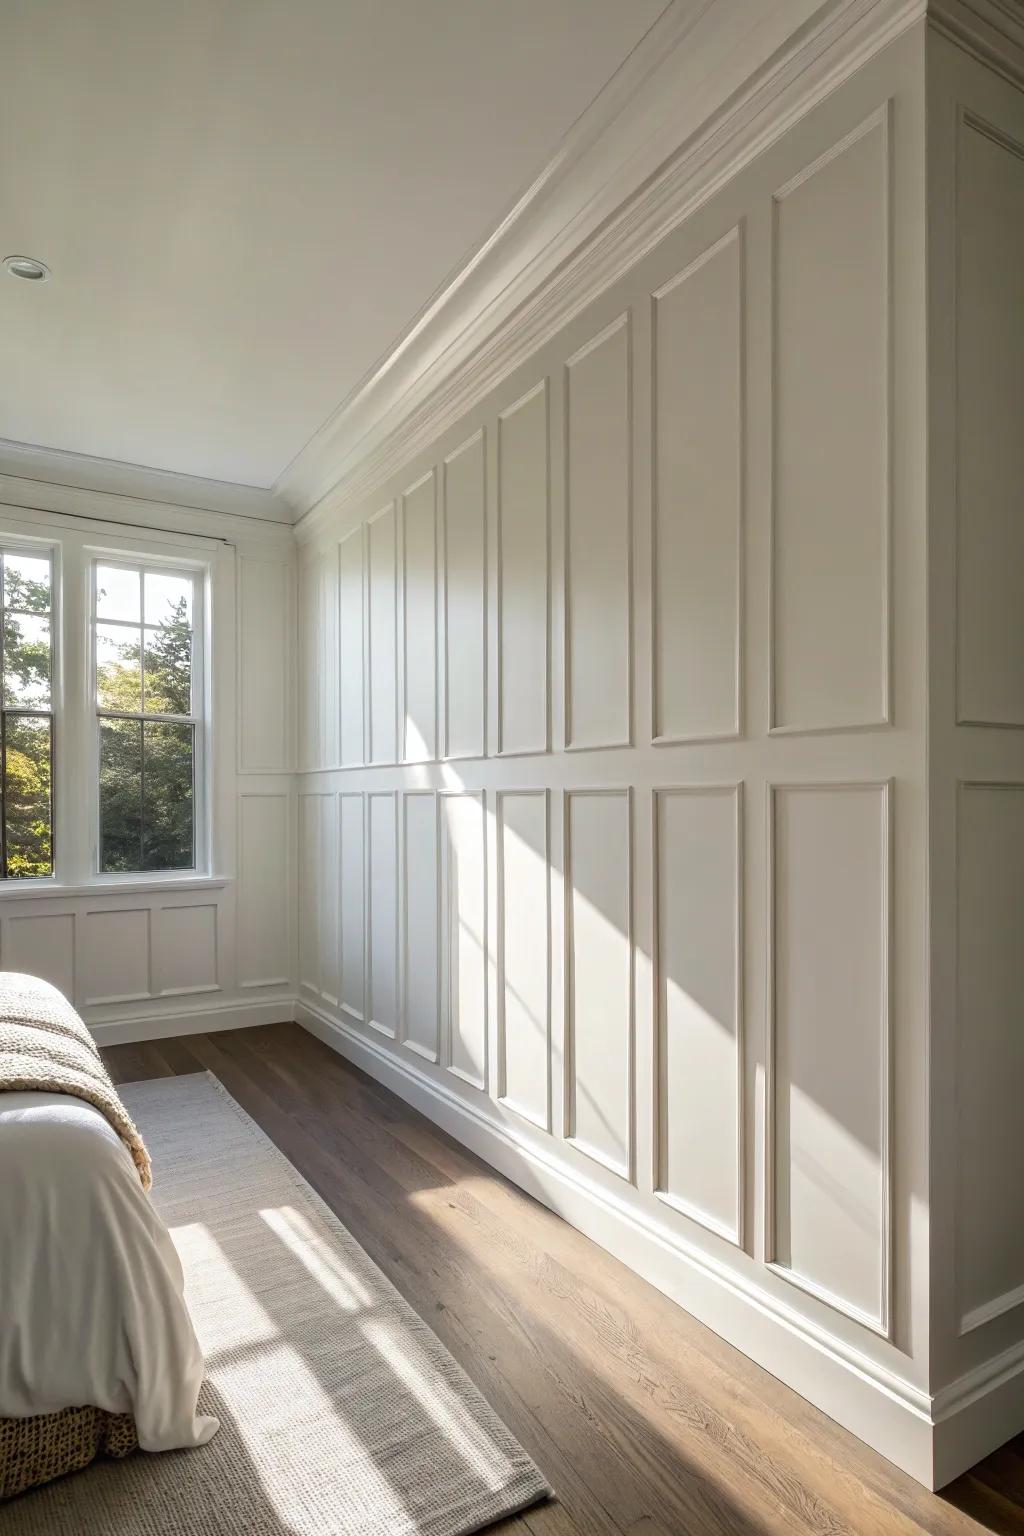
Taking the molding all the way up and tying into crown molding makes the master bedroom look like it was built that way. I’ve done this on a plain wall, and it instantly felt taller and more finished.
Maybe worth checking out:
- Primed Crown Molding: Seamlessly connect your wall panels to the ceiling with elegant crown molding for a polished, built-in appearance.
- Pre-made Wall Molding Kits: Create professional-looking rectangular frames easily with these pre-cut kits, saving you time measuring and cutting angles.
- Construction Adhesive: Ensure your paneling stays securely in place without excessive nailing by using a strong, reliable construction adhesive.
Panel Molding That Frames the Headboard
I love sizing the molding so it visually “hugs” the bed, basically creating a headboard frame on the wall. I’ve used this when the headboard was simple, and the wall did the heavy lifting style-wise.
These products might be useful:
- DIY Wall Molding Kit with Pre-cut Panels: Create a custom headboard frame effortlessly using these ready-to-assemble molding kits designed for easy installation.
- Laser Level for Precise Alignment: Ensure your wall panels are perfectly straight and symmetrical around your bed with this essential tool.
- Primed Wood or PVC Trim Molding: Design your own bespoke wall frames with durable, paintable trim that adds instant architectural elegance.
Chair Rail With Upper Picture Frames
A chair rail plus picture frame molding above it gives that classic, layered architecture without covering the whole wall. I’ve used it behind the bed when I wanted detail, but also wanted a clean zone for bedding and pillows.
You might like:
- Primed Chair Rail Molding: Define your wall’s midline with durable molding that creates a classic separation for your bedroom’s new framed look.
- Pre-Cut Picture Frame Molding Kits: Create elegant upper wall frames quickly with pre-cut kits designed to add architectural depth without complex measuring.
- Laser Level Tool: Ensure your chair rail and picture frames are perfectly straight and evenly spaced for a professional, polished finish.
Diagonal Grid for a Fresh Twist
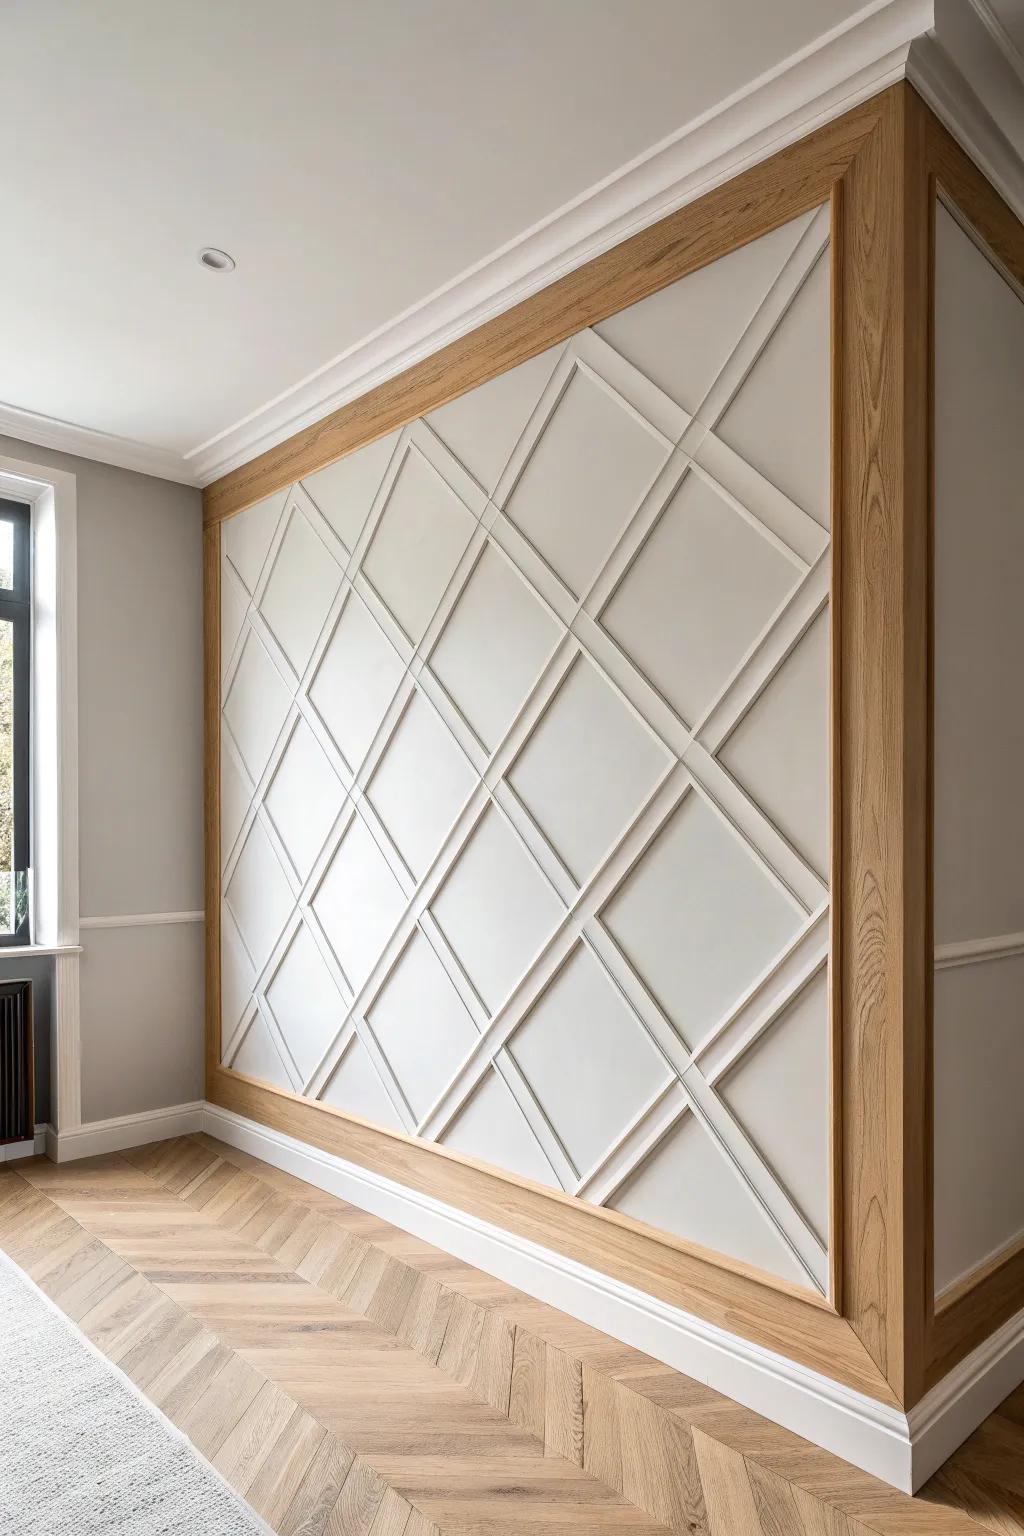
A diagonal layout turns regular box molding into a geometric feature wall that feels bold but still classy. I’ve built this once for a master bedroom, and it got the most “how did you do that?” reactions by far.
Try these:
- Primed Pine or MDF Molding Strips: Create the geometric lattice framework for your accent wall using these paint-ready, versatile molding strips.
- Digital Angle Finder and Protractor: Ensure your diagonal cuts are absolutely precise for tight, seamless joints with this essential measuring tool.
- Construction Adhesive and Caulk Gun: Secure your molding strips firmly to the wall before nailing for a durable, long-lasting installation.
Chevron Molding Headboard Wall
chevron molding adds movement behind the bed and makes the wall feel like a statement even with simple decor. I’ve cut the angles in batches, and the pattern hides small wall imperfections better than you’d think.
Useful items to consider:
- Brad Nailer Kit: Secure your molding strips efficiently without splitting wood; essential for achieving professional-looking, seamless joints.
- Digital Miter Gauge/Finder: Measure precise angles for your chevron cuts to ensure every piece fits together perfectly on your wall.
- Wood Stain and Sealer: Enhance the natural grain of your new wood wall and protect it with a lasting finish.
Modern Slat Wall With Trim Borders
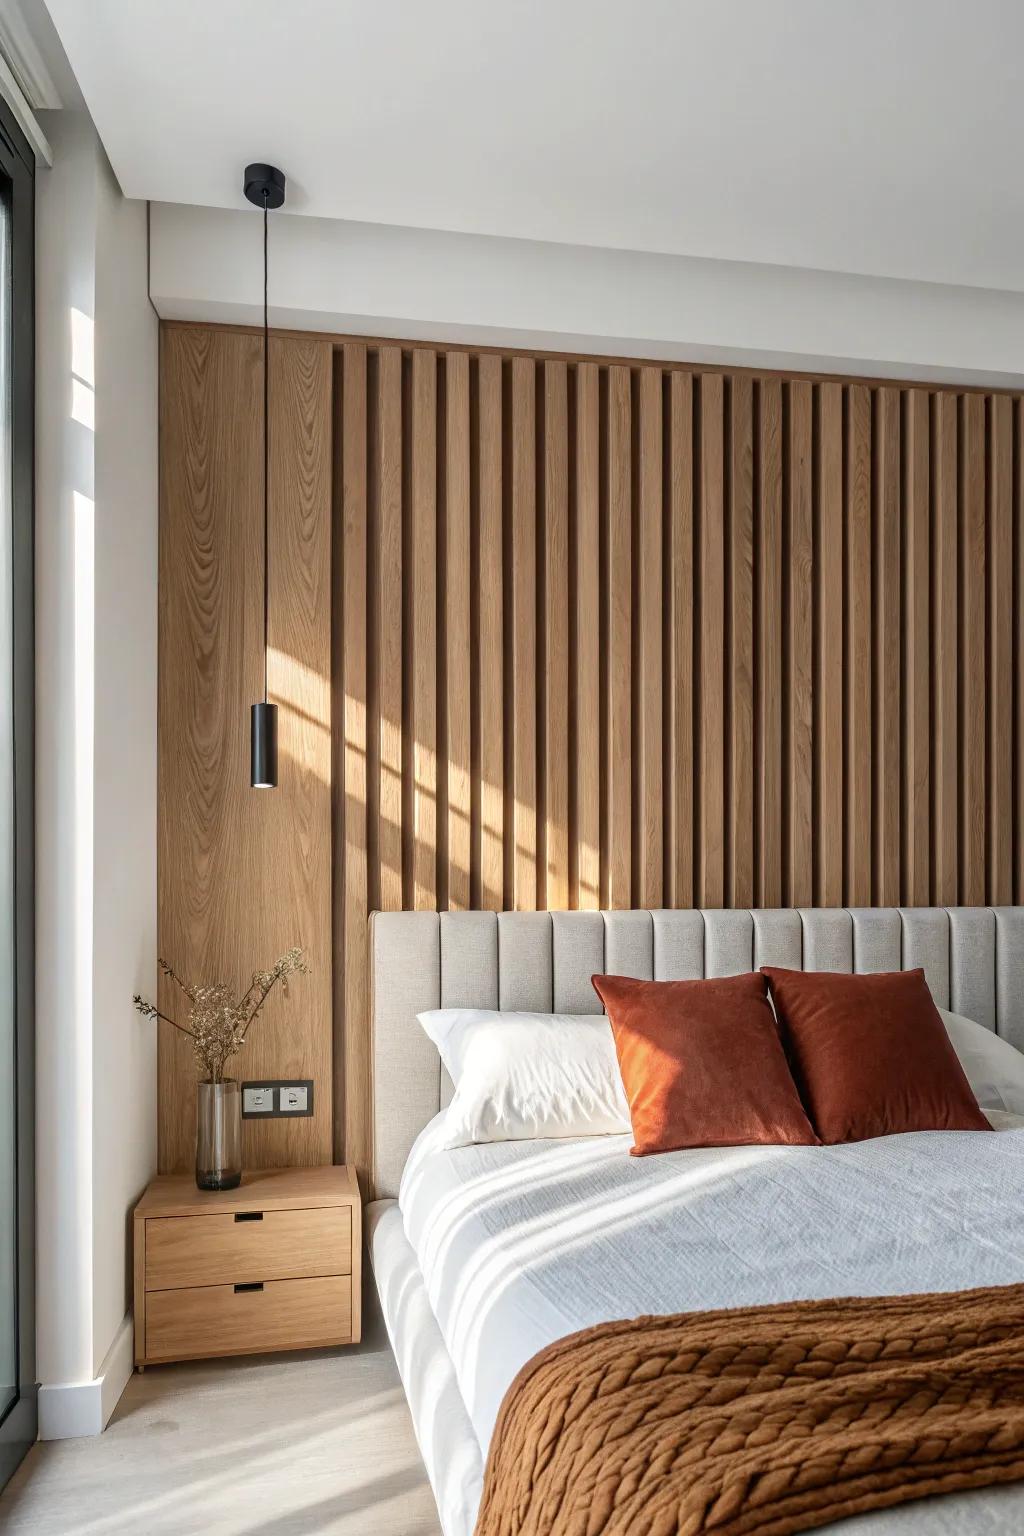
I like pairing vertical wood slats with a thin molding border to make it feel framed and intentional on the master bedroom headboard wall. I’ve done this with simple spacing blocks, and it’s one of the quickest ways to get texture.
Explore these options:
- Wood Slat Wall Panels: Instantly add texture and warmth to your bedroom wall with these easy-to-install, modern acoustic wood panels.
- Modern Cylinder Pendant Light: Create a sleek focal point beside your bed with a minimalist black cylinder pendant light like this.
- Terracotta Velvet Throw Pillows: Bring warmth to your bedding design by adding rich, rust-colored velvet pillow covers for a cozy accent.
Wallpaper Inside the Molding Frames
Putting wallpaper inside molding gives you color and pattern without overwhelming the whole bedroom. I’ve done this behind a bed with neutral bedding, and it looked like an upscale designer panel wall.
A few relevant products:
- Neutral Peel and Stick Wallpaper: Instantly elevate your molding panels with this easy-to-apply wallpaper featuring subtle floral or botanical patterns.
- Pre-Cut Wall Molding Kit: Create the perfect framework for your wallpaper panels using these ready-to-install molding strips for easy DIY.
- Wallpaper Smoothing Tool Kit: Ensure a professional, bubble-free finish on your feature wall with these essential application and cutting tools.
Hidden Door Seam Disguised in Panel Lines
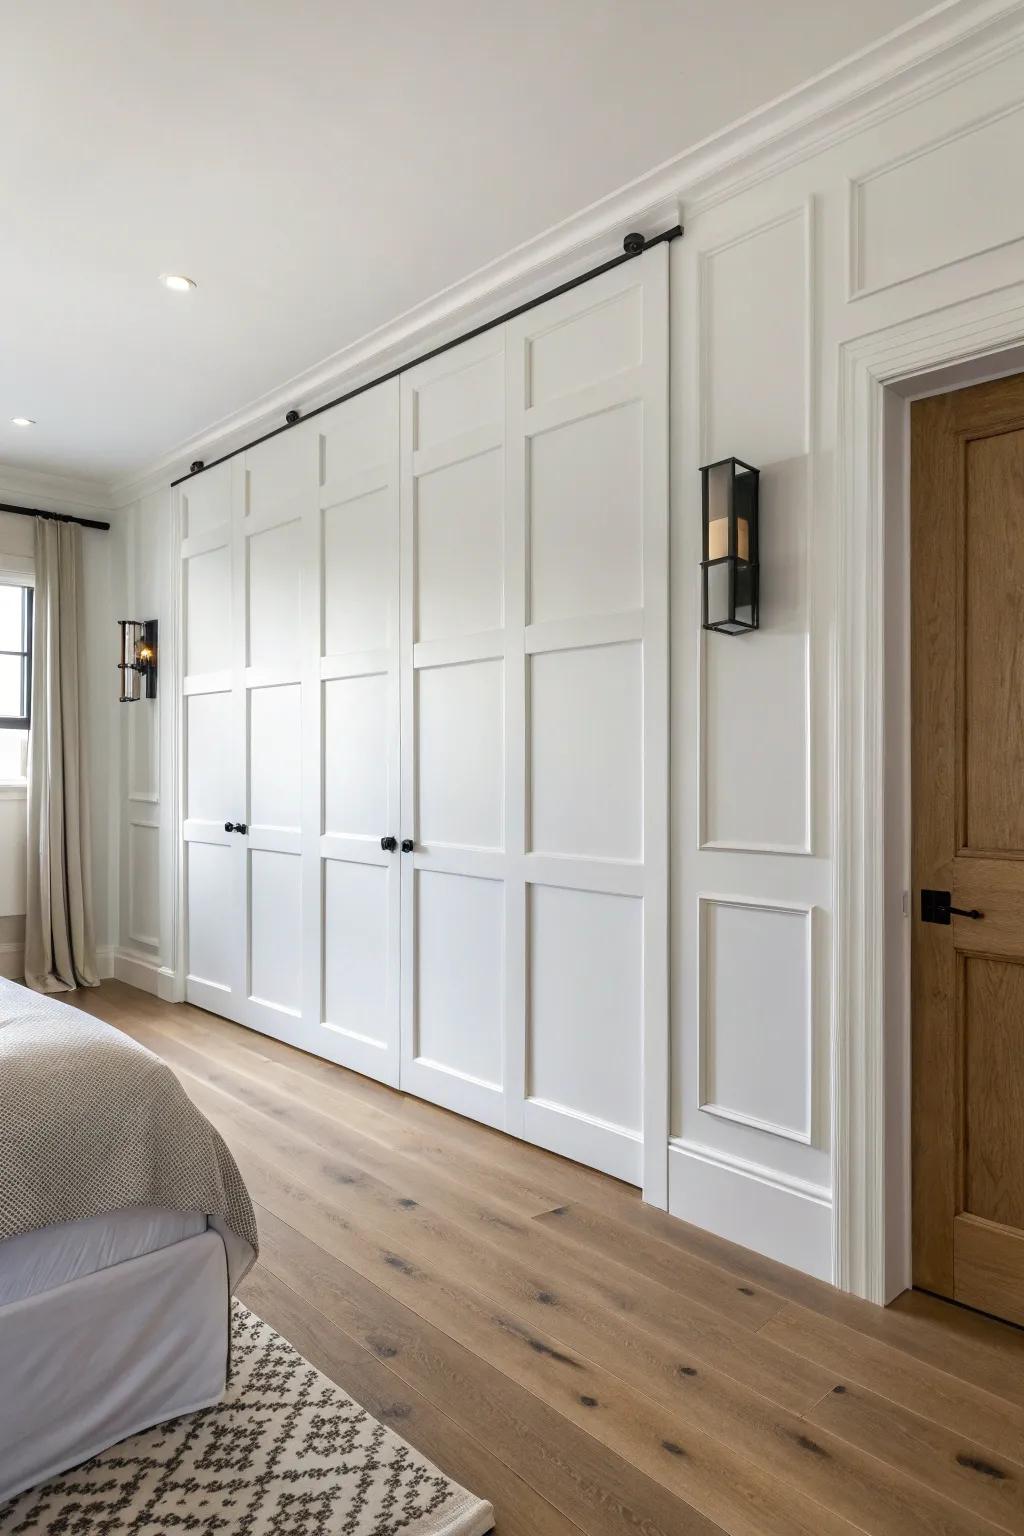
If your master bedroom has an awkward closet or side door, you can align the wall molding pattern so the seams disappear into the panel grid. I’ve helped hide a door this way before, and it’s a total wow-factor once you realize the wall actually opens.
Possibly helpful picks:
- Primed Wood Panel Molding Kit: Create the essential grid structure for your hidden door by applying these ready-to-install decorative trim pieces.
- Heavy-Duty Sliding Barn Door Hardware Track: Support the weight of your paneled hidden door with a robust, smooth-gliding track system like this.
- Matte Black Modern Wall Sconces: Frame your hidden door with matching lighting fixtures to add symmetry and enhance the built-in aesthetic.


