
Bathroom ceilings don’t get enough love, but the right trim can make the whole room feel finished in a weekend. I’ve tried a lot of approaches in my own projects, and these are the bathroom ceiling trim ideas that actually hold up in steamy, real-life bathrooms.
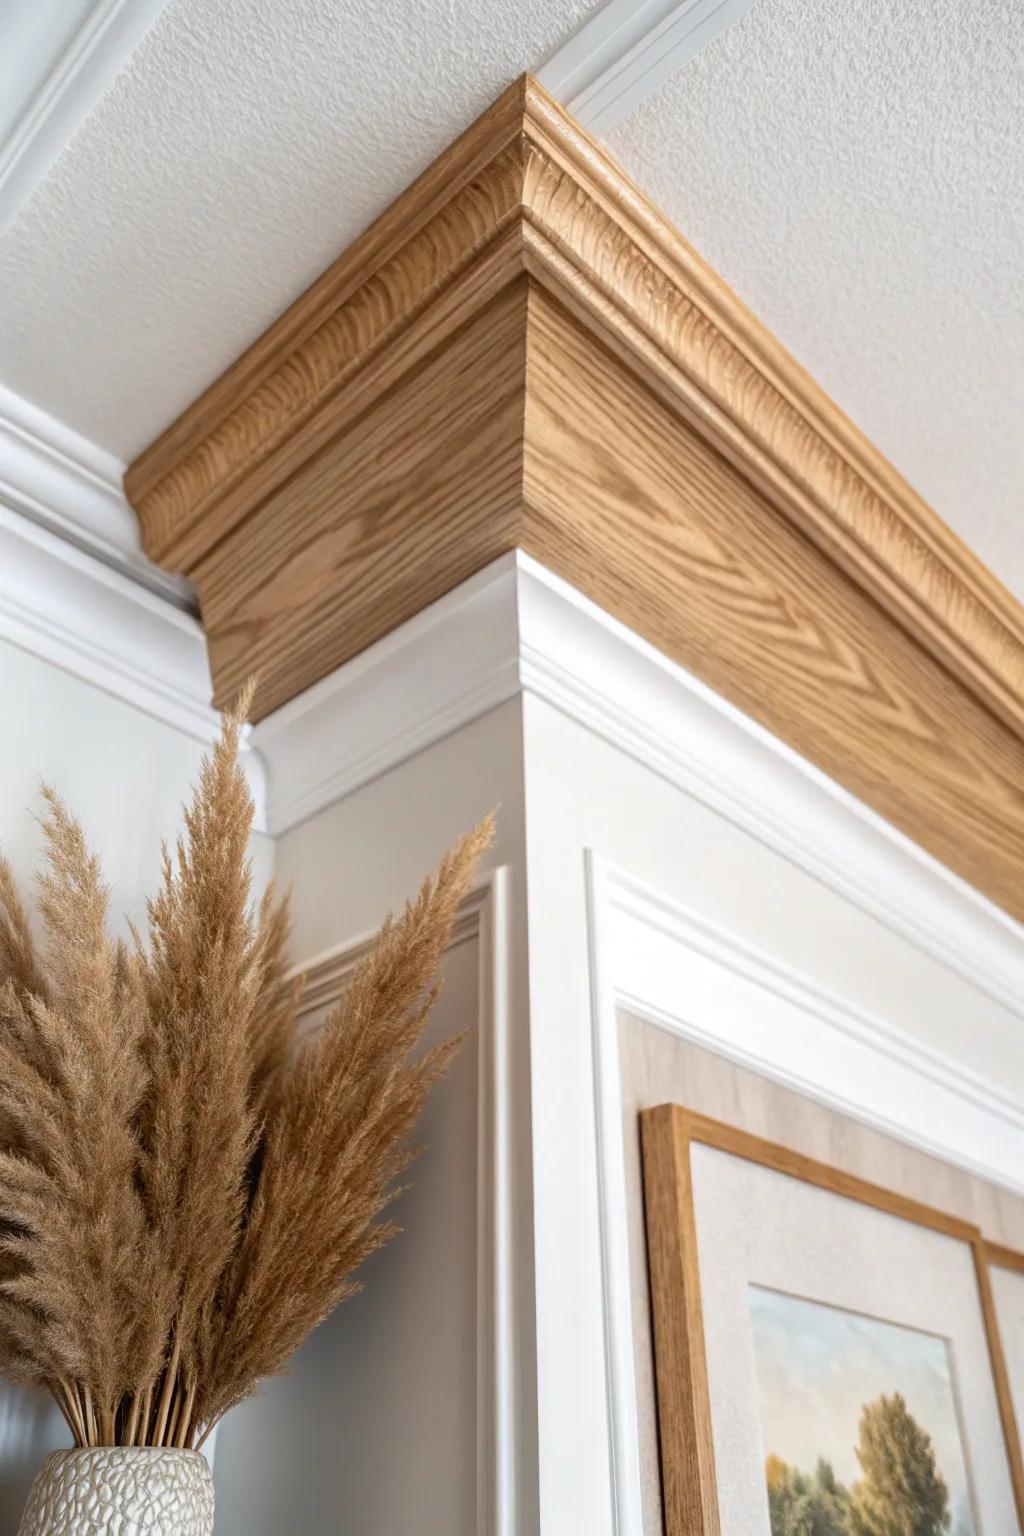
Stained Wood Crown for Warmth
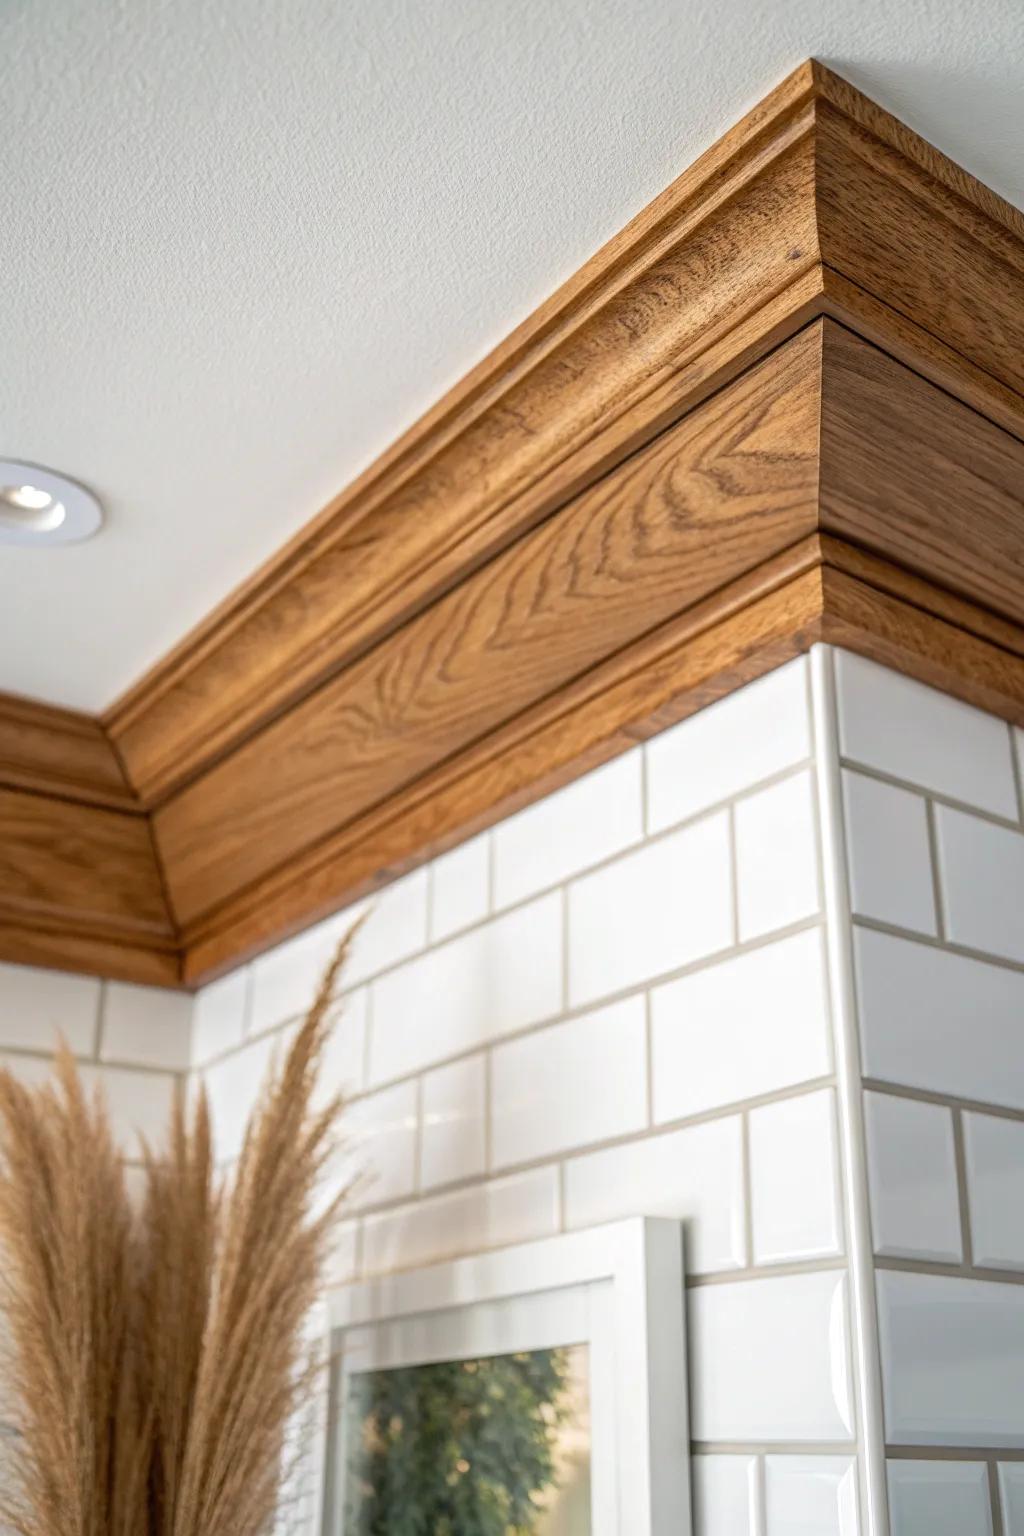
A stained wood crown can be gorgeous in a bathroom if you seal it properly and keep the grain front and center. I’ve used rot-resistant wood on steamy projects, and that warm tone looks so good against cool tile.
These products might help:
- Polyurethane Wood Sealant: Protect your wood trim from moisture and steam damage with a durable, clear finish for long-lasting beauty.
- Wood Conditioner & Stain: Enhance natural grain patterns and achieve that rich, warm hue before sealing your new bathroom molding.
- Dried Pampas Grass Decor: Recreate the natural, organic look shown in the inspiration photo by adding texture to your bathroom counter.


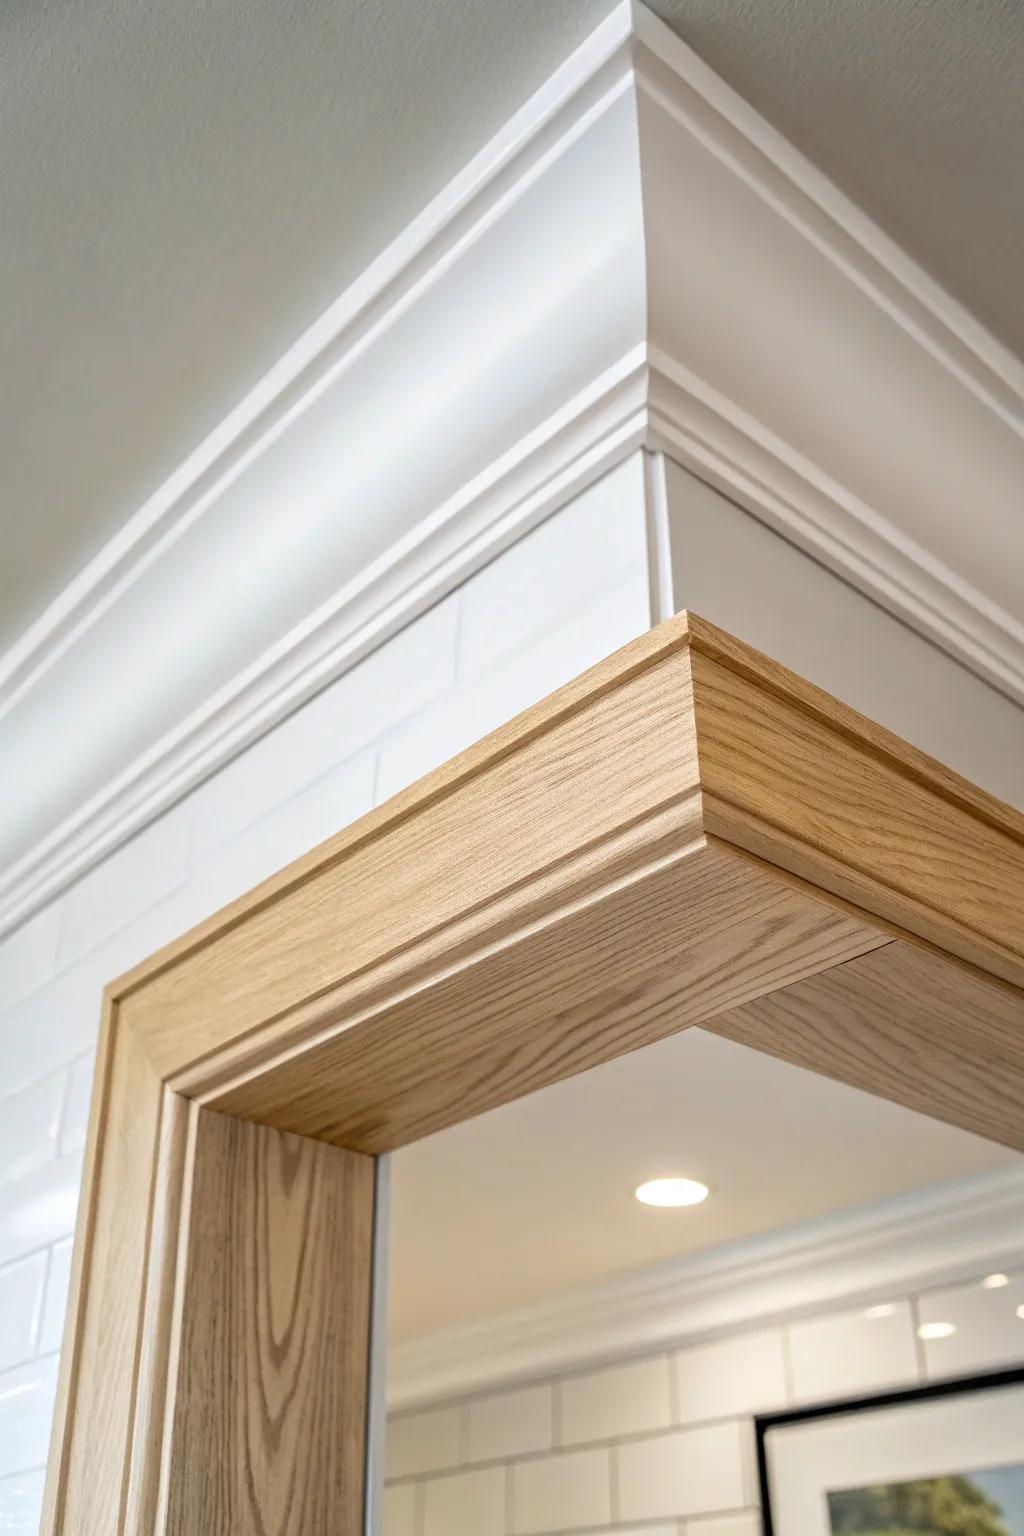
Classic Crown Molding Perimeter
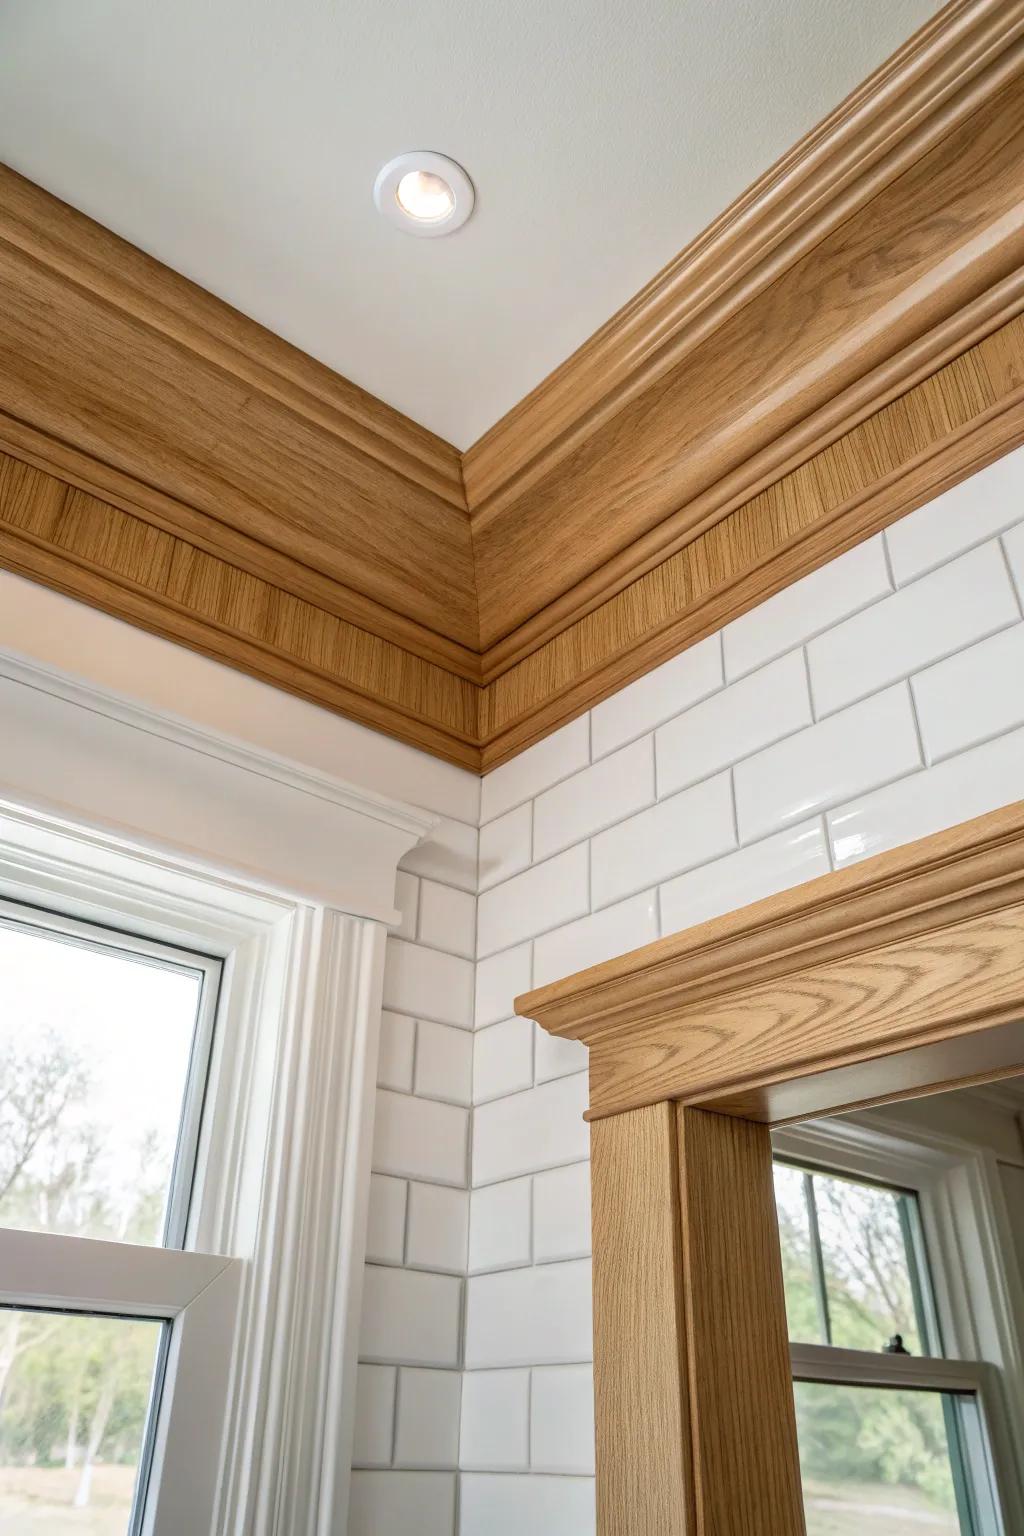
My go-to is crown molding around the full ceiling perimeter because it instantly makes a bathroom feel taller and more polished. I’ve used it specifically to hide that tricky tile-to-ceiling transition and it makes the edge look intentional, not “stopped short.”
A few relevant products:
- Unfinished Oak Crown Molding: Add warmth and height to your bathroom by staining this unfinished wood molding to match your cabinetry.
- Waterproof Wood Stain & Sealer: Protect your new wooden trim from bathroom humidity while achieving that rich, custom honey-oak finish.
- Construction Adhesive for Tile: Securely bond your molding directly to slick tile surfaces where traditional nailing might not be possible.


Simple Square-Edge Ceiling Trim
When I want a clean, modern look, I install square stock trim (basically a sleek perimeter frame) instead of ornate profiles. In my own bath refresh, this was the easiest way to get crisp lines above tile without fighting a bunch of angles.
A few helpful options:
- Primed square trim molding boards: Create that modern perimeter frame instantly; choose primed boards to save time before your final paint coat.
- Cordless brad nailer kit: Secure your trim pieces effortlessly without dragging a compressor around, ensuring tight joints and clean lines.
- Painters caulk and finishing tool: Seal gaps between the trim and ceiling for a seamless, professional finish that hides minor wall imperfections.


Cove Molding for a Soft Transition
I love cove molding in bathrooms because it visually “rounds” the corner where walls meet the ceiling and feels calm and spa-like. I’ve used it over glossy wall tile, and it’s amazing at making the top edge feel less harsh.
Try these:
- Unfinished Oak Wood Molding: Choose unfinished oak trim to stain or seal for a natural, spa-like warmth above your tiles.
- Construction Adhesive for Trim: Secure your molding firmly to tile and drywall surfaces without nails using a strong construction adhesive.
- Wood Stain and Sealer: Protect your wood trim from bathroom humidity while enhancing the natural grain with a quality sealer.
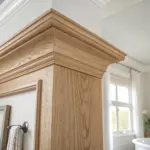
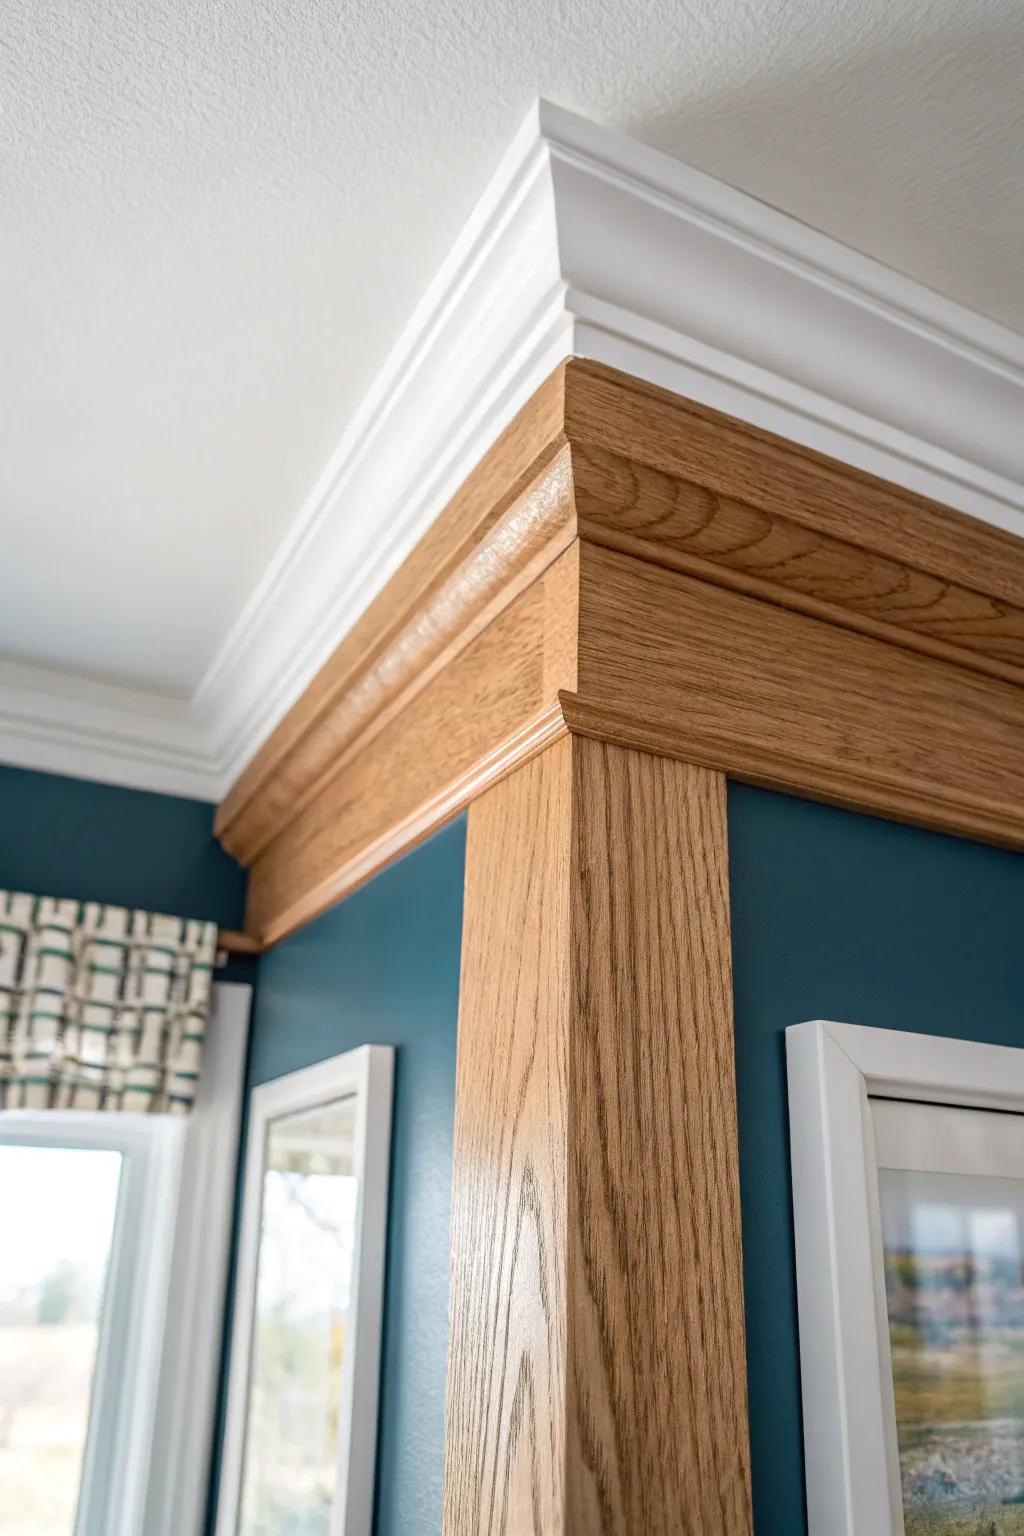
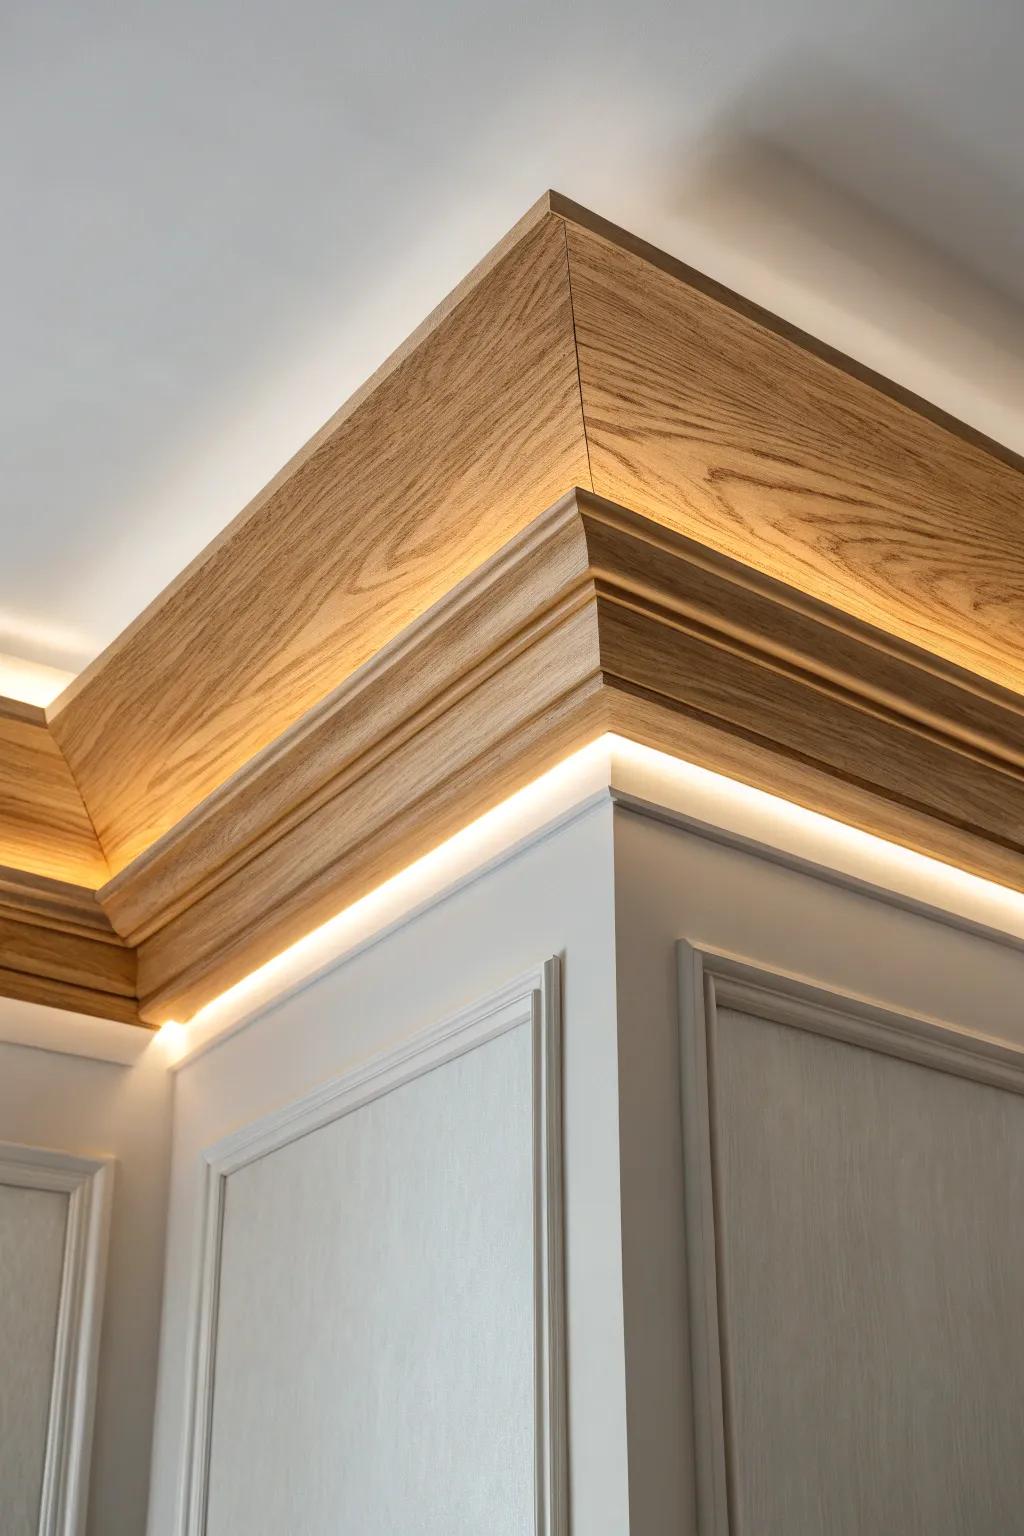
Layered Crown for Extra Depth
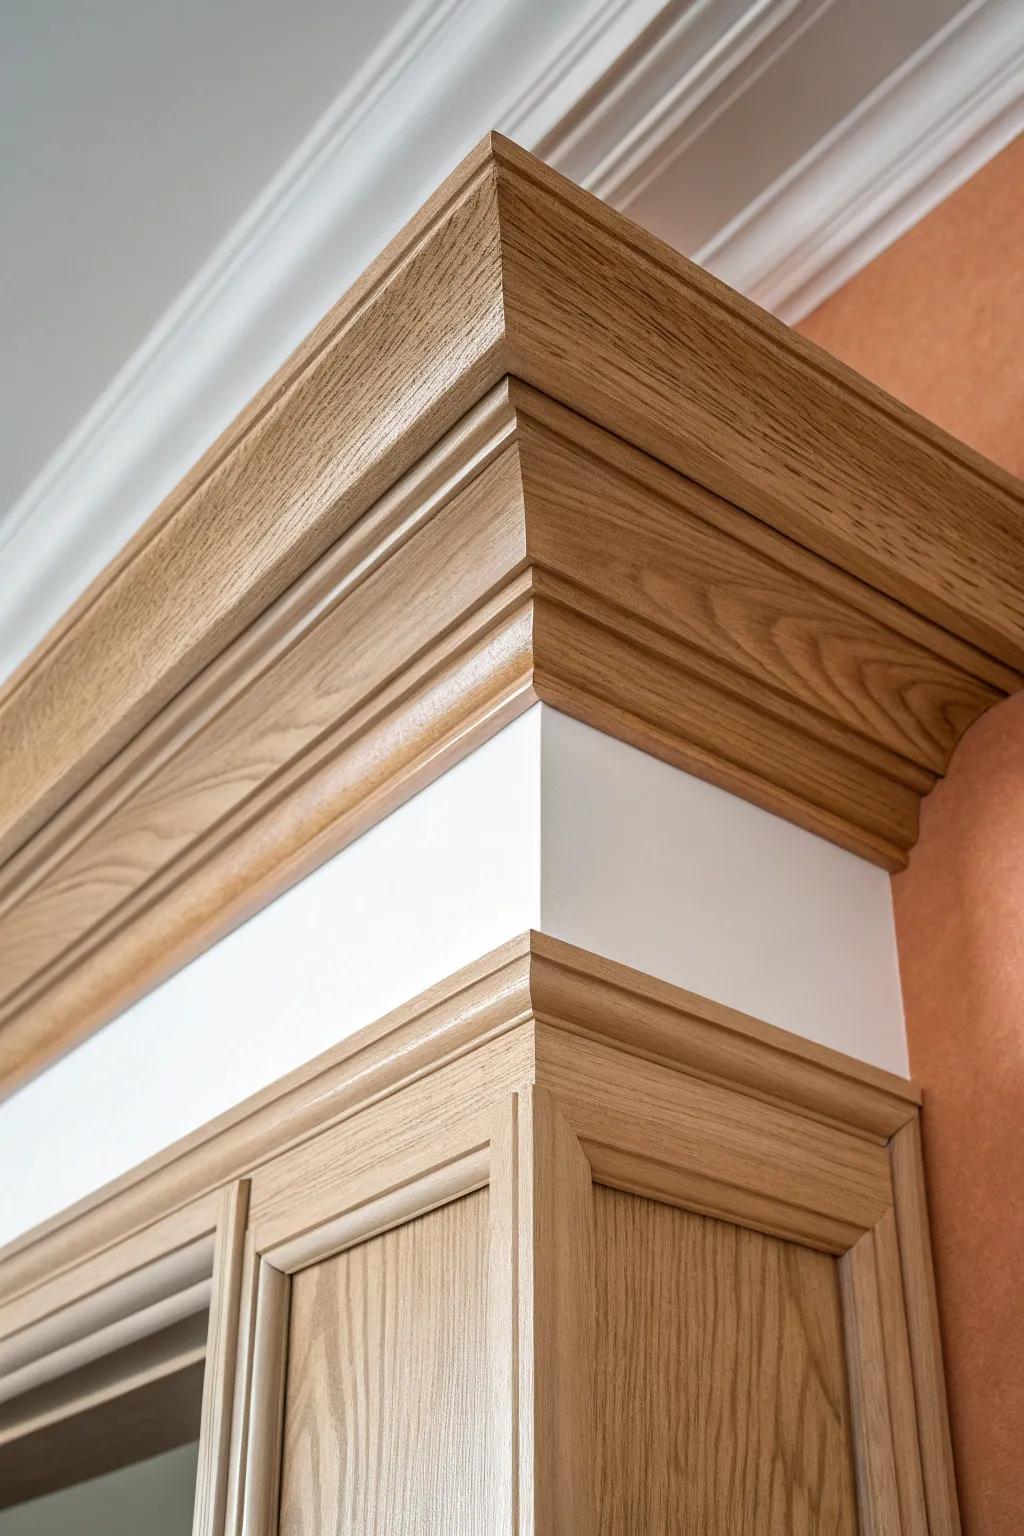
If you want that high-end look, I’ll stack crown molding layers (a small profile plus a larger one) for a beefier shadow line. I’ve done this in a small bathroom and it made the ceiling look more architectural without changing anything else.
You might give these a try:
- Solid Oak Crown Molding: Choose unfinished oak molding to stain fast and match existing woodwork, adding instant elegance to your bathroom ceiling.
- Wood Baseboard Molding (for layering): Use flat baseboard trim as a mounting plate behind your crown to create that stacked, high-end projection easily.
- Brad Nailer Kit: Secure your layered trim pieces precisely without damaging the wood grain; essential for tight corners and clean lines.
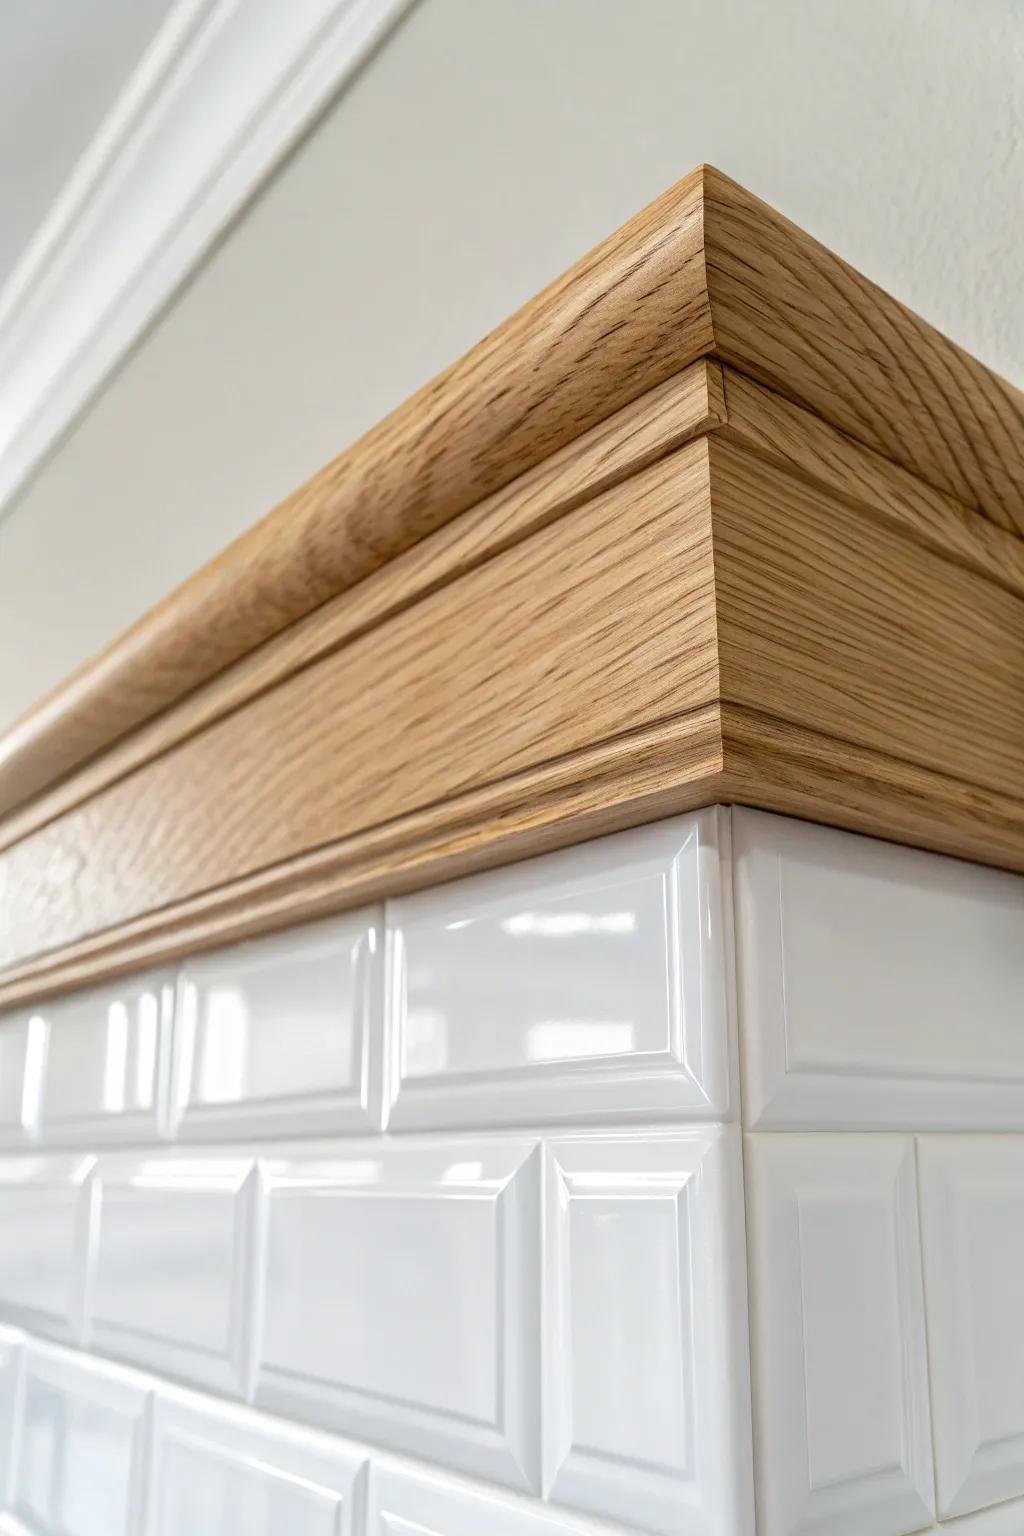
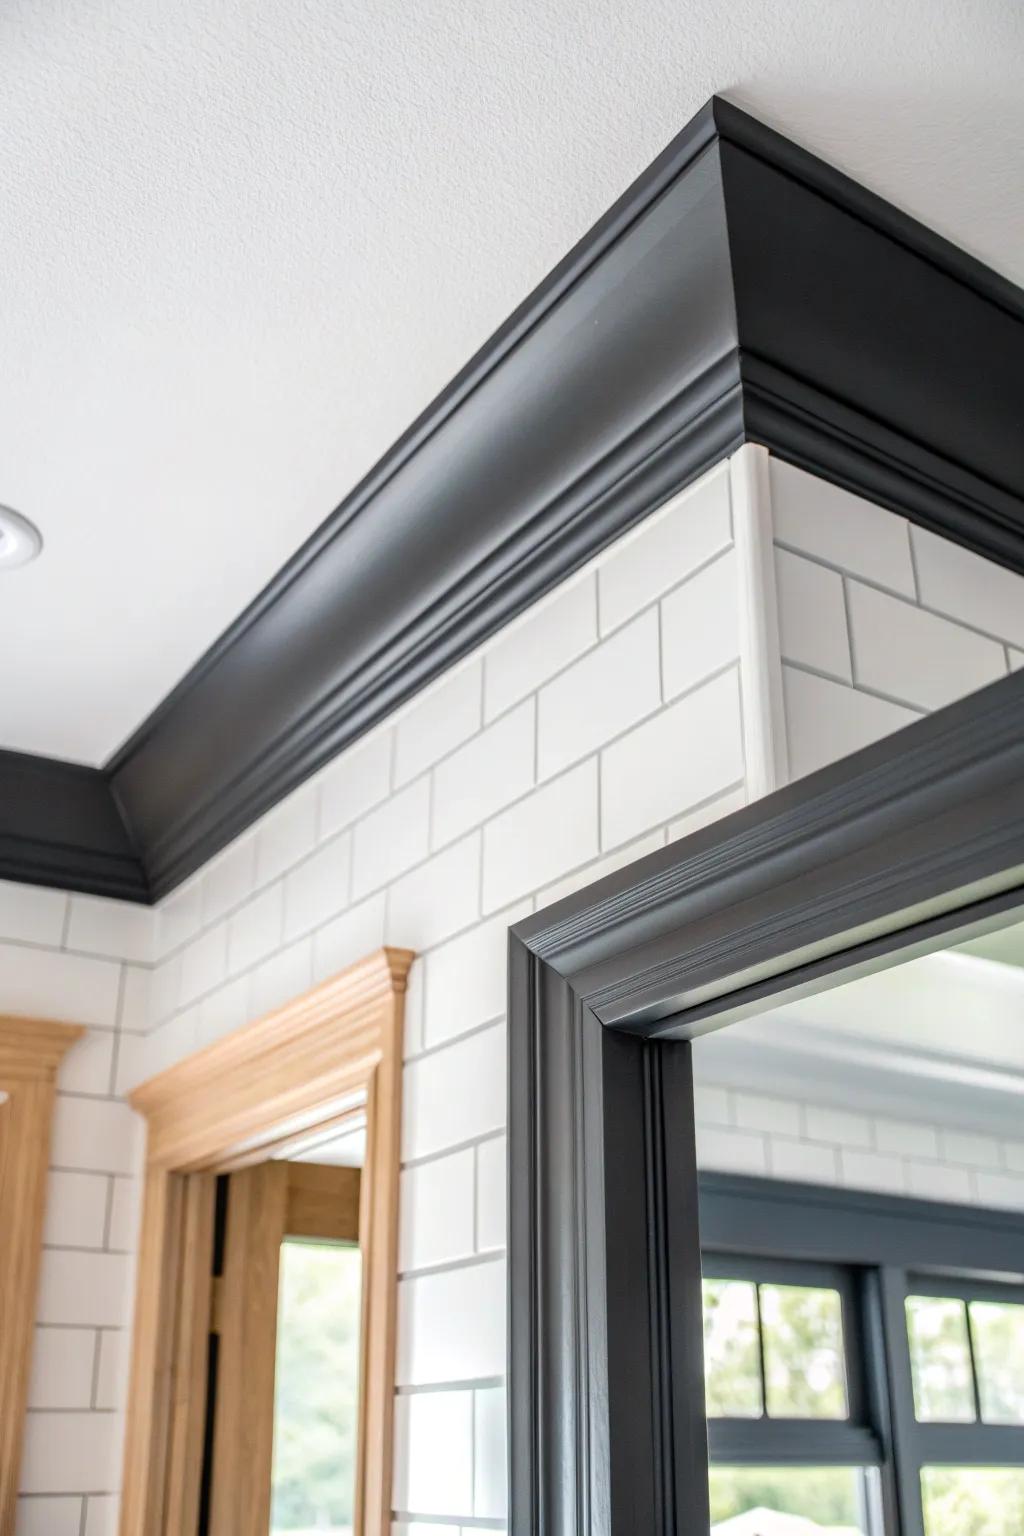
Crown Molding Above Subway Tile
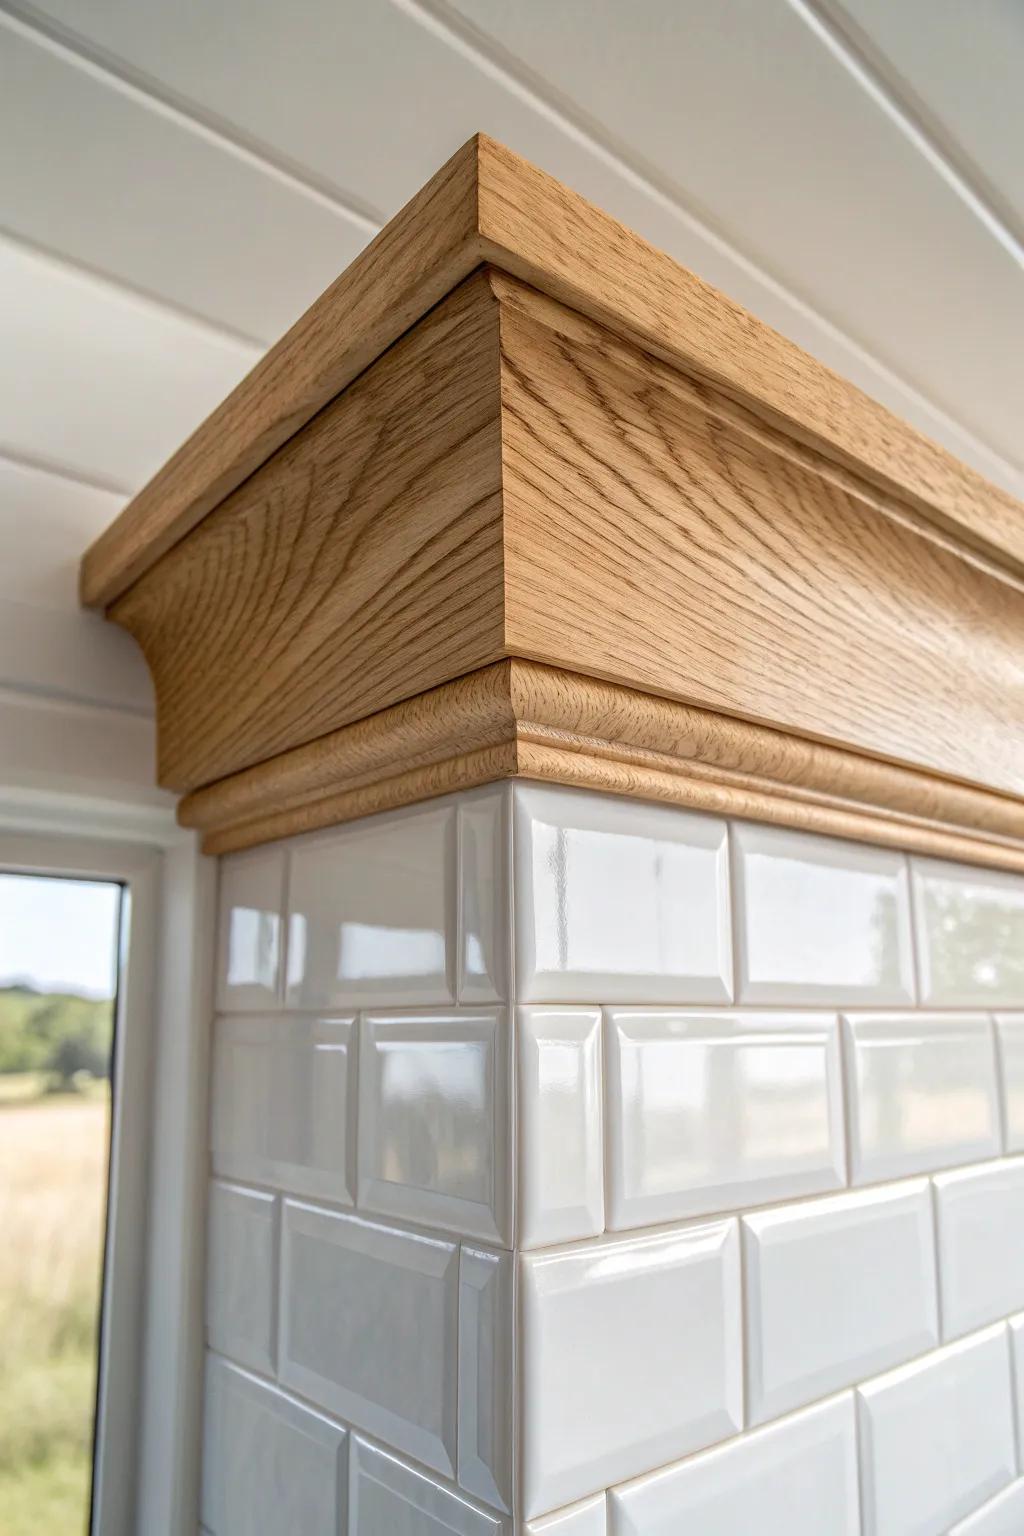
Running crown molding above subway tile is one of those details people notice even if they can’t name it. I’ve used it to cover uneven tile cuts at the top row, and it saved me from doing a fussy tile edge trim.
Possibly helpful picks:
- Solid Oak Crown Molding: Add a classic, warm finish to your tiling project with durable hardwood molding that hides uneven edges.
- Construction Adhesive for Wood: Secure your new molding firmly to the wall and tile surface for a lasting, professional-looking installation.
- Clear Wood Sealer or Varnish: Protect your wooden trim from bathroom moisture while enhancing the natural grain and color of the timber.

Trim Wrapped Into a Shower Zone
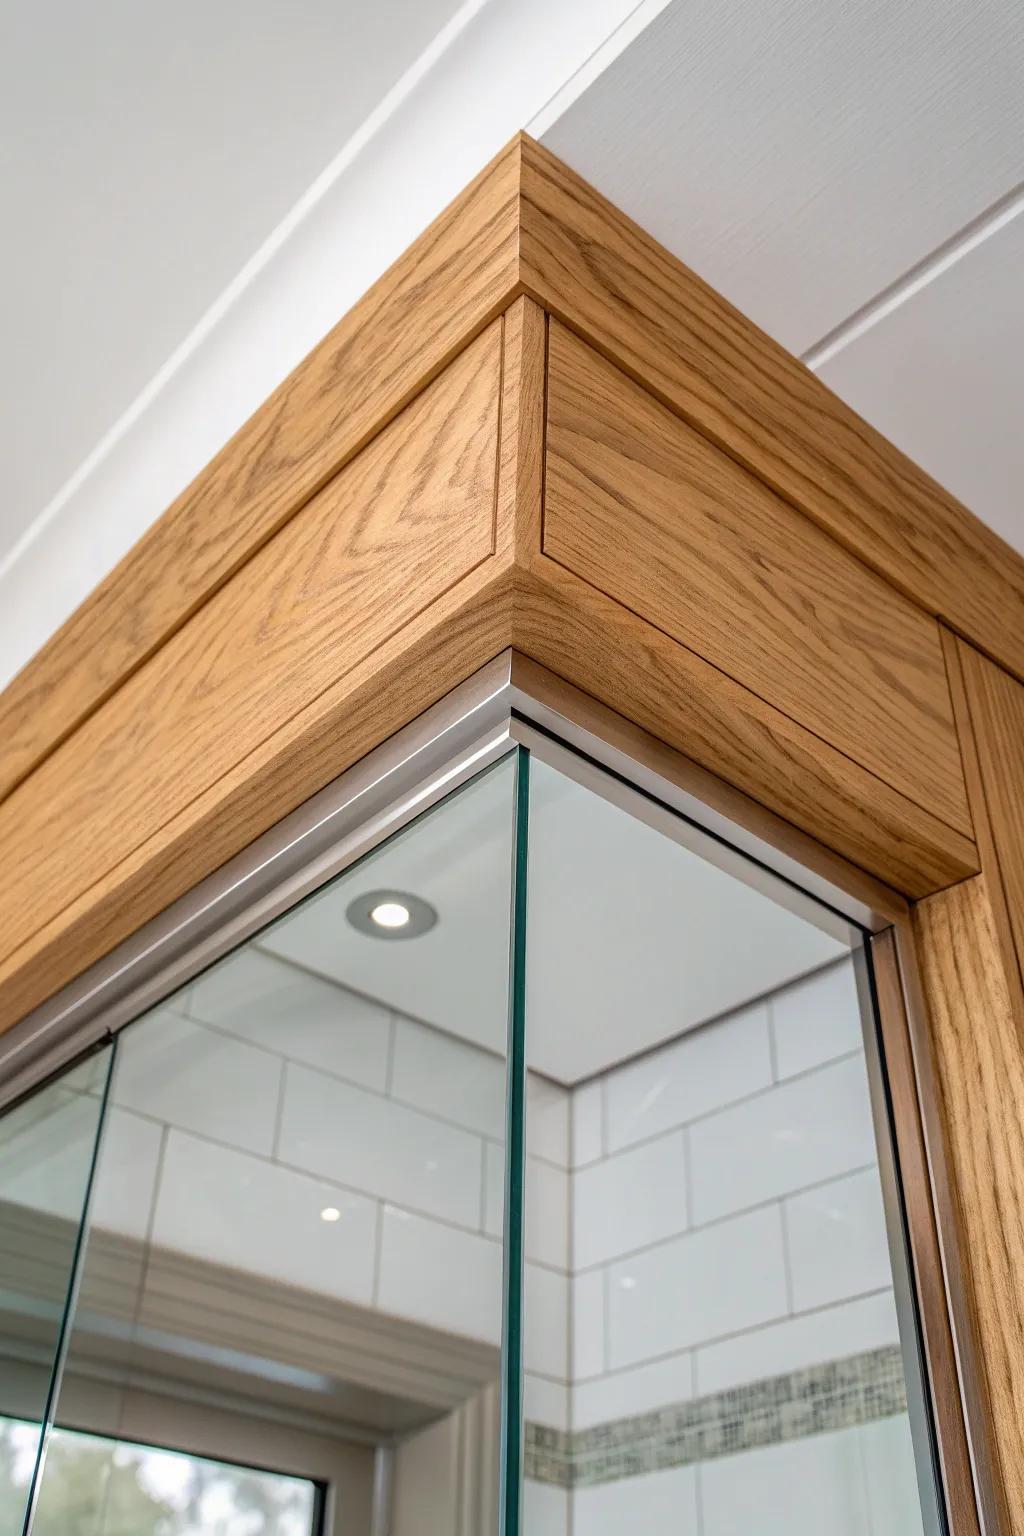
In a glass shower setup, I’ve continued ceiling trim right along the shower ceiling line so the whole perimeter feels unified. The key in my projects is treating it like a wet-area detail and sealing it like I mean it.
Items that may come in handy:
- Clear Waterproof Silicone Sealant: Protect your wood trim from moisture damage by applying a durable, waterproof sealant to all exposed joints.
- Moisture-Resistant Recessed Shower Light: Ensure safety and style inside your shower zone with a wet-rated recessed light fixture for bright illumination.
- Modern Glass Channel Support: Secure your glass panels firmly against the ceiling or trim with a sleek channel for a seamless look.
Crown Molding With Recessed Light Layout
I always plan crown molding around recessed lights so the profile doesn’t crowd the can trims or look chopped up. I’ve learned the hard way that shifting a light a couple inches can make the trim install way smoother.
Useful items to consider:
- Solid Wood Crown Molding: Upgrade your bathroom’s elegance with substantial wood trim that adds warmth and architectural interest to ceilings.
- Adjustable Hole Saw Kit: Create perfectly sized openings for recessed lighting and easily adjust placement to accommodate your new molding.
- Gimbal Recessed Lighting Trim: Use directional trims to angle light away from molding, reducing glare and highlighting your new woodwork.
Tall Crown to “Lift” Low Ceilings
For a low bathroom ceiling, I’ve had great results using taller crown molding to draw the eye up. It sounds counterintuitive, but in my own remodel it made the room feel more finished and less boxy.
These products might be useful:
- Wide White Crown Molding: Create immediate visual height by installing wide, paintable crown molding along the top perimeter of your bathroom walls.
- Oak Wood Trim Board: Add warmth and contrast below your white molding with natural wood boards to replicate this layered, two-tone look.
- Molding Coping Saw: Ensure your corners fit perfectly and look professional with a specialized coping saw designed for detailed joinery work.
Painted Trim for a Crisp Outline
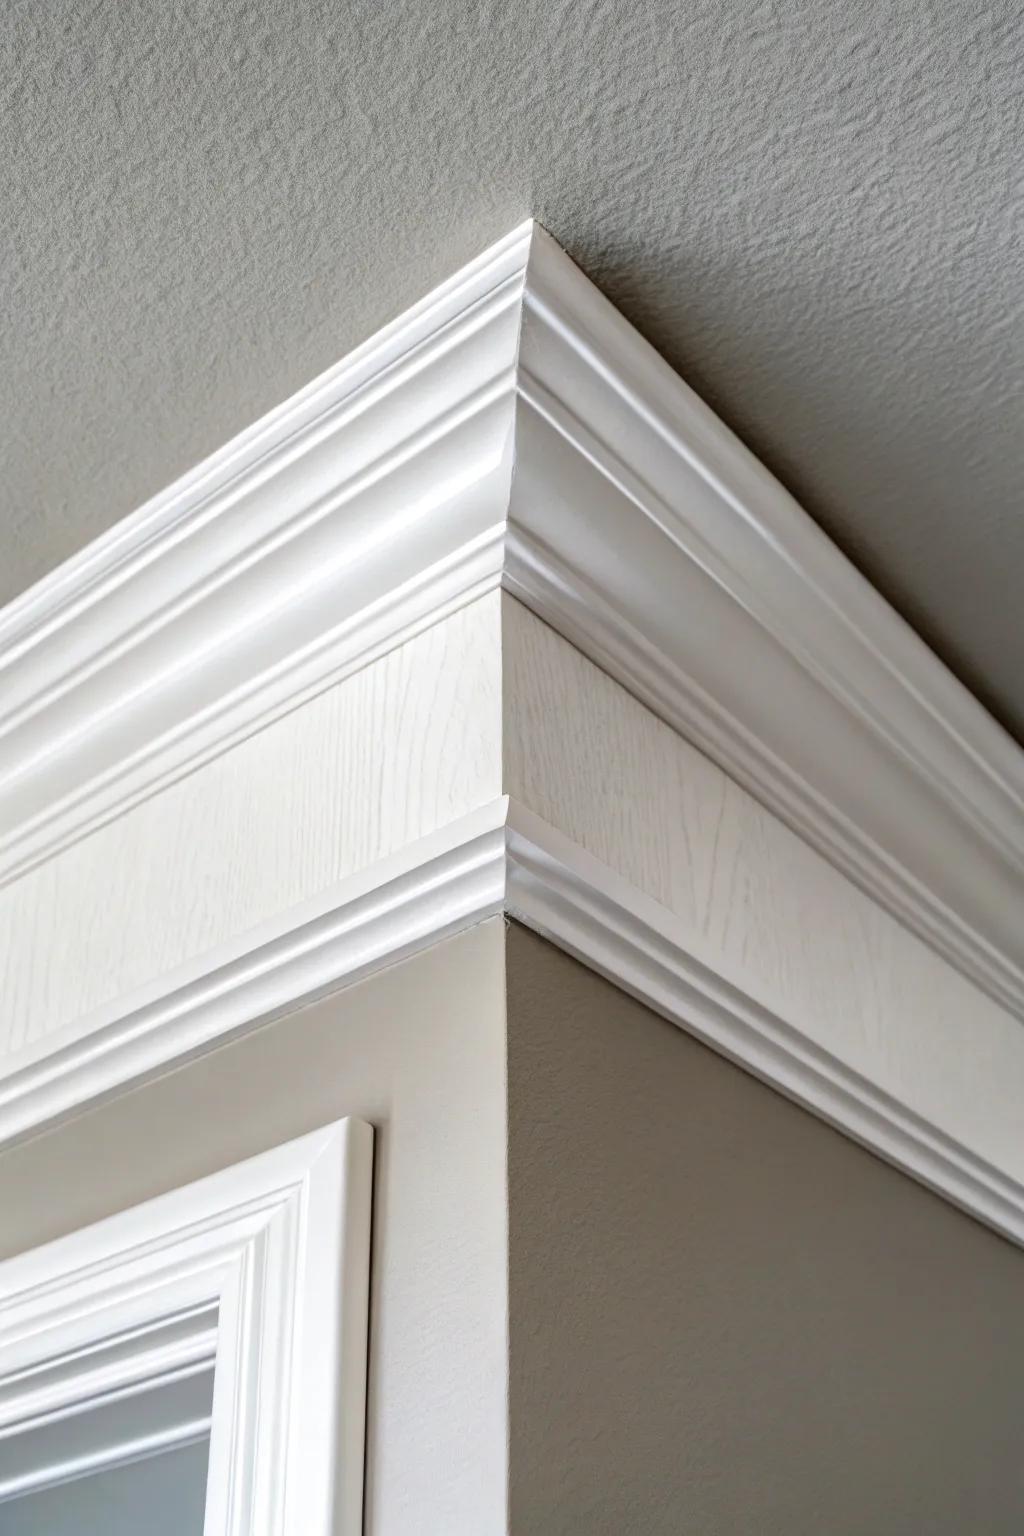
A bright painted ceiling trim is my favorite way to outline the room and make everything feel cleaner. I’ve used a high-humidity paint system on trim in bathrooms, and it holds up way better than skipping prep.
Possibly handy products:
- Moisture-Resistant Trim Paint: Protect your bathroom trim from steam and mildew while achieving a durable, scrubbable semi-gloss finish.
- Angled Sash Paint Brush: Create sharp, professional lines along your ceiling and corners easily with distinct, precise brush bristles.
- Polyurethane Crown Molding: Add elegant detail to your ceiling that resists moisture damage better than traditional wood molding options.
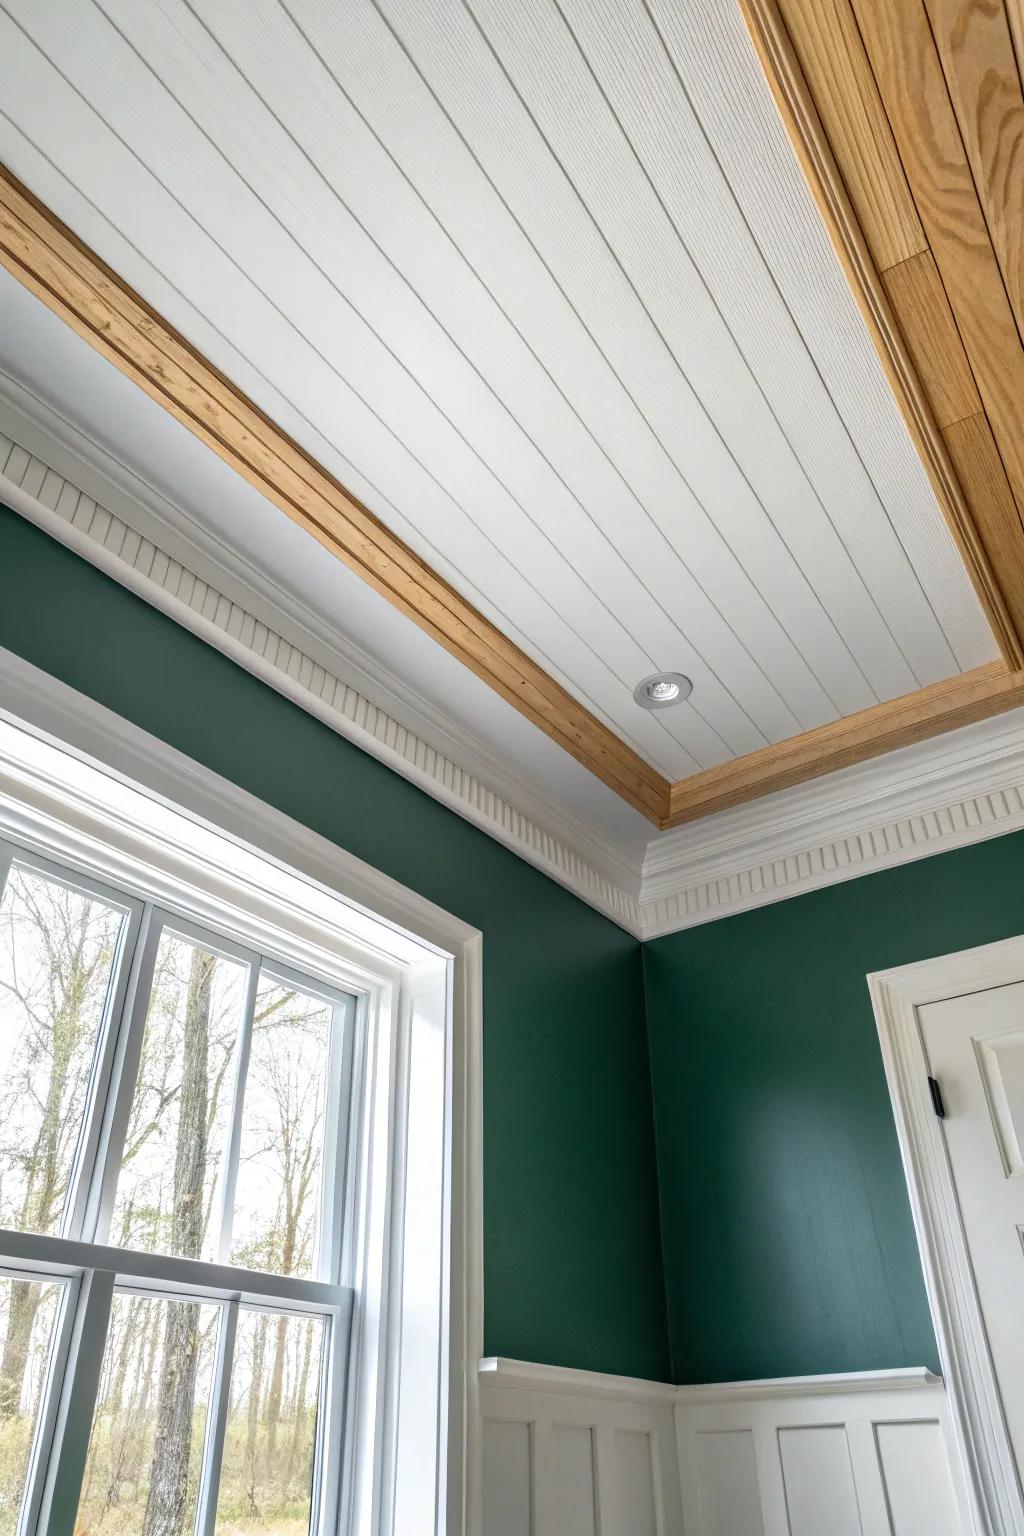
Contrasting Ceiling Color With White Trim
If you’re craving drama, try a deeper ceiling color with white ceiling trim to frame it like a picture. I’ve done this look above light tile and the contrast makes the whole bathroom feel intentionally designed.
Maybe worth checking out:
- Dark Interior Paint or Primer: Create immediate drama and contrast by refreshing your existing trim or ceiling with a bold, dark paint.
- Decorative Crown Molding: Install elegant crown molding to frame your ceiling and create a professional, polished transition between surfaces.
- High-Contrast Caulk or Sealant: Ensure clean, seamless lines along your new trim installation with a durable, paintable caulk for perfect finishing.
Beadboard Ceiling With Perimeter Trim
I’m a sucker for a beadboard ceiling, and adding perimeter trim gives it that clean, framed finish. In my experience, the trim also helps hide tiny panel gaps that show up when humidity swings.
Give these a look:
- White Vinyl Beadboard Planking: Instantly upgrade your ceiling with moisture-resistant panels that mimic the classic wood look without the rot risk.
- Natural Wood Trim Boards: Create that striking contrast border by framing your beadboard with real wood planks ready for stain or clear coat.
- Recessed Gimbal Light Fixture: Illuminate your new ceiling detail perfectly with adjustable downlights that fit neatly into your new paneling.
Shiplap Ceiling With Clean Edge Trim
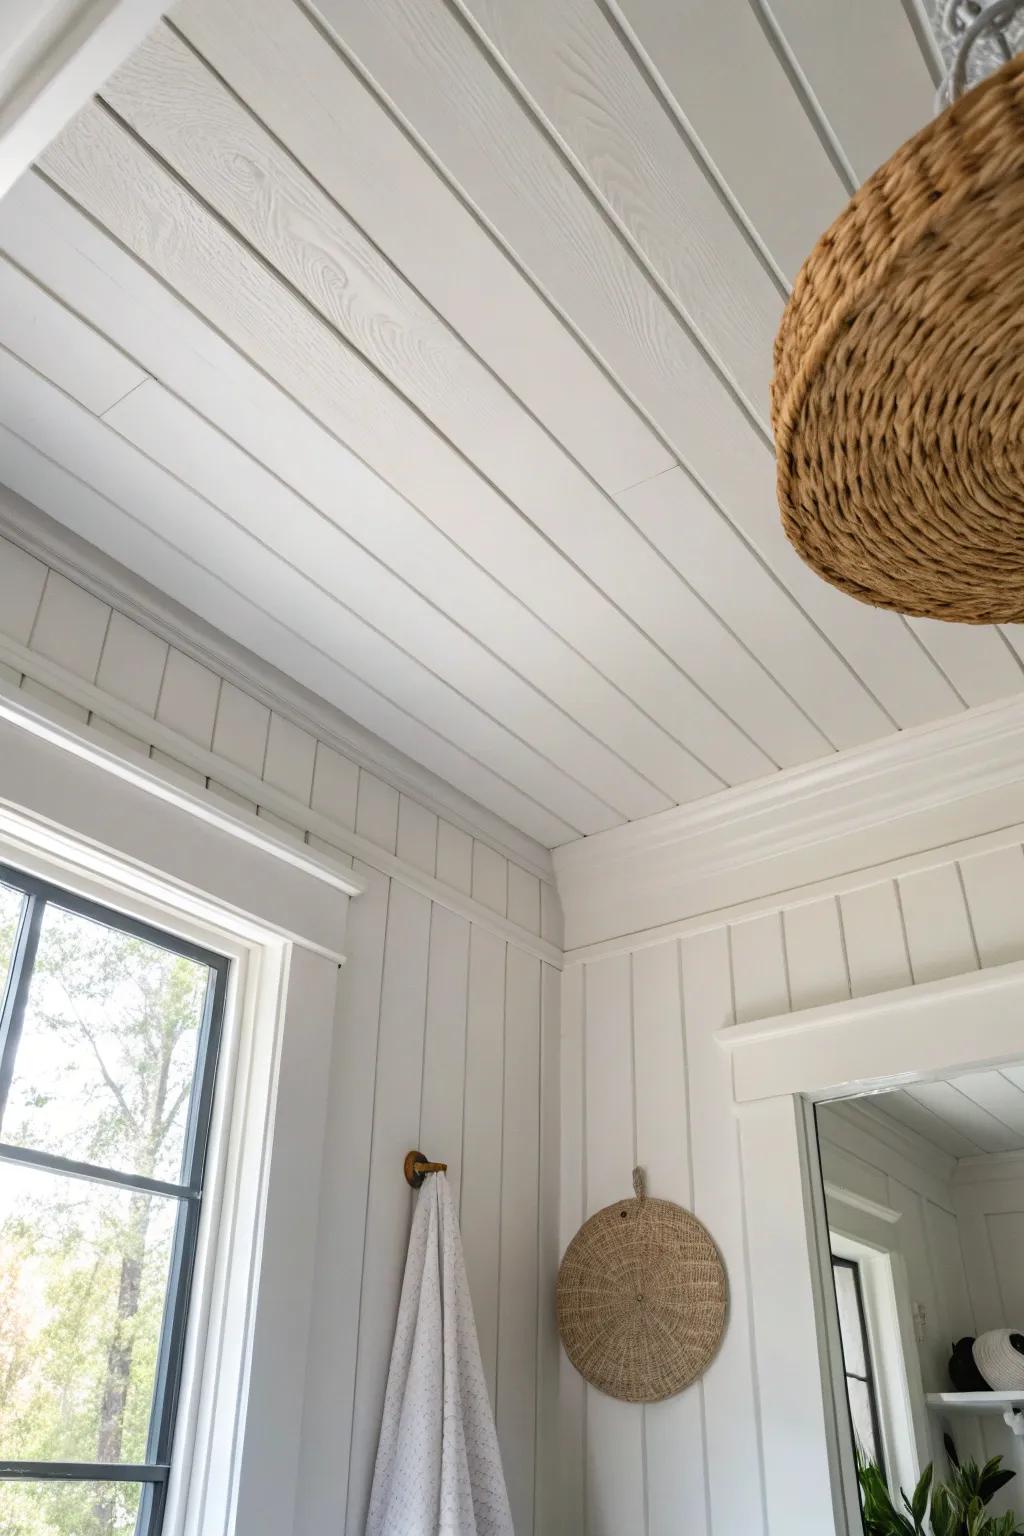
A shiplap ceiling feels cozy and farmhouse-y, and I always finish it with ceiling edge trim so the ends look intentional. I’ve installed it so the trim slightly overlaps the board ends, and it makes the whole thing look custom.
Check these products out:
- Primed Ceiling Crown Moulding: Finish your shiplap ceiling seamlessly by installing simple, clean-lined moulding to hide any rough uneven edges.
- Brad Nailer Kit: Secure your trim and shiplap planks efficiently with this essential tool designed for delicate finishing woodwork.
- Paintable Wood Caulk: Achieve a professional look by filling gaps between the trim and ceiling for a smooth, unified appearance.
Faux Beam Ends With Trim Blocks
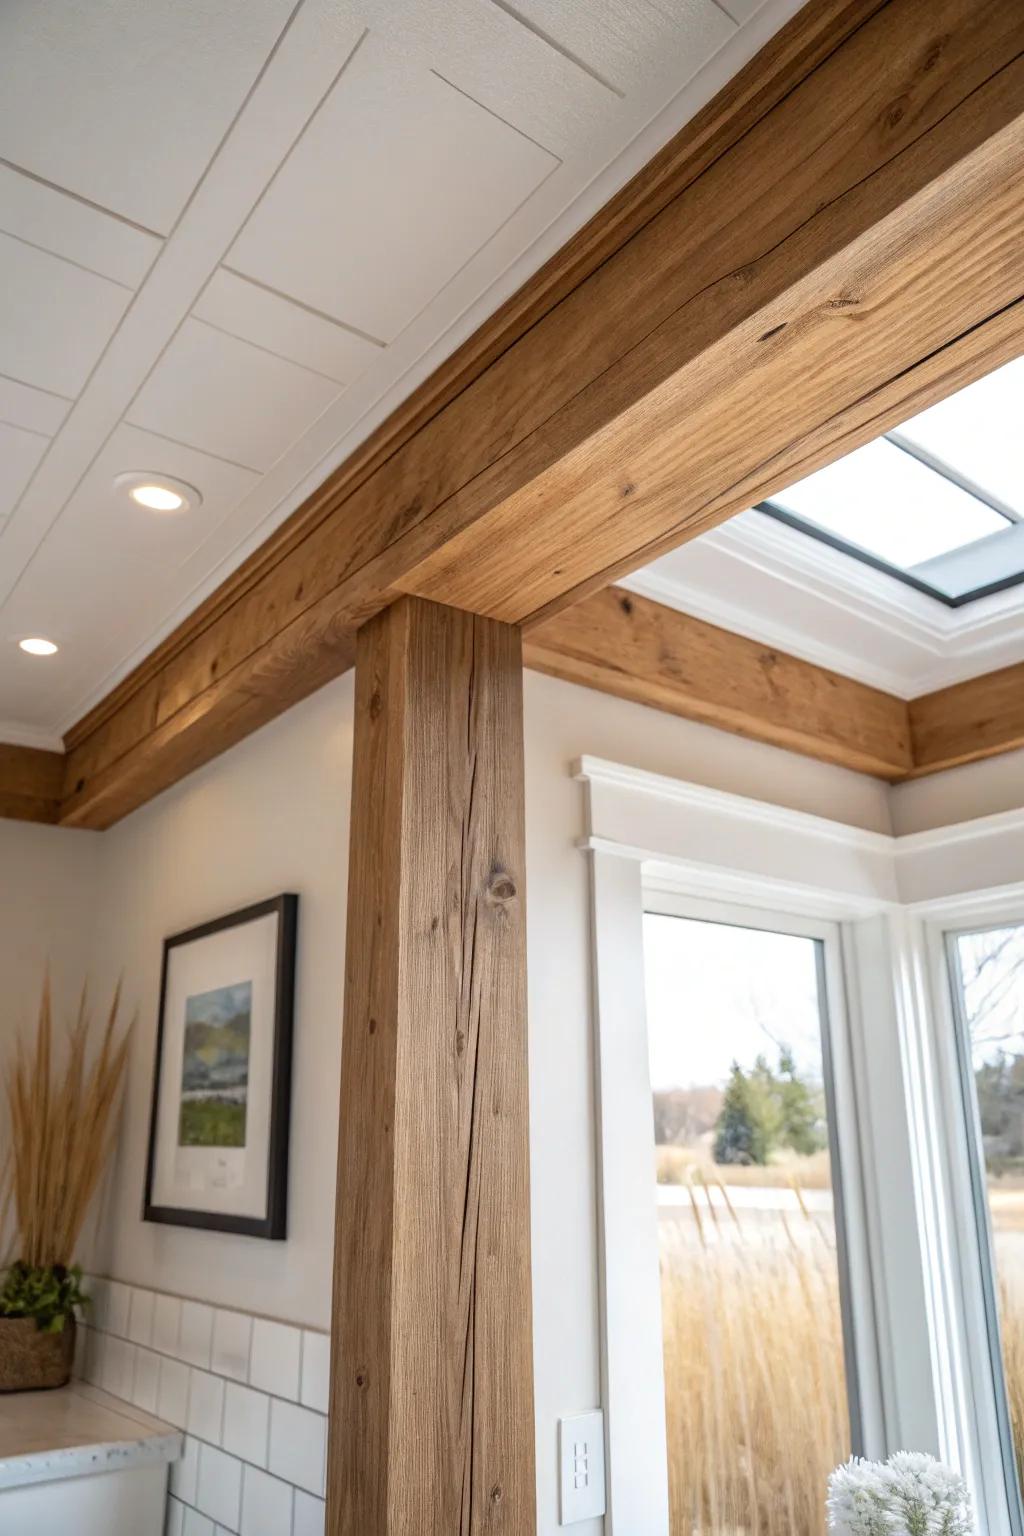
When I add faux beams, I like to “land” them into trim blocks at the ceiling perimeter so everything looks planned. I’ve used this trick to avoid awkward beam-to-crown collisions and it reads like real structure.
Some handy options:
- Faux Wood Ceiling Beams: Add rustic charm to your ceiling with these lightweight, realistic-looking beams that are easy to install overhead.
- Decorative Wood Corbels or Blocks: Use these wooden accents to create the perfect landing spot for your beams where they meet the wall.
- Construction Adhesive & Caulk Gun: Secure your trim blocks and beams firmly in place with high-strength adhesive designed for vertical and overhead applications.
Coffered Ceiling Grid With Slim Trim
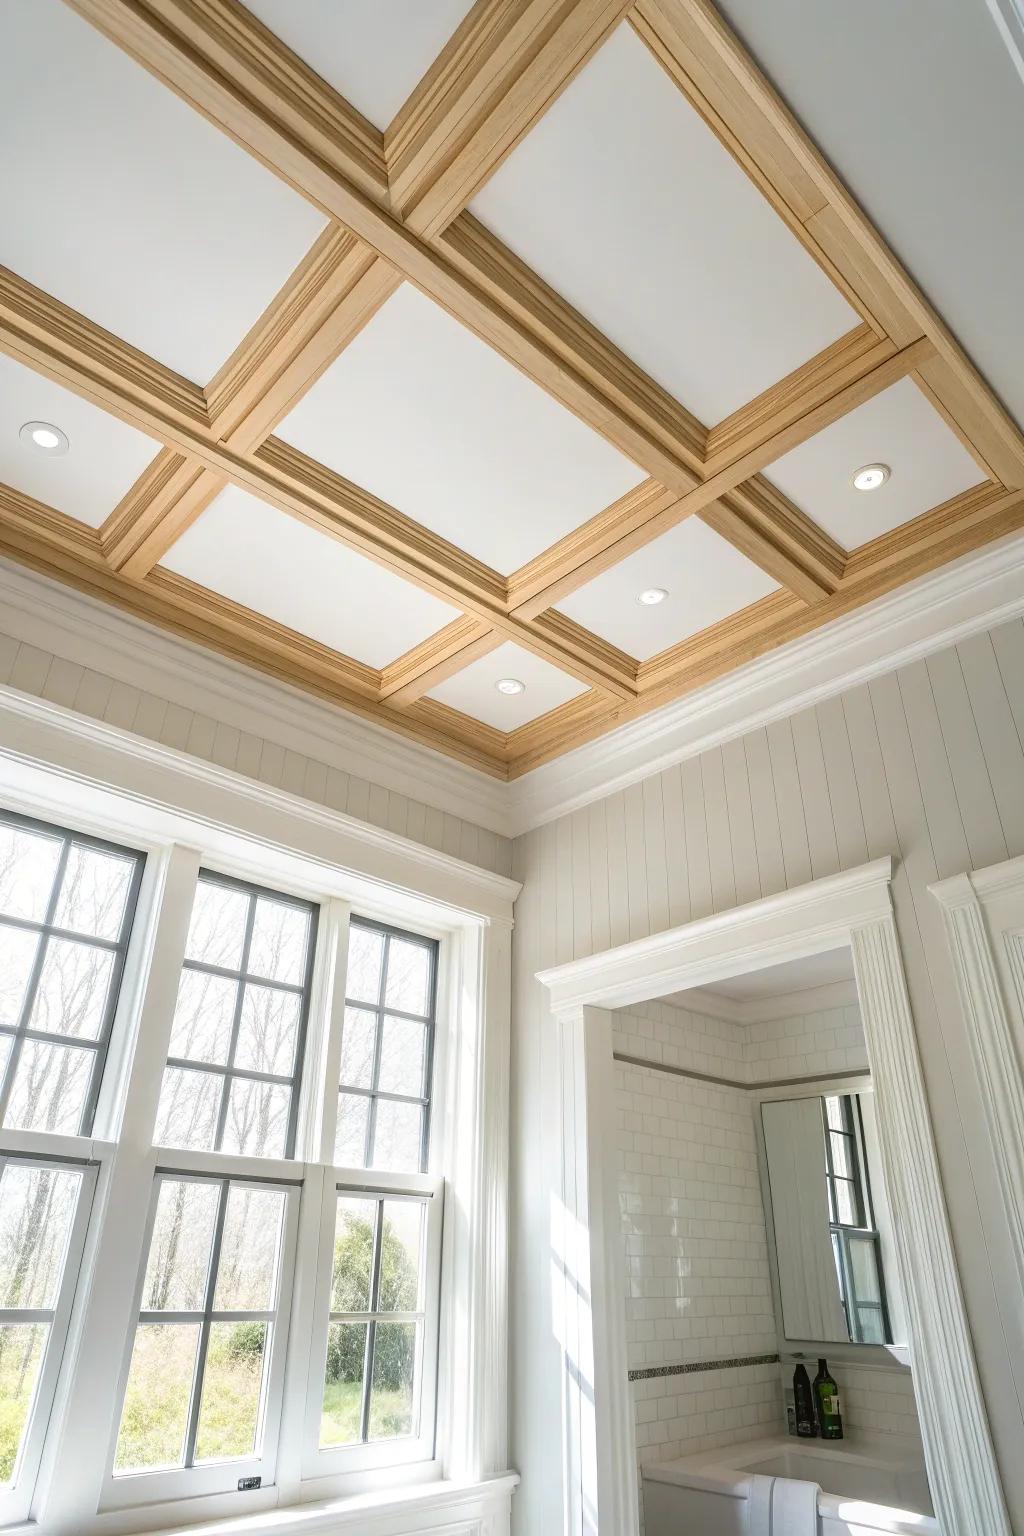
A light coffered ceiling made from slim trim strips can totally transform a plain bathroom ceiling. I’ve built a simple grid and finished the perimeter with matching trim, and it gives that boutique-hotel vibe without heavy framing.
A few things you might like:
- Recessed Lighting Kits: Brighten your new grid ceiling layout by installing discreet, modern lighting fixtures for a customized look.
- Unfinished Wood Molding Strips: Create your custom ceiling grid using versatile wood trim that is ready for staining or painting.
- Brad Nailer Tool Kit: Secure your lightweight ceiling trim efficiently and cleanly with a reliable power nailer for professional results.
Ceiling Picture-Frame Box Molding
For something decorative but still DIY-friendly, I love box molding rectangles on the ceiling with a neat perimeter trim. I’ve done this over smooth drywall, and it adds “wow” without needing fancy crown profiles.
Some ideas to consider:
- Primed Molding Trim Kit: Create elegant box shapes effortlessly on your ceiling with these ready-to-paint molding pieces for a custom look.
- Laser Level Tool: Ensure perfectly straight lines and symmetrical spacing for your molding layout with this essential precision alignment tool.
- Construction Adhesive: Secure your trim pieces firmly in place before nailing to guarantee a long-lasting and professional installation.
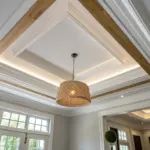
LED Light Cove Trim Glow
One of my favorite upgrades is cove trim designed to hide indirect lighting so the ceiling has a soft halo at night. I’ve used this in a bathroom and it instantly turned harsh overhead light into a calm, spa feel.
You might like:
- Flexible LED Strip Lights: Create that calming spa glow by installing these versatile, dimmable light strips behind your crown molding.
- Cove Lighting Crown Molding: Simplify your installation with specialized molding specifically designed to hold and conceal indirect LED lighting strips.
- LED Aluminum Channel Diffusers: Ensure a smooth, even light distribution without visible hotspots by placing your strips inside these channels.
Vent and Fan Trim Frame Detail
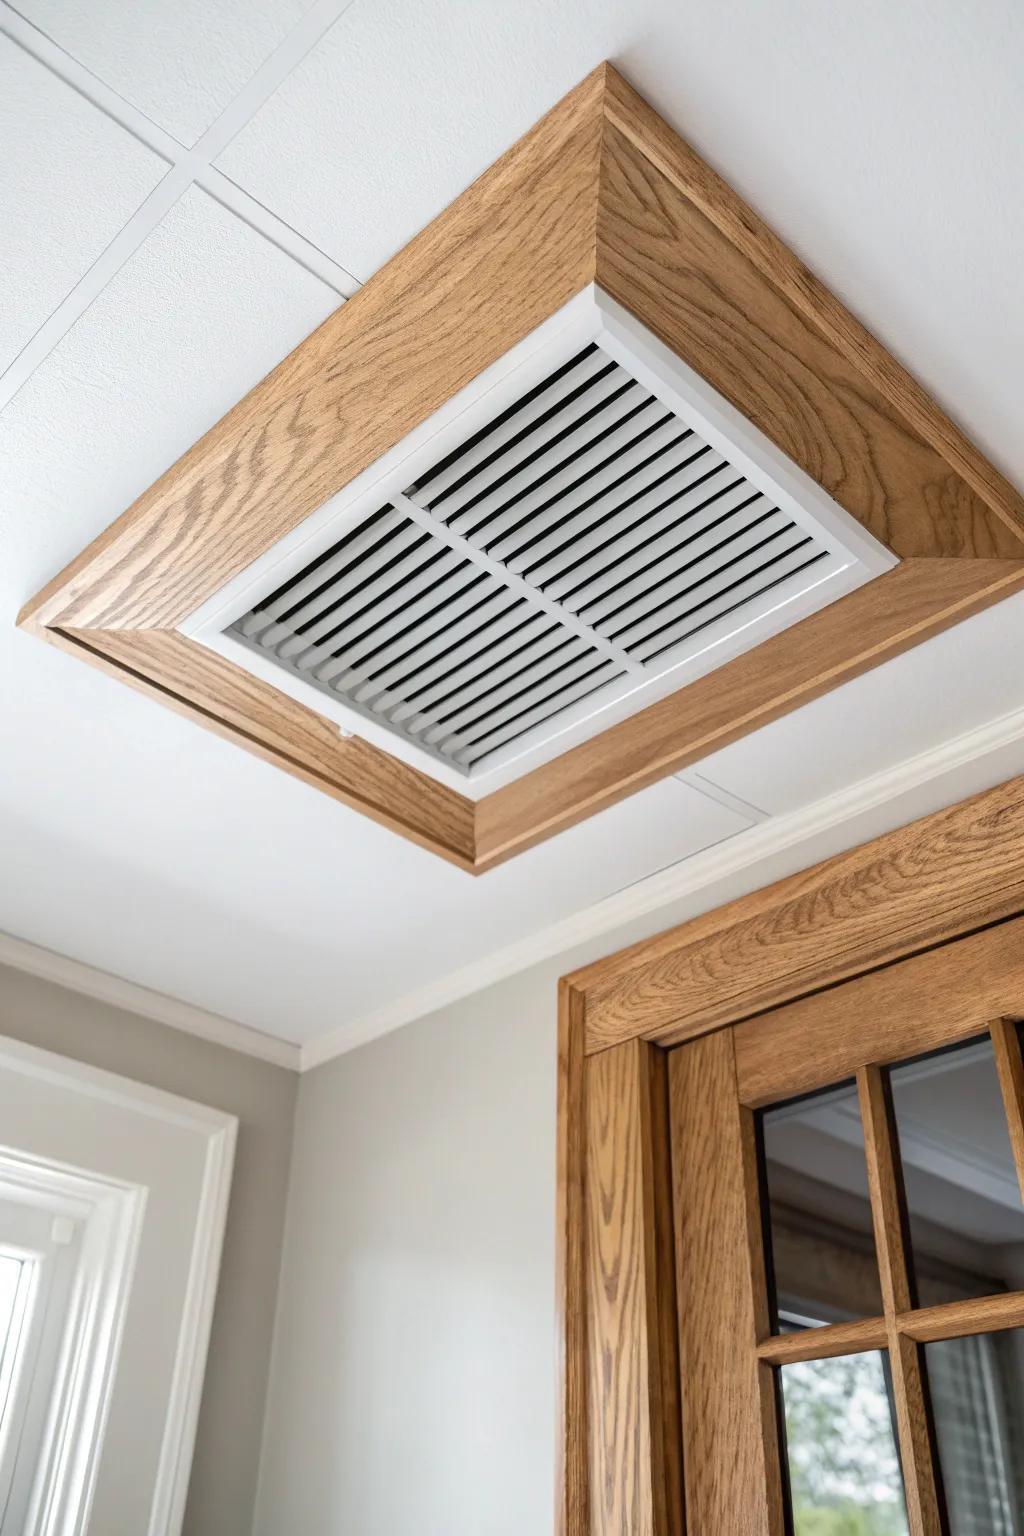
Instead of letting the fan or vent look like an afterthought, I’ll build a small trim frame around it on the ceiling. I’ve done this with simple stock and it makes the whole bathroom ceiling trim plan feel cohesive.
Might be a good match:
- General Purpose Oak Board Lumber: Build your own custom vent frame with durable oak boards that stain beautifully to match existing woodwork.
- Wood Corner Clamps: Ensure perfect 90-degree angles for your trim frames with these essential clamps for professional-looking joinery results.
- Decorative Ceiling Air Register: Replace standard industrial grilles with an upgraded decorative vent cover to complement your new custom wood trim.


