
There’s something seriously satisfying about burnt wood—that high-contrast look makes even simple pieces feel special and a little rustic-luxe.
Burned-And-Stitched Wall Hanging
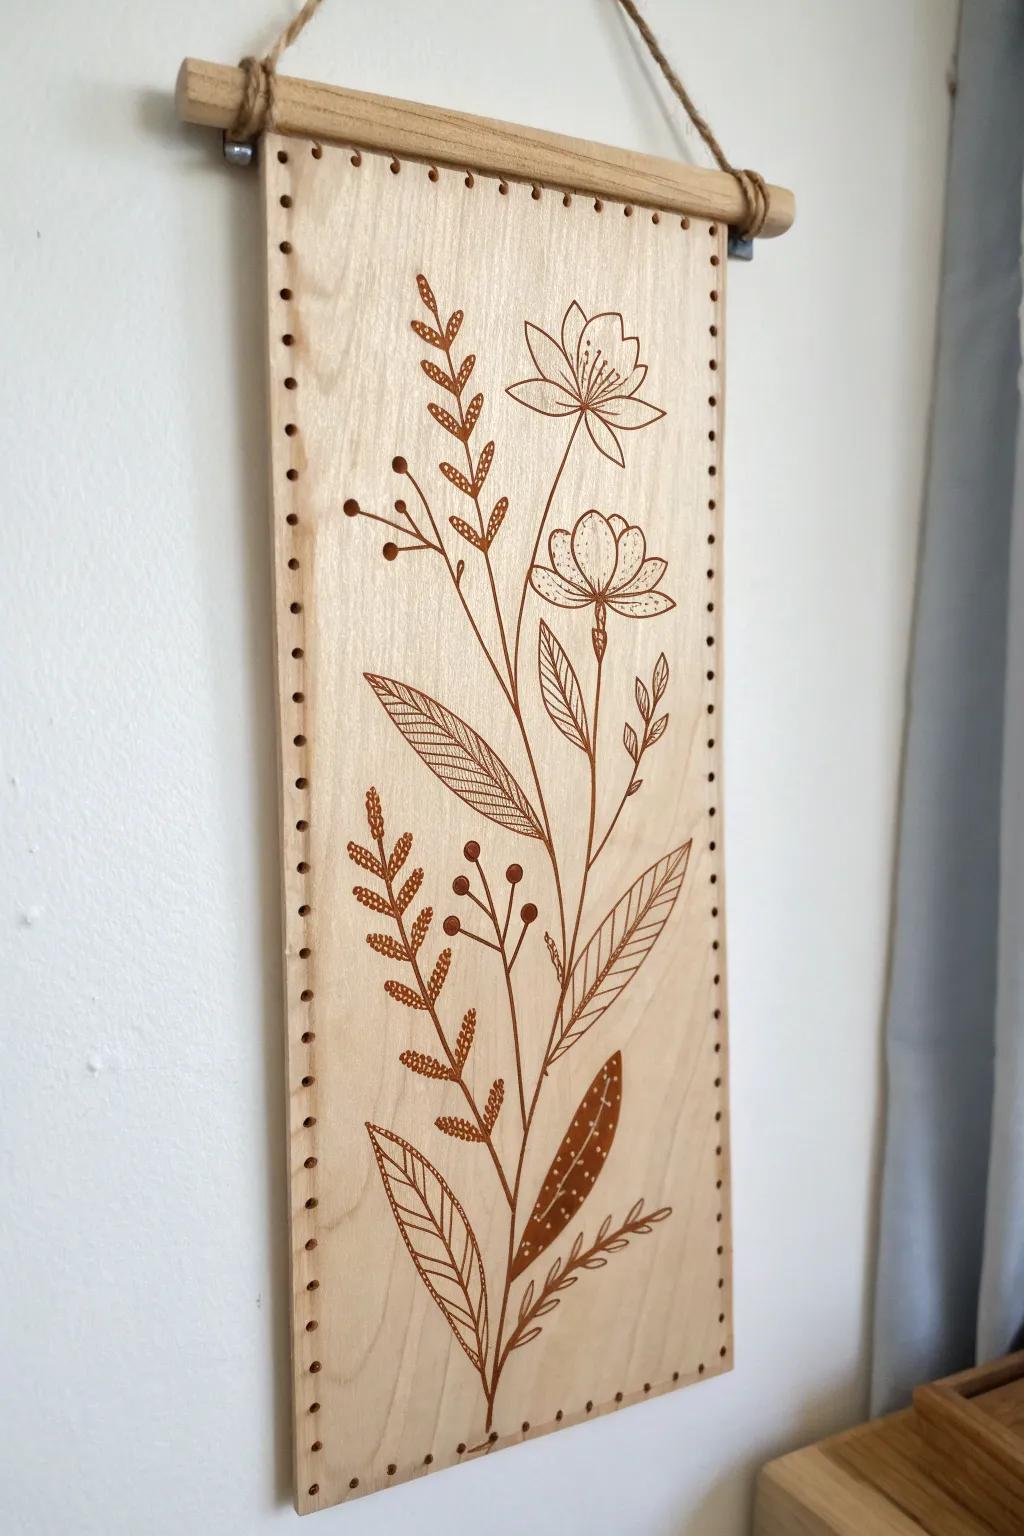
One of my favorite “wait, how did you do that?” pieces is burnt wood line art paired with stitched thread through tiny drilled holes. I’ve tried it with botanical outlines, and mixing pyrography and stitching makes the design feel soft and bold at the same time.
A few choices to try:
- Wood Burning Kit: Create your intricate floral outlines easily with a versatile pyrography pen that handles detailed line work beautifully.
- Thin Hanging Plywood Sheets: Select lightweight, unfinished wood sheets that act as the perfect blank canvas for your burning and drilling projects.
- Precision Hand Drill: Drill tiny, uniform holes for your stitching accents without splitting the delicate wood edges of your art piece.

Wood Round Coasters
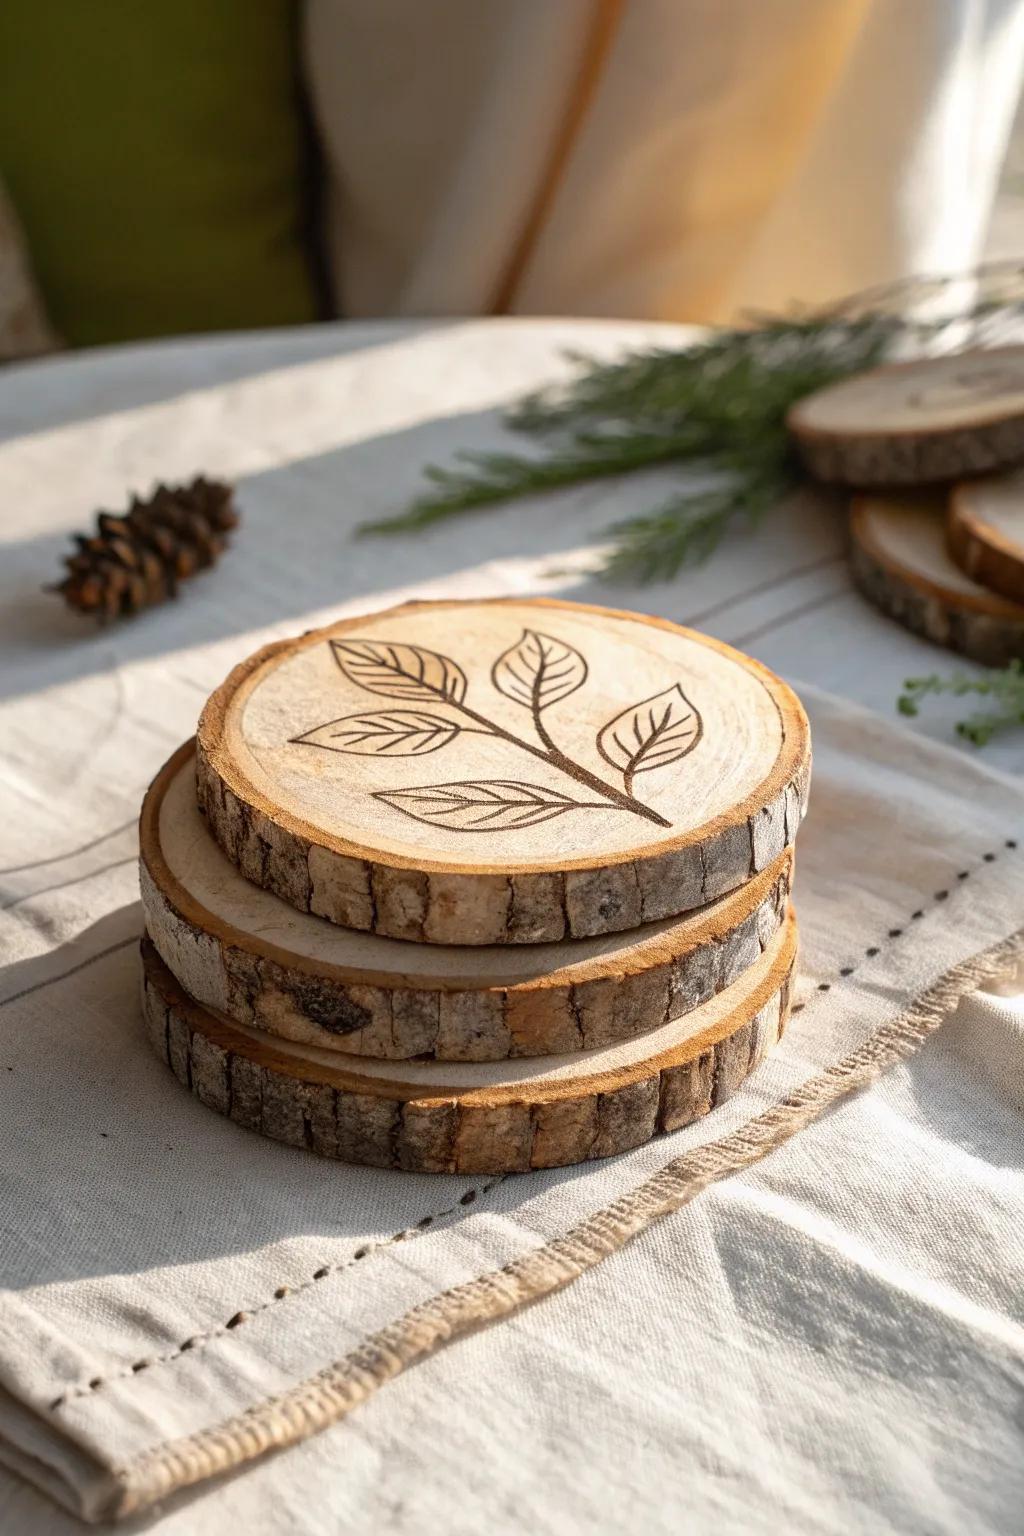
When I want an easy win, I grab wood rounds and burn a simple border or leaf pattern for burnt wood coasters that look way fancier than they are. I’ve learned that sealing them well is the difference between “cute” and “coffee-ring proof.”
Useful items to consider:
- Natural Wood Slices with Bark: Start your project right by choosing pre-sanded wood slices that serve as the perfect canvas for your pyrography designs.
- Wood Burning Pyrography Kit: Use a precision wood burning tool with variable temperature tips to easily etch delicate borders or leaf patterns onto coasters.
- Polyurethane Wood Sealer: Protect your finished artwork from moisture and coffee rings by applying a durable, clear sealant for long-lasting use.
Personalized Cutting Board Art
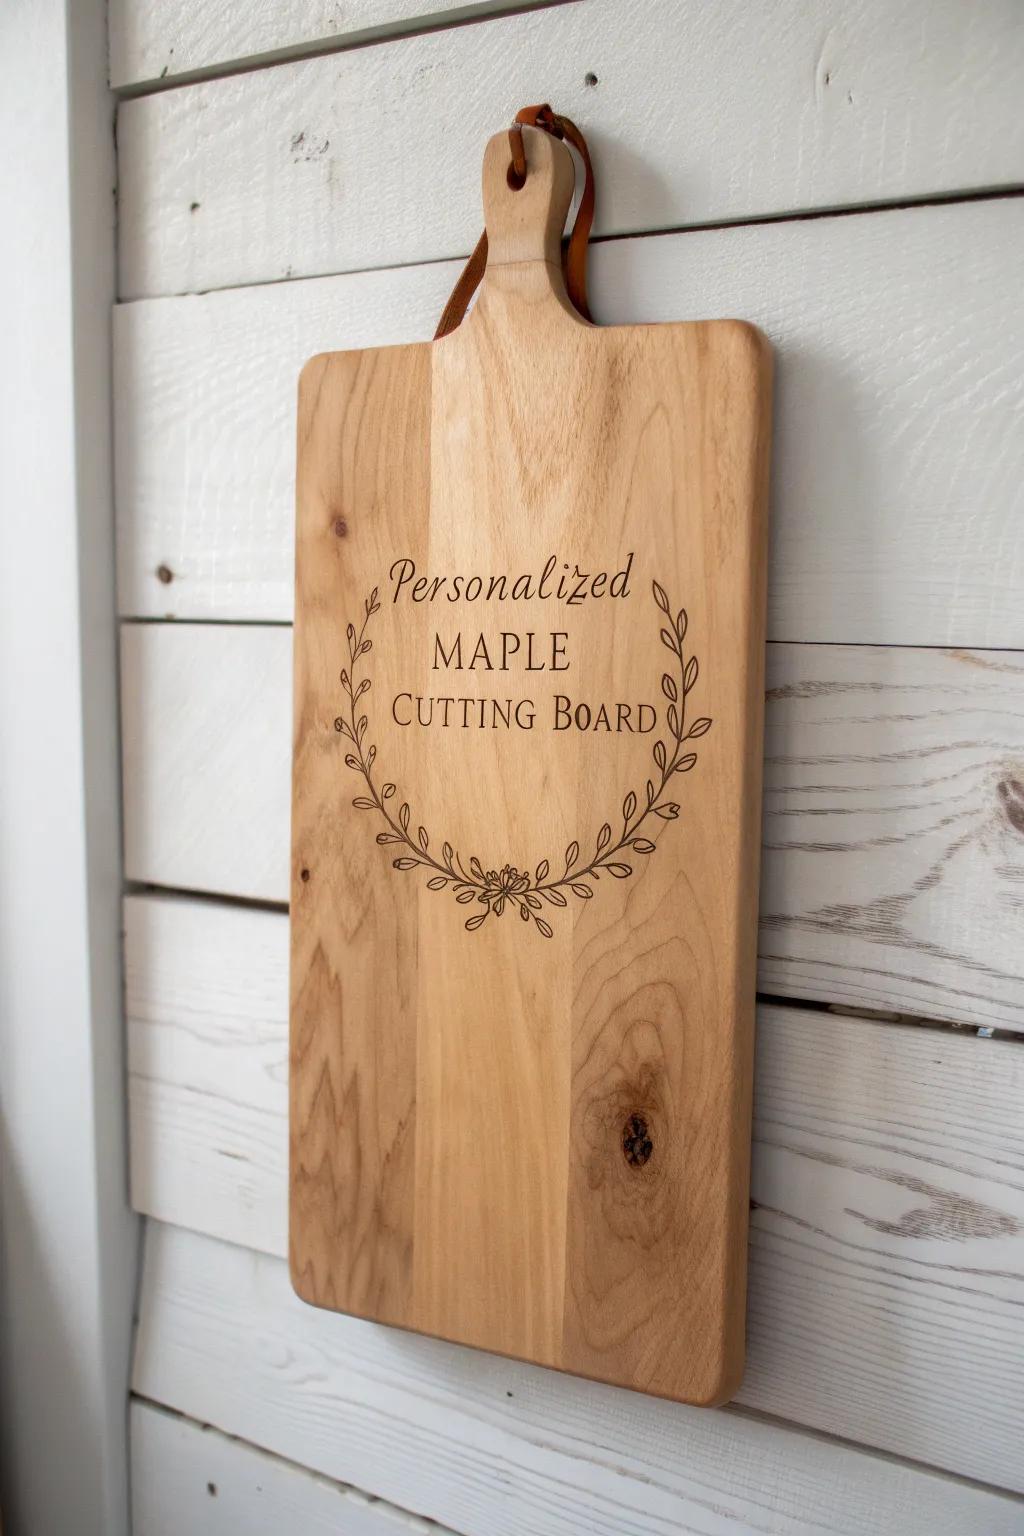
I love turning a plain board into burnt wood kitchen decor by burning a wreath, initials, or a favorite saying along the edge. In my own kitchen, I hang mine up like art when I’m not using it, because the wood burning detail deserves to be seen.
Some handy options:
- Wood Burning Kit with Temperature Control: Create detailed wreaths and lettering easily with a versatile pyrography pen that offers adjustable heat settings.
- Unfinished Maple or Beech Cutting Board: Start your project with a blank slate using a high-quality, unfinished hardwood board perfect for burning.
- Letter and Wreath Stencil Set: Achieve professional-looking lettering and botanical designs quickly by tracing these durable, reusable stencils before burning.

Wood Burned Spoon Set
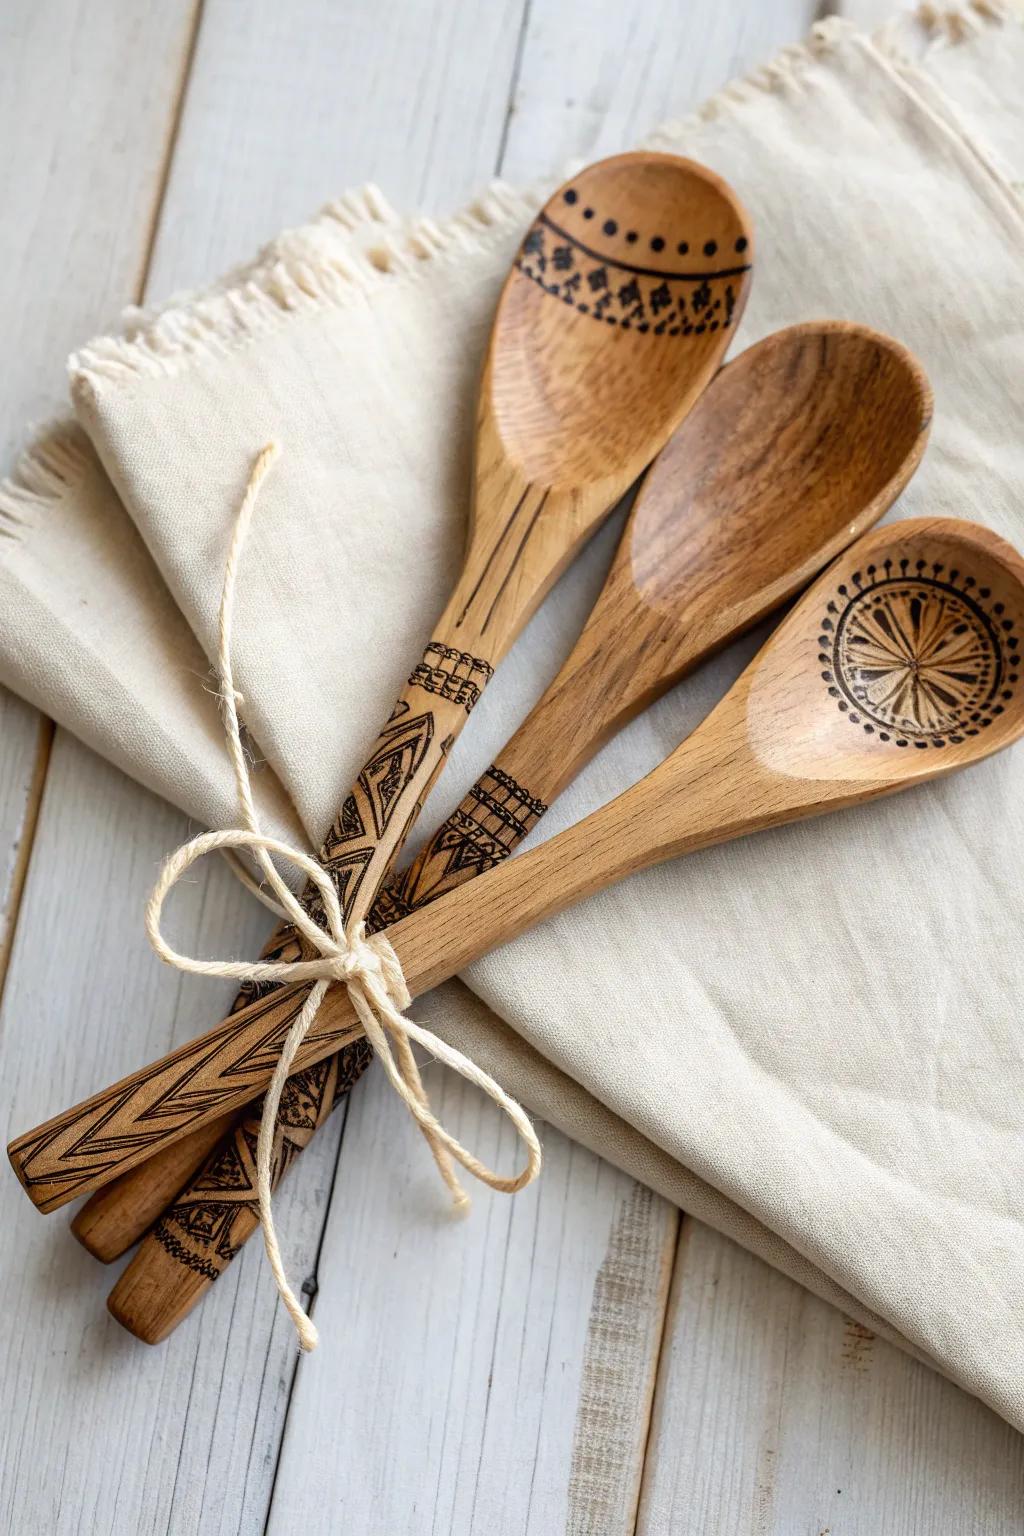
I’ve made a whole set of wood burned utensils with little patterns on the handles, and they instantly made my utensil crock look more put-together. My tip from experience: keep the designs higher up the handle so the burnt wood stays crisp after washing.
These products might help:
- Wood Burning Pyrography Kit: Start creating your custom designs immediately with a versatile tool featuring adjustable heat and various tips.
- Bamboo or Beechwood Spoon Set: Use these durable, unfinished wooden spoons as the perfect blank canvas for your new pyrography projects.
- Food Safe Mineral Oil: Protect your finished artwork and keep the wood conditioned and safe for daily cooking use.
Rustic Botanical Wall Plaque
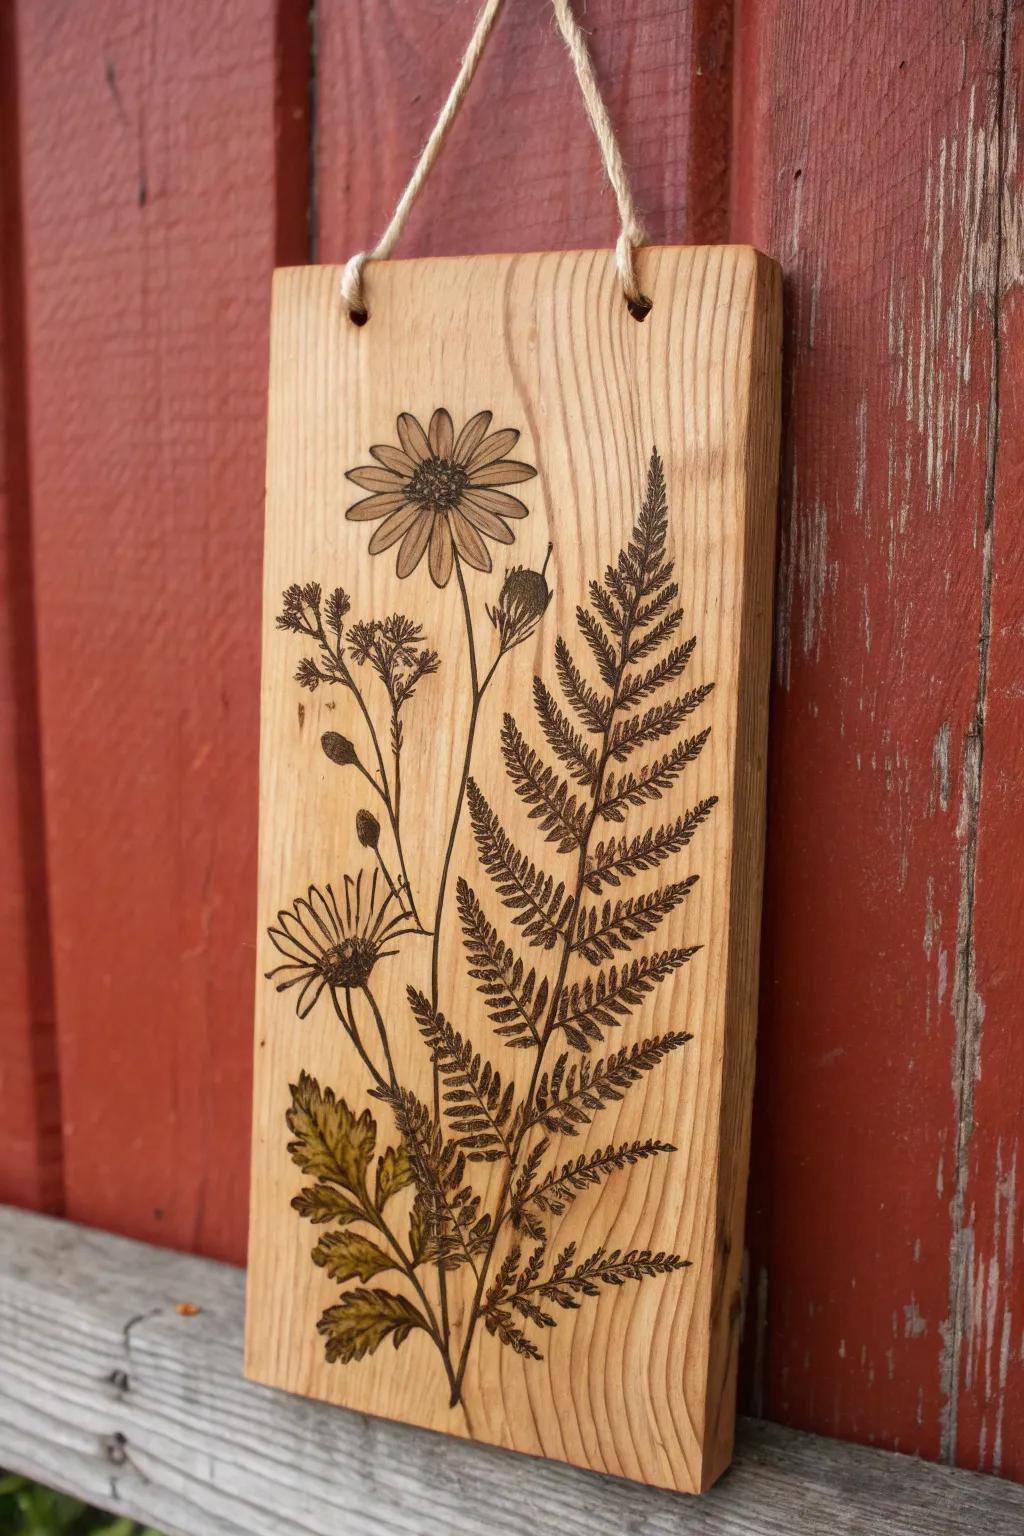
A simple rectangle of wood becomes a cozy focal point when I add pyrography wildflowers or ferns and leave plenty of natural grain showing. I usually let knots “become” part of the design, because burnt wood looks best when it works with the board, not against it.
Possibly handy products:
- Wood Burning Tool Kit: Start your botanical designs with a reliable pyrography pen that offers variable heat control for precision.
- Unfinished Basswood Planks: Choose smooth, light-colored wood like basswood that makes burning detailed floral patterns much easier.
- Jute Twine Rope: Complete the rustic aesthetic by adding a simple, natural hanger using durable jute twine cord.
Live-Edge Wood Clock Face
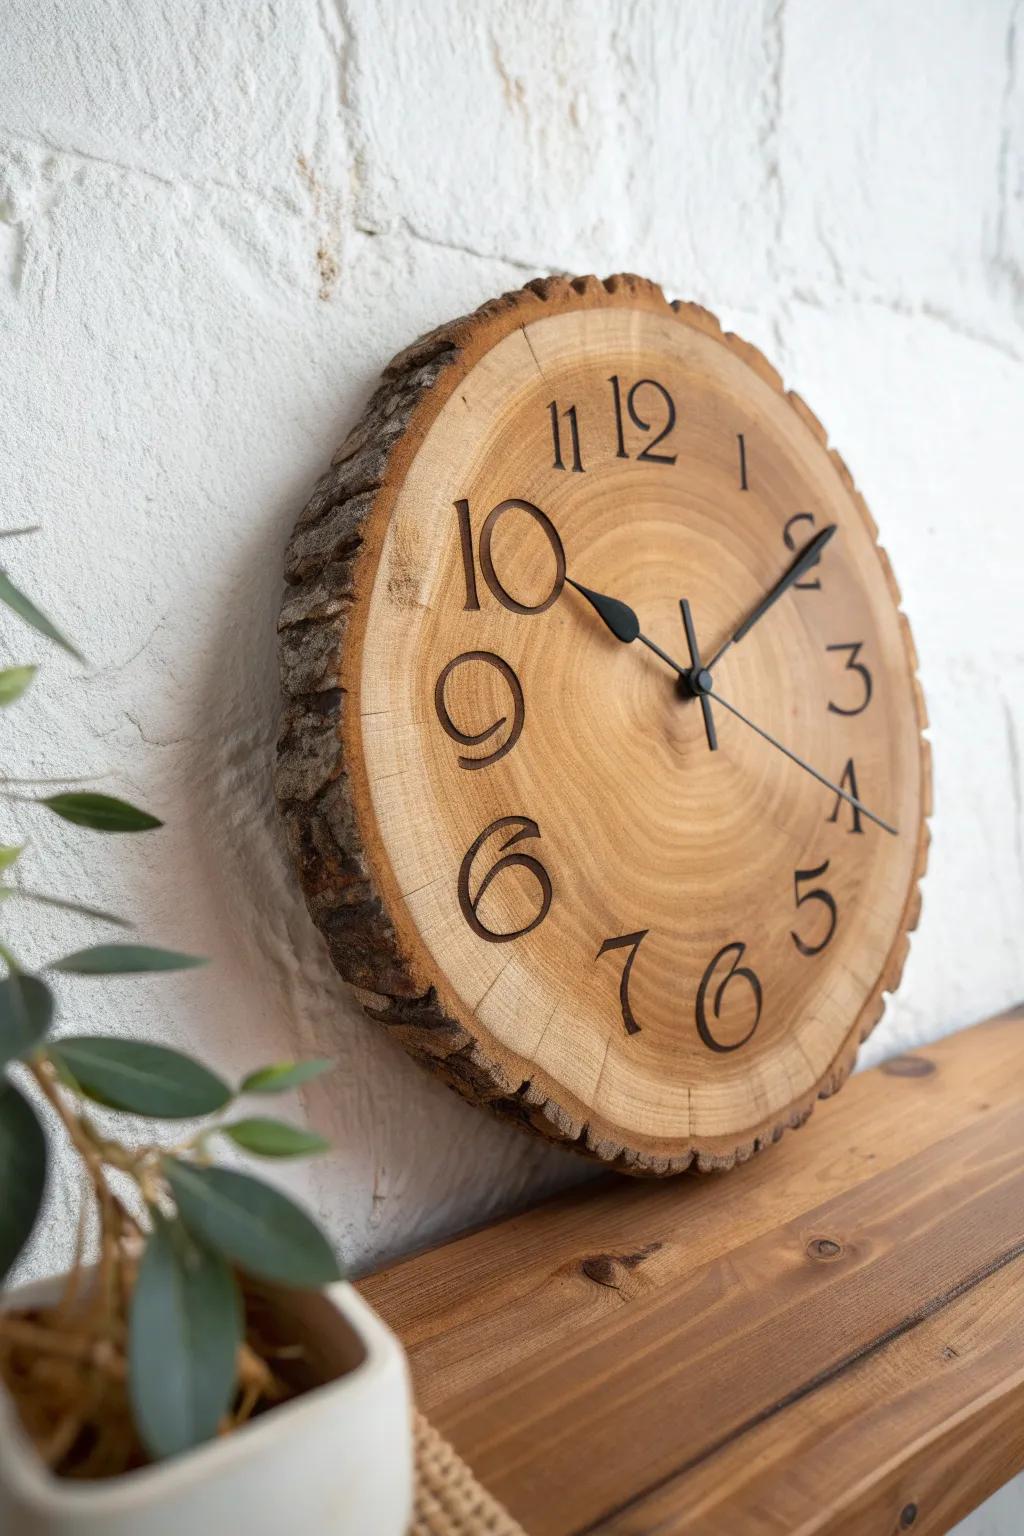
I’ve turned a live edge slice into a clock by burning the numbers and a ring around the center, and it always gets comments. The burnt wood marks read super clearly from across the room, which is honestly the whole point of a clock.
Consider these options:
- Wood Burning Pyrography Kit: Etch beautiful, dark numbers into your wood slice with a versatile pen for precise, permanent designs.
- High Torque Clock Movement Mechanism: Ensure your handmade clock keeps perfect time by installing a reliable mechanism with varying hand styles.
- Unfinished Live Edge Wood Slices: Start your project easily with pre-dried, sanded rounds that feature natural bark edges for rustic charm.
Snowflake Wood Ornaments
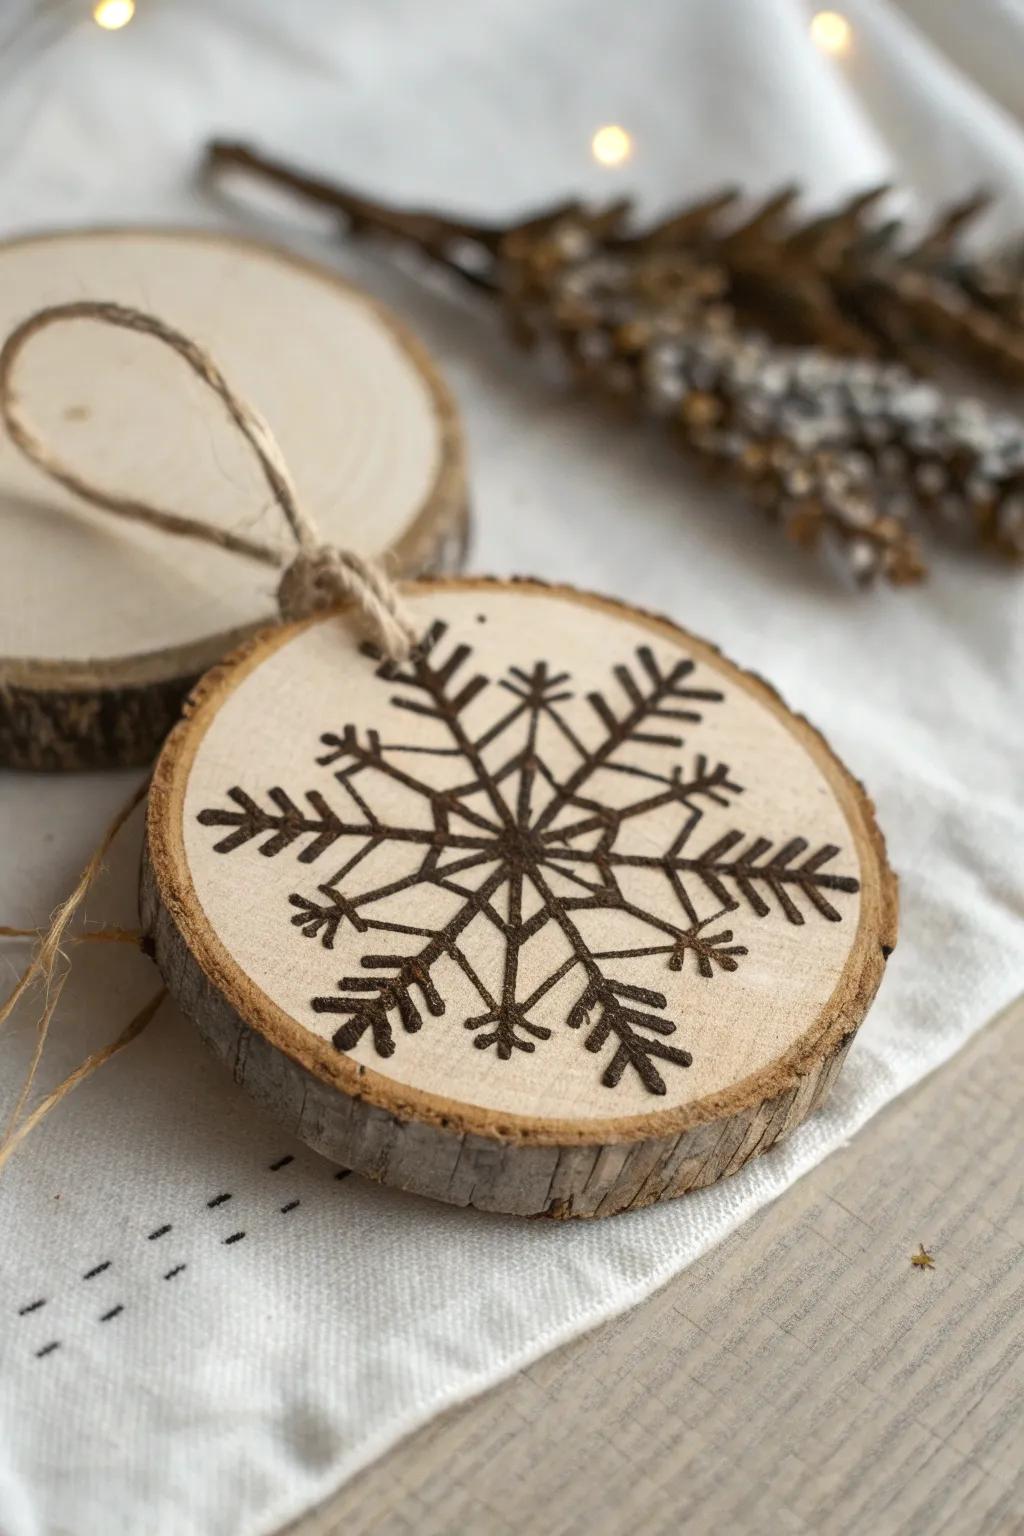
Every winter I batch-make burnt wood ornaments on small rounds, and snowflakes are my favorite because the symmetry hides little wobbles. I tie mine with twine, and the dark wood burning lines pop beautifully against pale wood.
Explore these options:
- Pyrography Wood Burning Kit: Create detailed burnt designs easily with varied nibs for precise lines and shading on your ornaments.
- Unfinished Natural Wood Slices: Use these pre-drilled wooden rounds with bark edges as the perfect rustic canvas for your snowflake art.
- Jute Twine String: Complete your rustic holiday look by looping this sturdy natural fiber cord through your finished ornaments.
Landscape Bookmarks With Tassels

I’m a sucker for slim burnt wood bookmarks with a tiny mountain-and-pine scene burned vertically down the length. I’ve made these as quick gifts, and the moment I add a simple tassel, the whole pyrography piece feels extra finished.
Some ideas to consider:
- Blank Wood Bookmarks with Pre-Drilled Holes: Start your project easily with ready-to-burn wooden blanks featuring pre-drilled holes for adding decorative tassels.
- Pyrography Wood Burning Kit: Create detailed mountain scenes and delicate pine trees with a versatile wood burning pen and tips.
- Jute Cord and Tassel Syt: Finish your bookmark perfectly by adding a natural jute cord or elegant tassel for a polished look.
House Number Or Name Sign
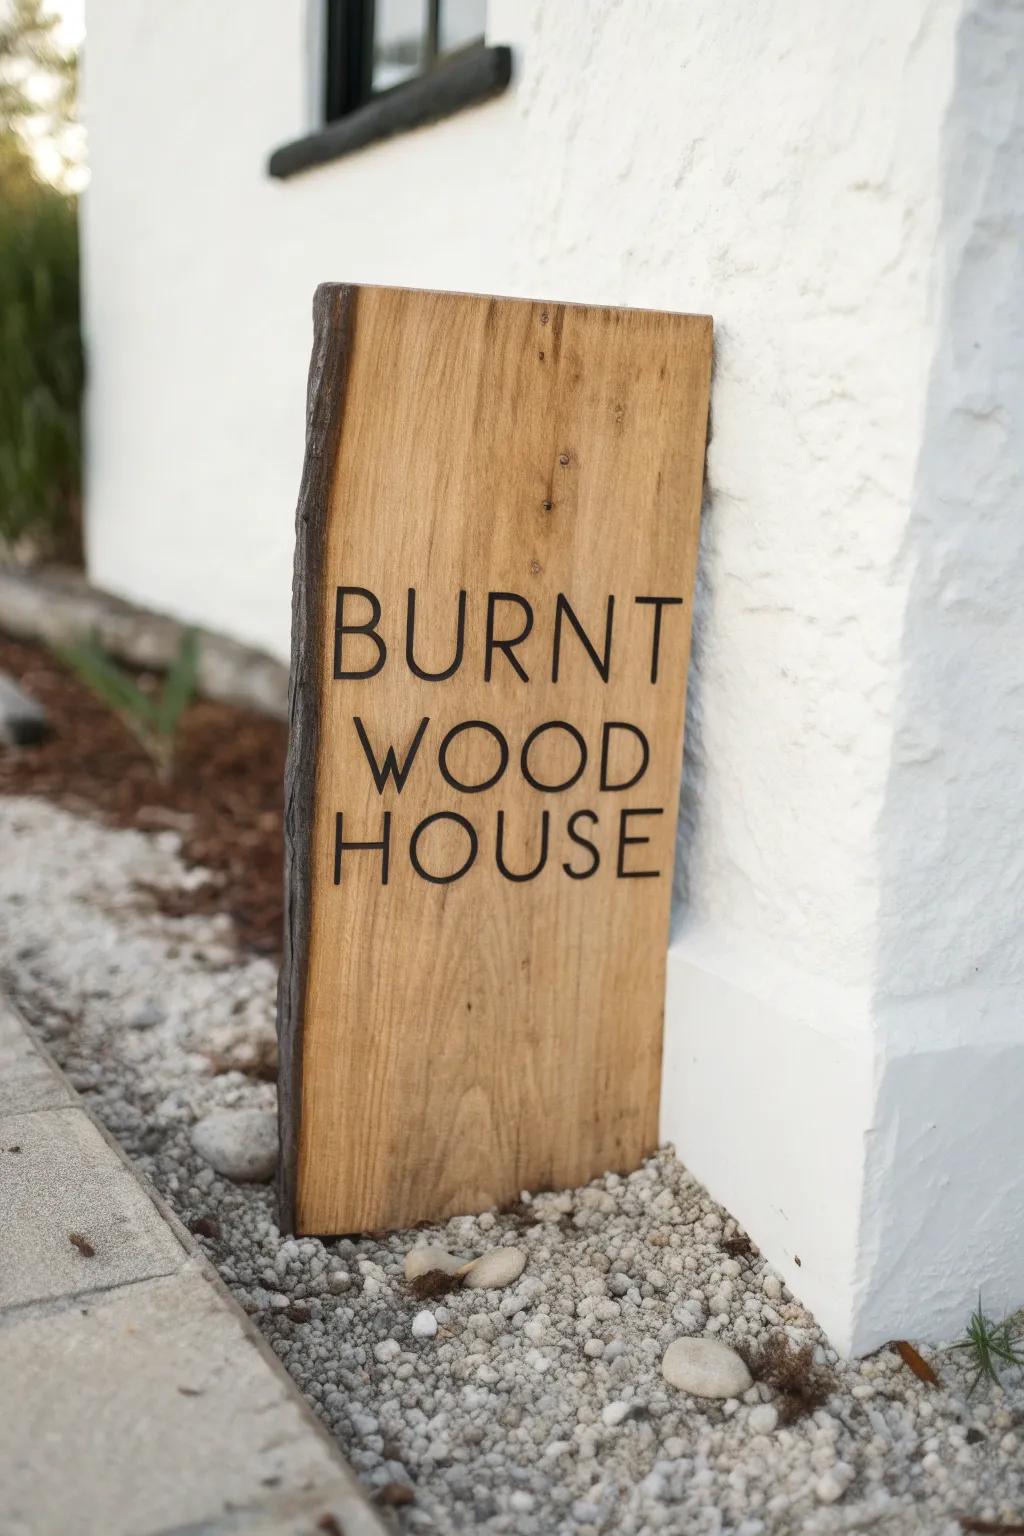
A clean burnt wood sign with a house number or family name is one of the most satisfying “one afternoon” projects I’ve done. I like burning the letters dark and bold, because crisp wood burning reads best from the curb.
Check these products out:
- Pyrography Wood Burning Kit: Create bold, dark lettering for your sign with a versatile wood burning tool featuring adjustable temperatures.
- Live Edge Wood Plank: Source a beautiful rustic base for your house sign that mimics the natural look in the photo.
- Large Letter Stencils: ensure crisp, professional-looking text on your sign by tracing these durable templates before you burn.
Wood Burned Picture Frame
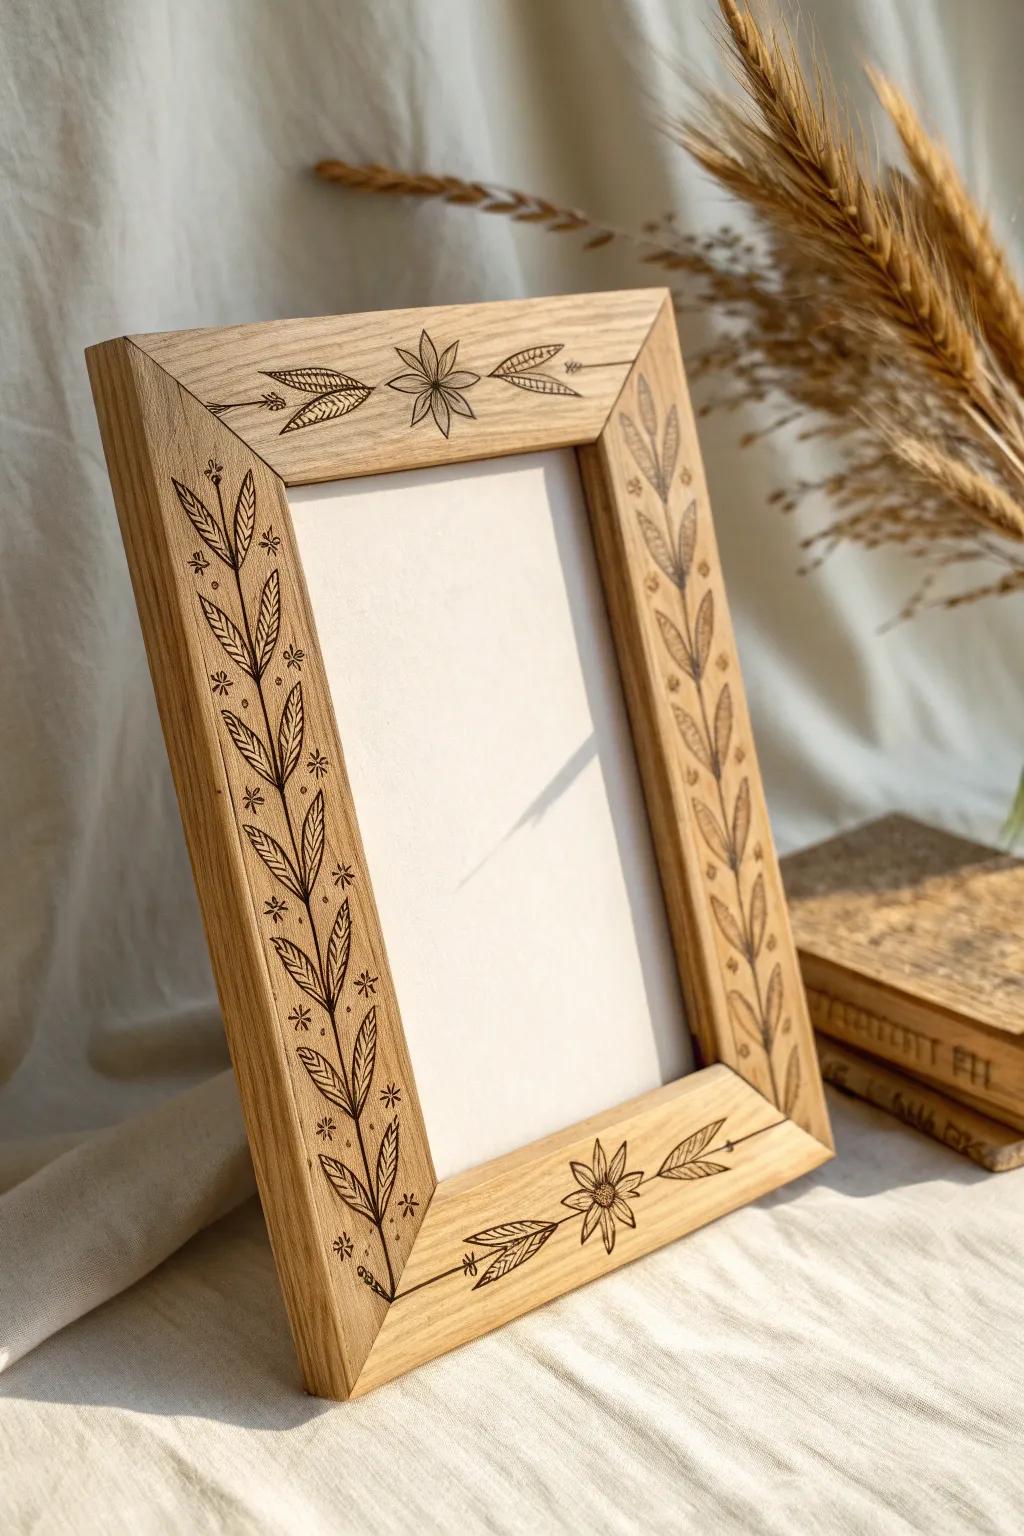
I’ve dressed up plain frames with burnt wood corner florals or a simple repeating pattern, and it instantly makes photos feel more heirloom-y. My favorite trick is burning a tiny date on the back, because pyrography is perfect for subtle details.
May just do the trick:
- Unfinished Wood Picture Frames: Start your project with a blank canvas; these smooth, raw frames act as the perfect base for burning.
- Pyrography Pen Starter Kit: Create detailed florals and dates easily with a variable temperature tool designed for precise wood burning art.
- Carbon Transfer Paper: Trace your favorite floral patterns directly onto the wood frame before burning to ensure clean, professional lines.
Burnt Wood Keepsake Box Lid

Any small box feels special when I burn a design on the lid—think fern fronds, a compass rose, or a monogram in burnt wood. I’ve found that shallow, clean wood burning lines look more polished on boxes than super dark shading.
Possibly helpful picks:
- Unfinished Wooden Box with Lid: Choose a smooth, unfinished wooden box as the perfect blank canvas for your custom botanical or monogram designs.
- Pyrography Pen Starter Kit: Create fine, clean lines and intricate details effortlessly with a versatile wood burning tool kit designed for beginners.
- Carbon Transfer Paper: Easily trace your fern or compass designs onto the wood surface to ensure precise and professional-looking burn lines.
Patterned Wooden Planter Wrap
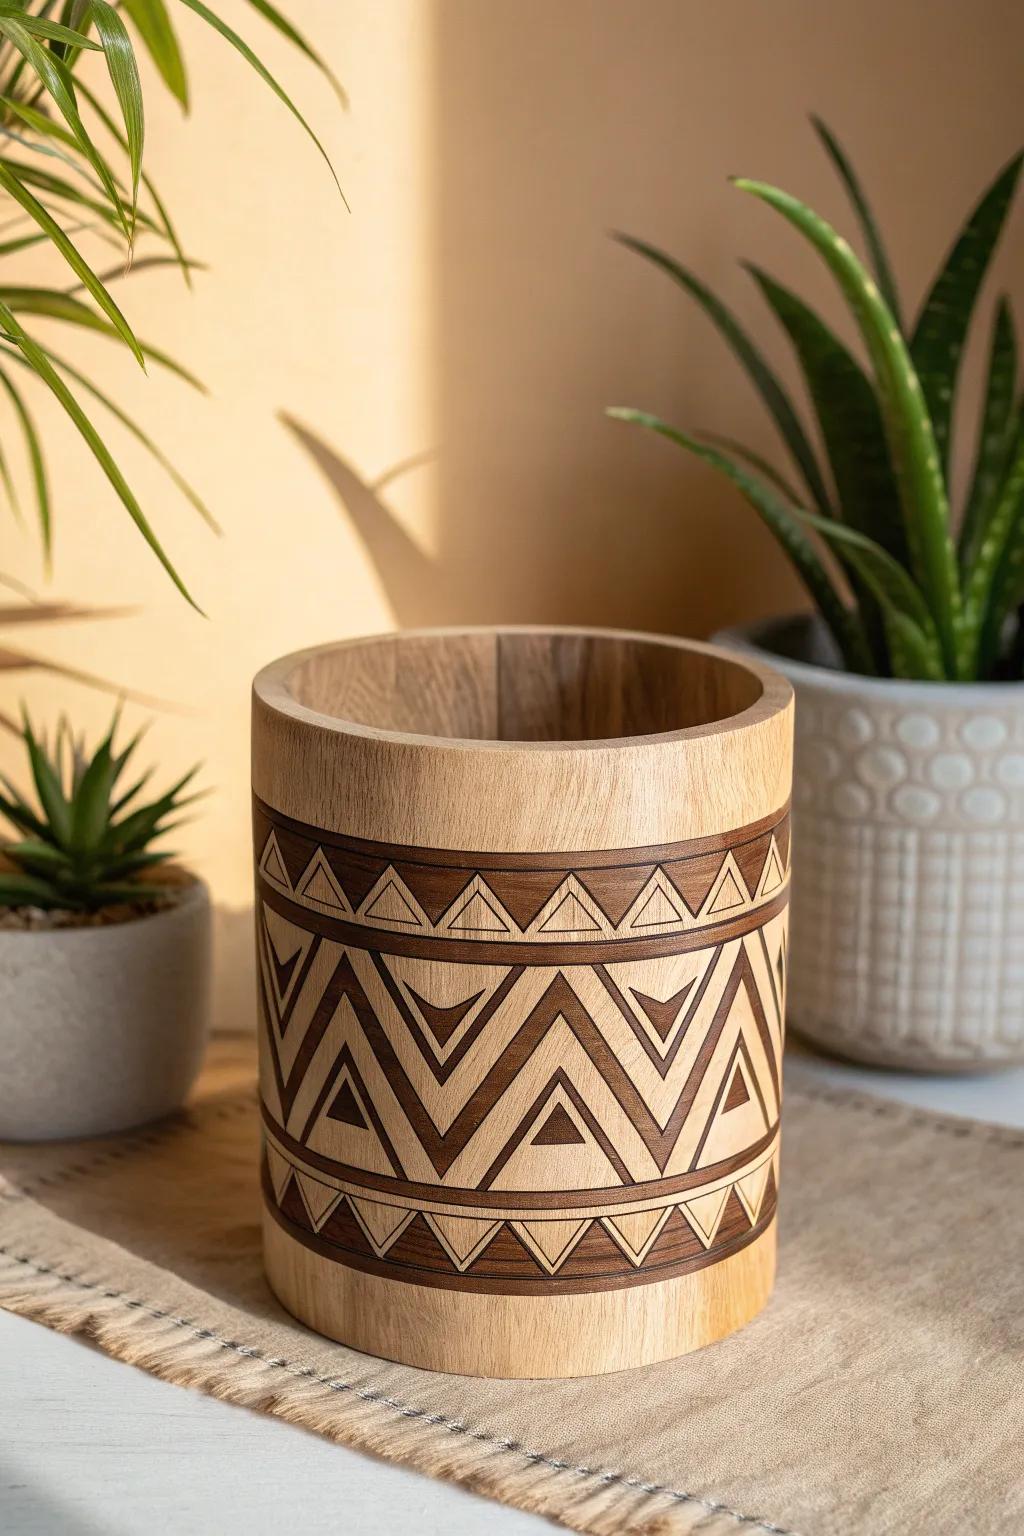
I’ve added burnt wood geometric bands to a simple planter sleeve, and it’s such a good way to make greenery look intentional. From my own trial-and-error, bold patterns beat tiny details here because outdoor light makes pyrography look softer.
A few helpful options:
- Pyrography Wood Burning Kit: Create bold geometric patterns precisely with a versatile wood burning kit featuring multiple interchangeable tips for detailing.
- Unfinished Wooden Cylinder Planter: Start your project with a blank canvas using a smooth, unfinished wooden vessel ready for custom designs.
- Geometric Stencils for Wood: Achieve symmetrical and clean lines effortlessly by tracing these reusable geometric stencils before you start burning.
Cozy Candle Holder Details

I like burning a vine or star pattern around a wooden candle holder so the burnt wood design catches the glow at night. I’ve learned to keep the burn work on the outside only, so the piece stays pretty and practical.
Might be a good match:
- Wood Burning Pyrography Kit: Create your own unique vine and star patterns on candle holders with this essential crafting tool.
- Unfinished Wooden Cylinder Blocks: Start your project with these blank wooden bases that are perfect for carving and wood burning.
- Unscented Tea Light Candles: Complete your cozy wooden holder with these simple candles designed to fit perfectly inside standard cutouts.
Serving Tray With Burned Border
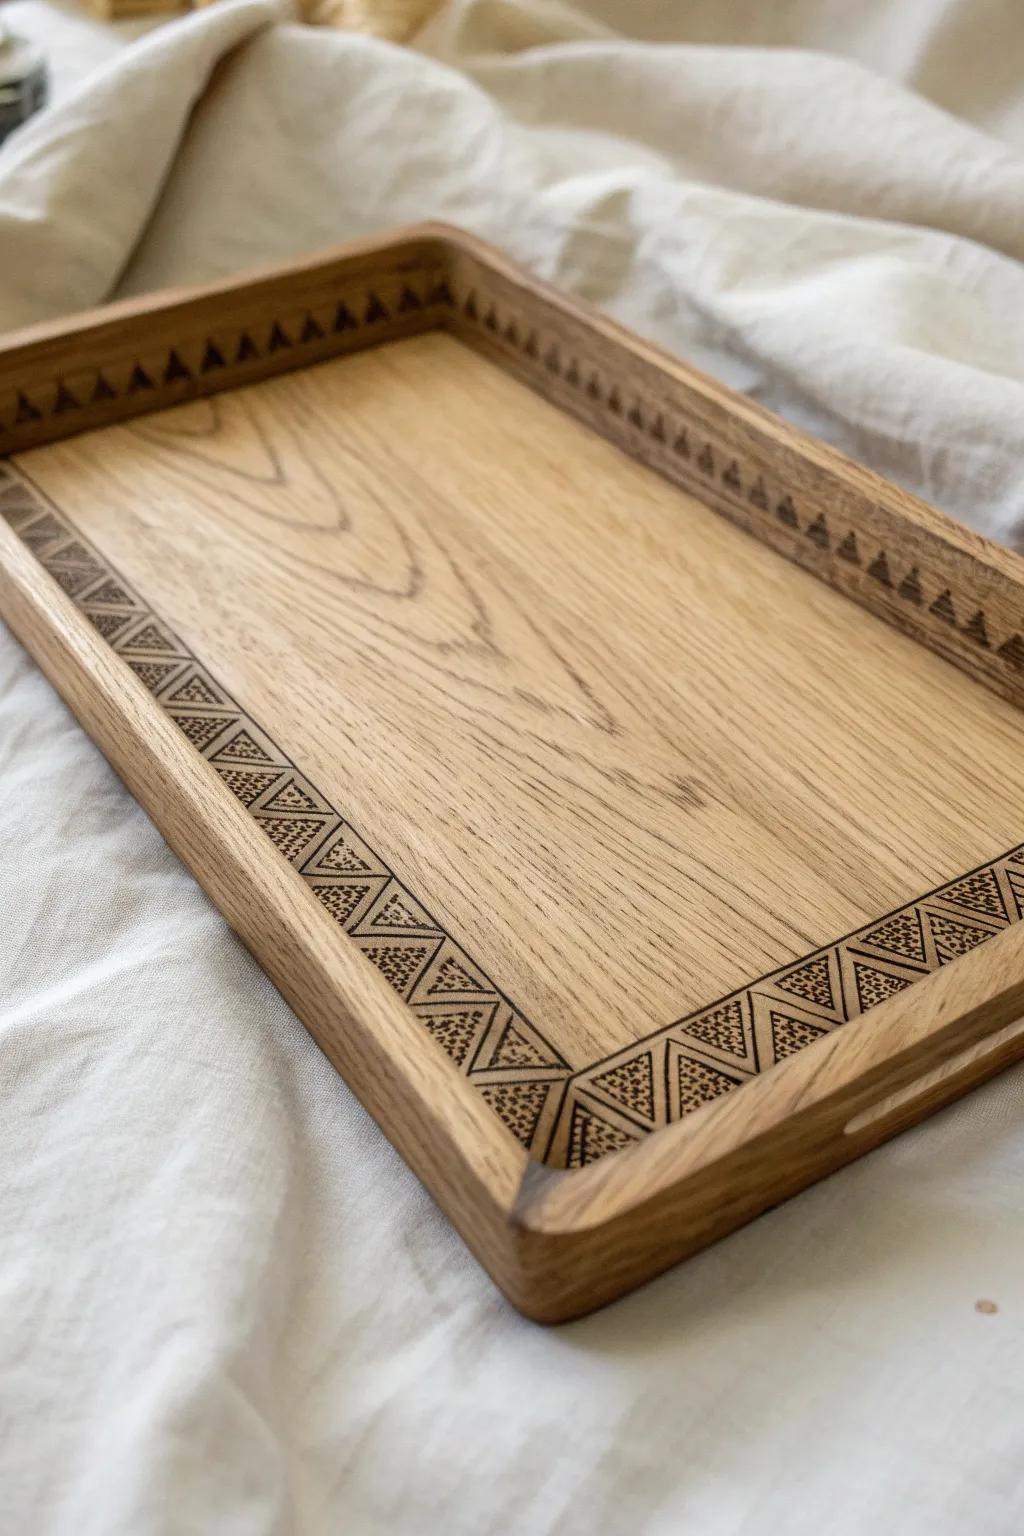
A wide tray is my go-to when I want a “big impact, low stress” wood burning project—just a border pattern and maybe a little centerpiece motif. I’ve made a few in burnt wood style, and they always end up living on the coffee table like decor.
Give these a look:
- Unfinished Wooden Serving Tray: Start your project with a smooth, untreated canvas perfect for creating your own custom burned border designs.
- Pyrography Pen Kit with Geometric Tips: Achieve precise, repetitive border patterns easily using a reliable wood burning tool with various stamping tips.
- Food-Safe Wood Finish/Sealant: Protect your finished artwork and wood surface from spills and stains with a durable, food-safe oil finish.
Burnt Wood Birdhouse Accents
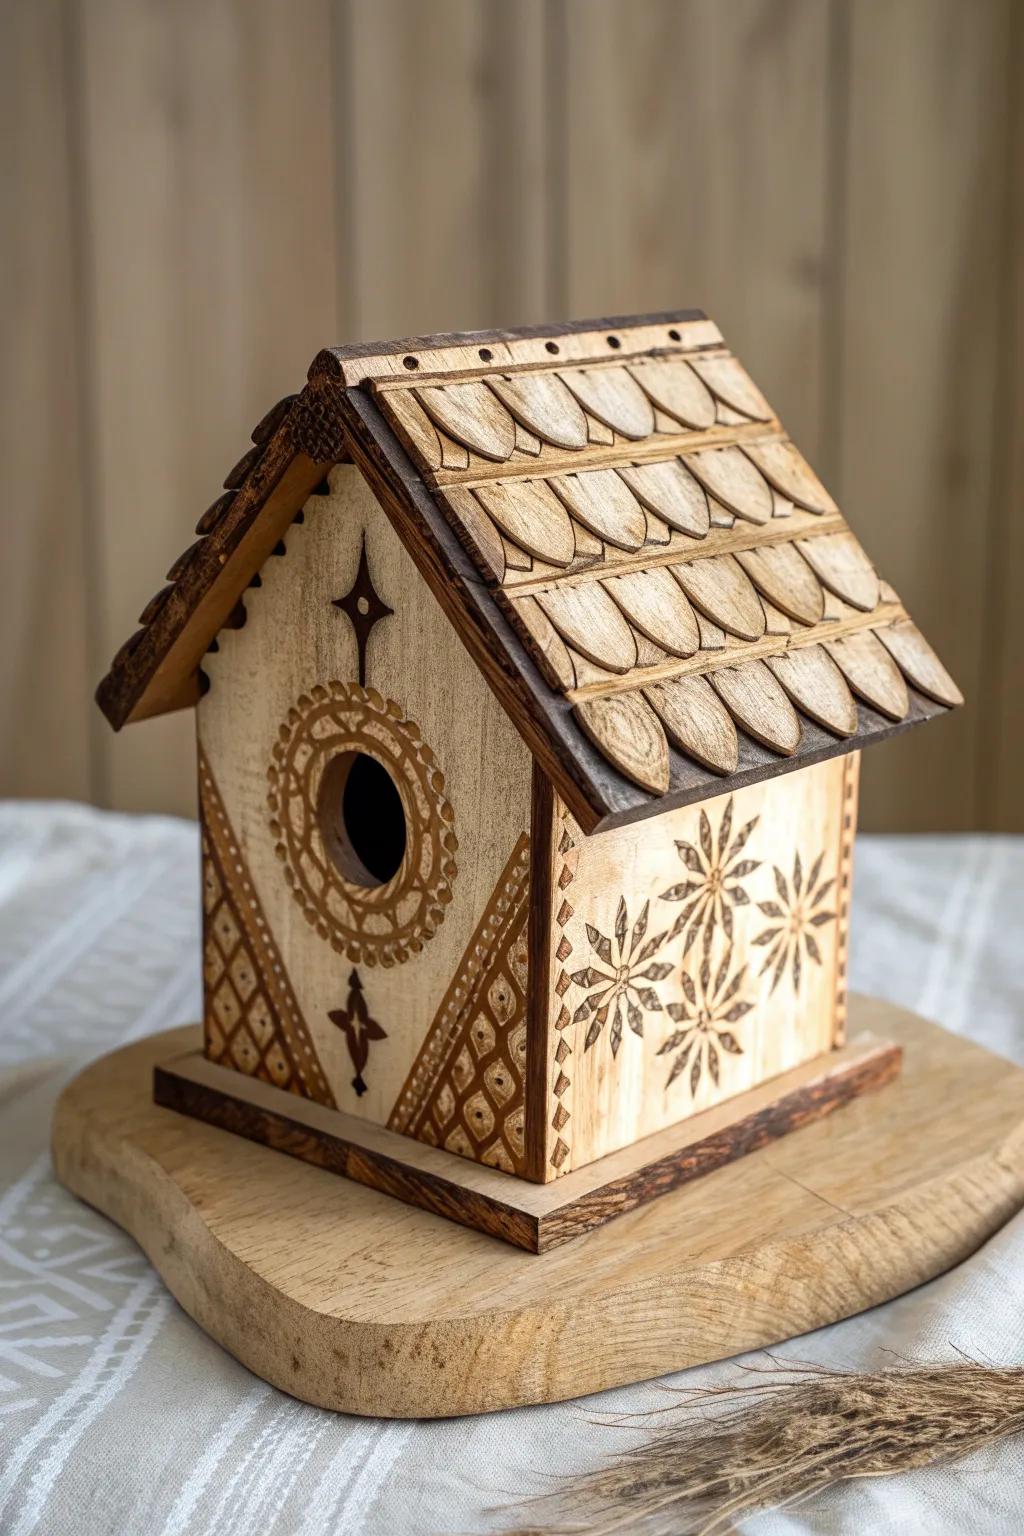
I’ve decorated a little birdhouse with burnt wood patterns and a tiny burned “roof shingle” texture, and it’s adorable without being precious. The best part is the burning hides minor imperfections, which is honestly why I love pyrography outdoorsy projects.
Products that could assist:
- Pyrography Wood Burning Kit: Create detailed patterns and textures on your birdhouse with a versatile kit featuring interchangeable metal tips.
- Unfinished Wood Birdhouse: Start your project immediately with a pre-built, untreated wooden birdhouse ready for your custom designs.
- Clear Outdoor Wood Sealer: Protect your burnt wood artwork from the elements with a durable, clear outdoor-rated varnish or sealer.
Furniture Makeover Burned Panel
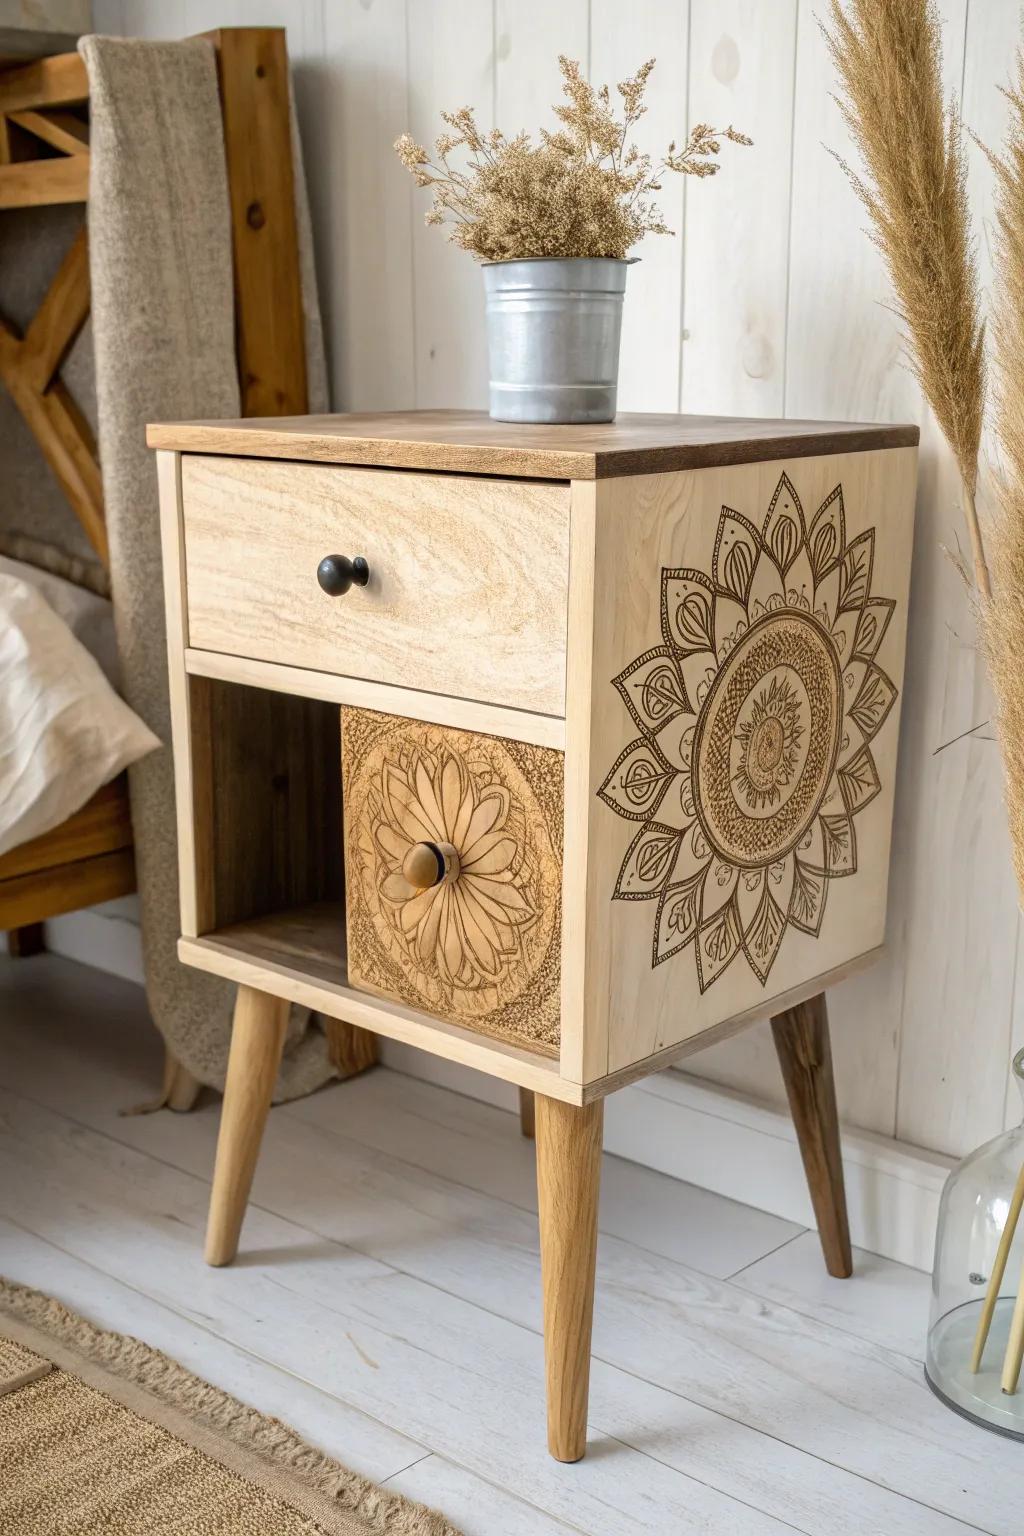
When I’m upcycling, I’ll burn a simple mandala or repeating lines onto a drawer front or stool top for a subtle burnt wood statement. I’ve done this on thrifted pieces, and that little wood burning detail makes the whole makeover feel custom.
Items that may come in handy:
- Wood Burning Pyrography Kit: Create your own detailed custom mandalas on furniture with a versatile tool featuring adjustable temperature controls.
- Mandala Stencil Set: Easily trace perfect geometric patterns onto wood surfaces to guide your burning for professional-looking results.
- Large Graphite Transfer Paper: Transfer your complex printed designs directly onto wooden drawers or panels clearly before you start burning.
Charred Wood Accent Mosaic
I’ve made small wall panels by lightly torch-charring strips and arranging them into a simple pattern, and the burnt wood texture is just unreal in person. Brushing back the soot a bit gives that classic shou sugi ban vibe without needing a giant project.
Check if these fit your needs:
- Handheld Propane Torch Head: Achieve that authentic charred finish safely; use this tool to lightly burn wood strips for deep texture.
- Wire Brush for Wood Distressing: Reveal striking wood grain details by brushing away excess soot after charring to create the perfect rustic look.
- Unfinished Wood Slats or Lath: Start your mosaic project right with pre-cut wooden strips ready for your custom burning and arrangement.
Constellation Night-Light Panel
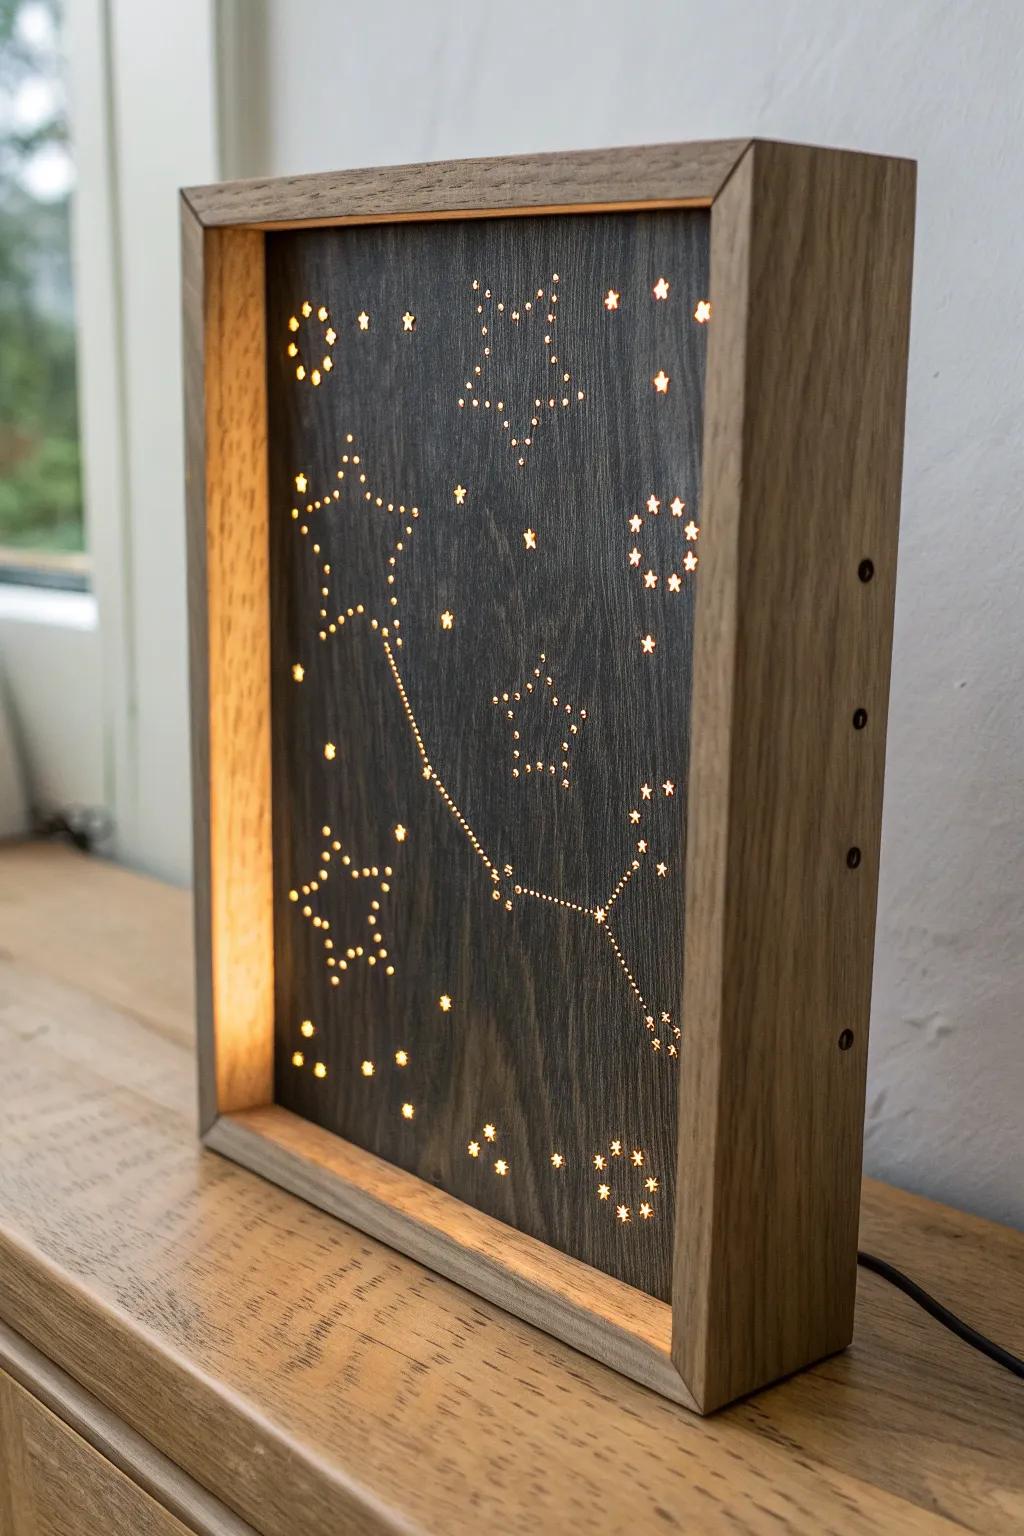
For a real wow moment, I burn a dark burnt wood sky gradient, drill tiny “star” holes, and mount it in front of a soft backlight so it glows. I made one as a gift, and the combo of wood burning plus light-through-holes still feels a little magical every time I see it.
Maybe worth checking out:
- Pyrography Pen Kit: Create detailed burnt wood designs and darken your panel surfaces effectively with a versatile, adjustable-temperature wood burning tool.
- Precision Hand Drill Set: Cleanly create tiny, accurate star holes in your wood panel without splitting the grain using these fine manual tools.
- Warm White LED Strip Lights: Provide the soft, magical glow behind your constellation panel with these easy-to-install, cuttable, and dimmable adhesive lighting strips.

