
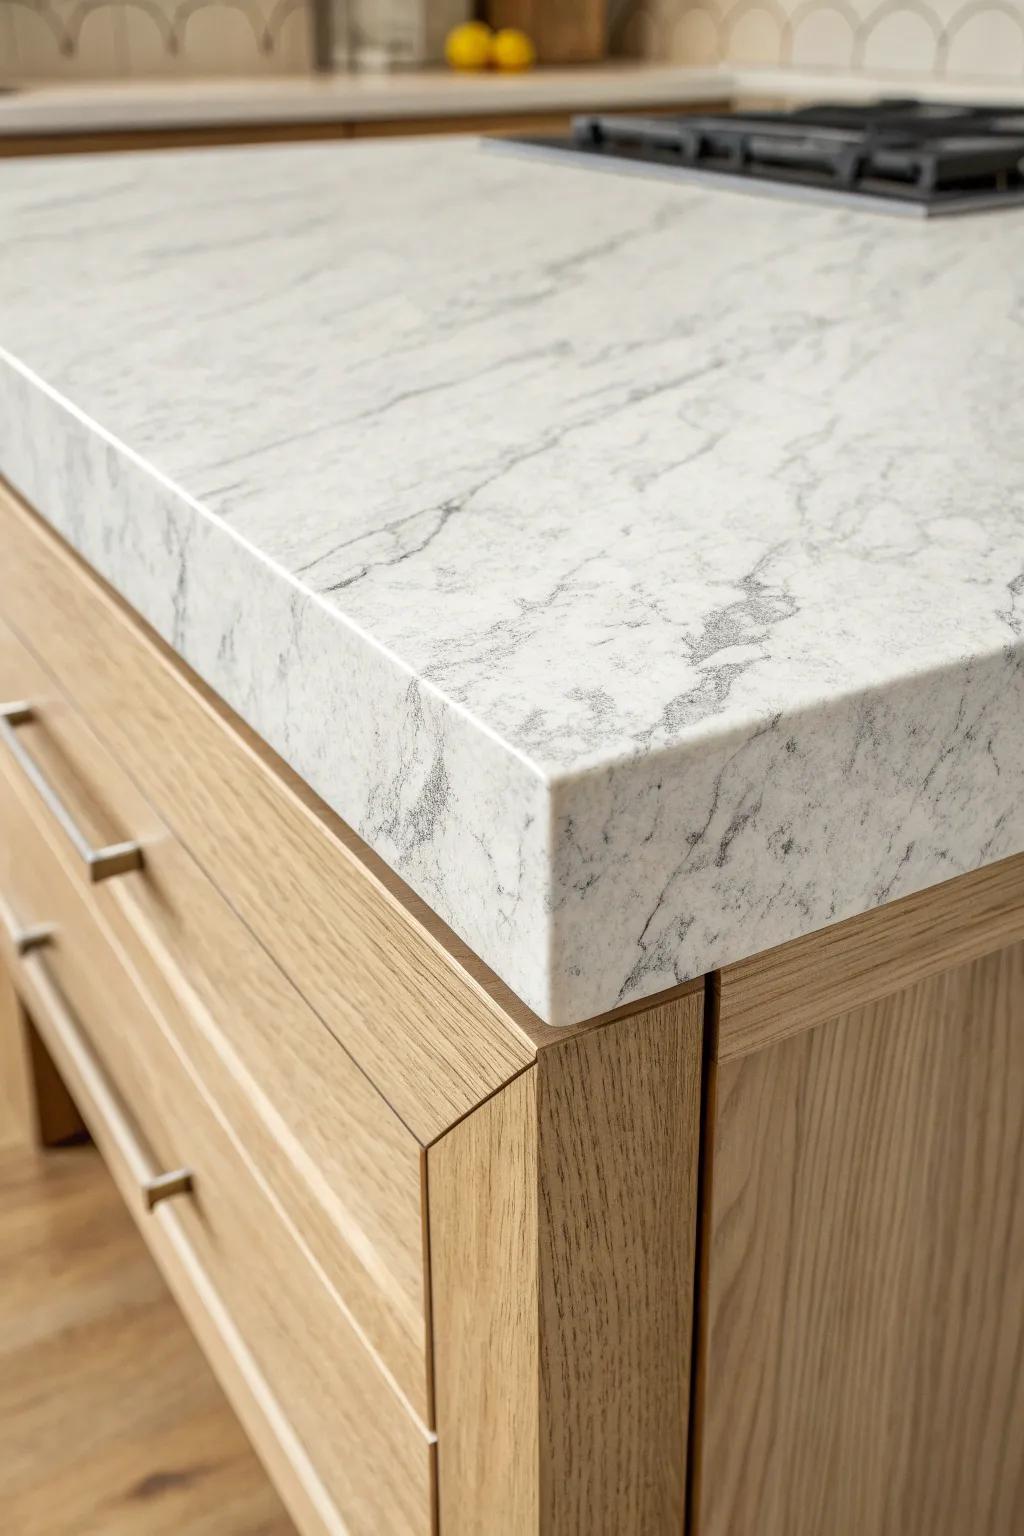
A great countertop can still look unfinished if the edge is rough, chipped, or just a little too plain. I’ve trimmed a lot of countertop edges in my workshop, and the right detail can make even a budget surface feel custom.
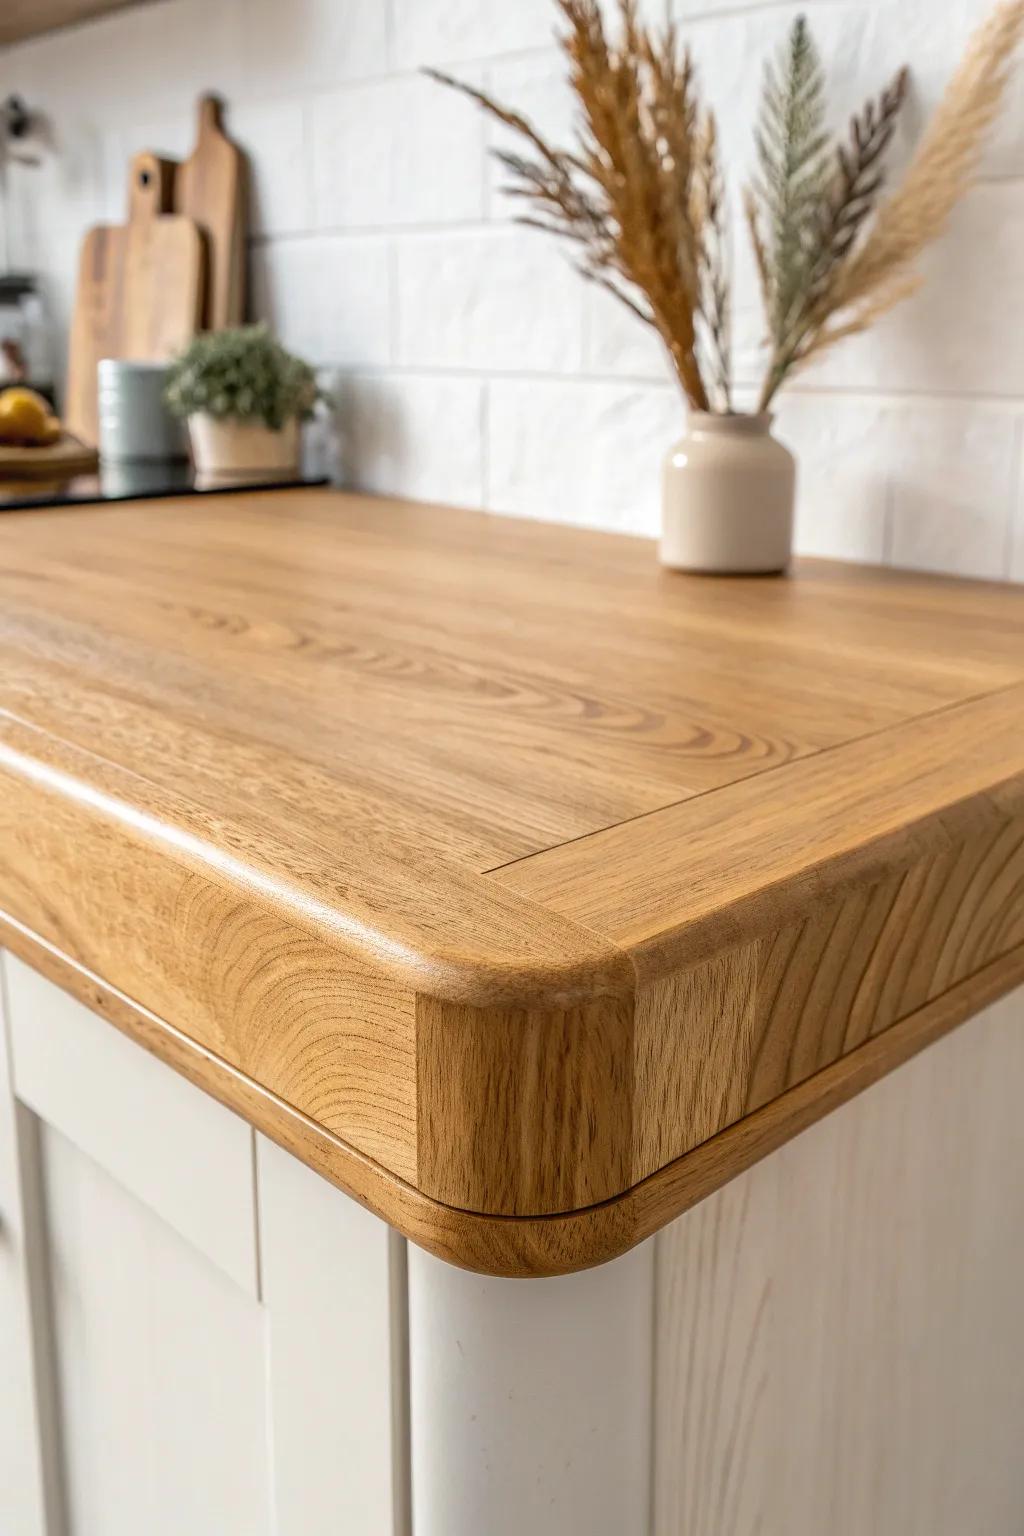
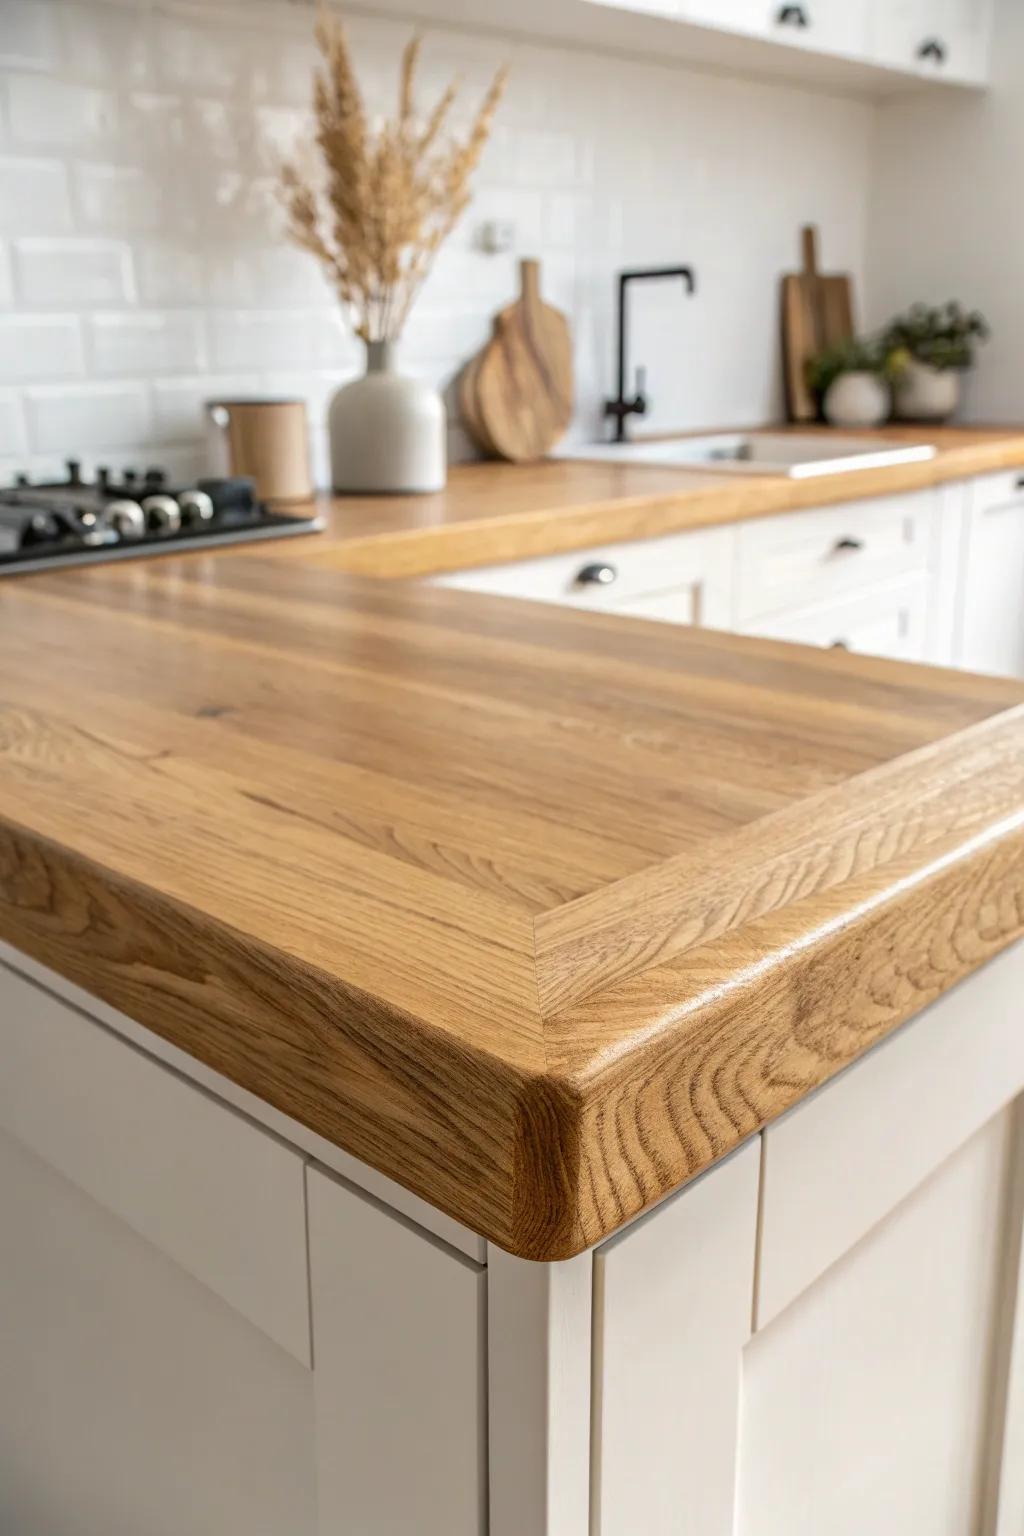
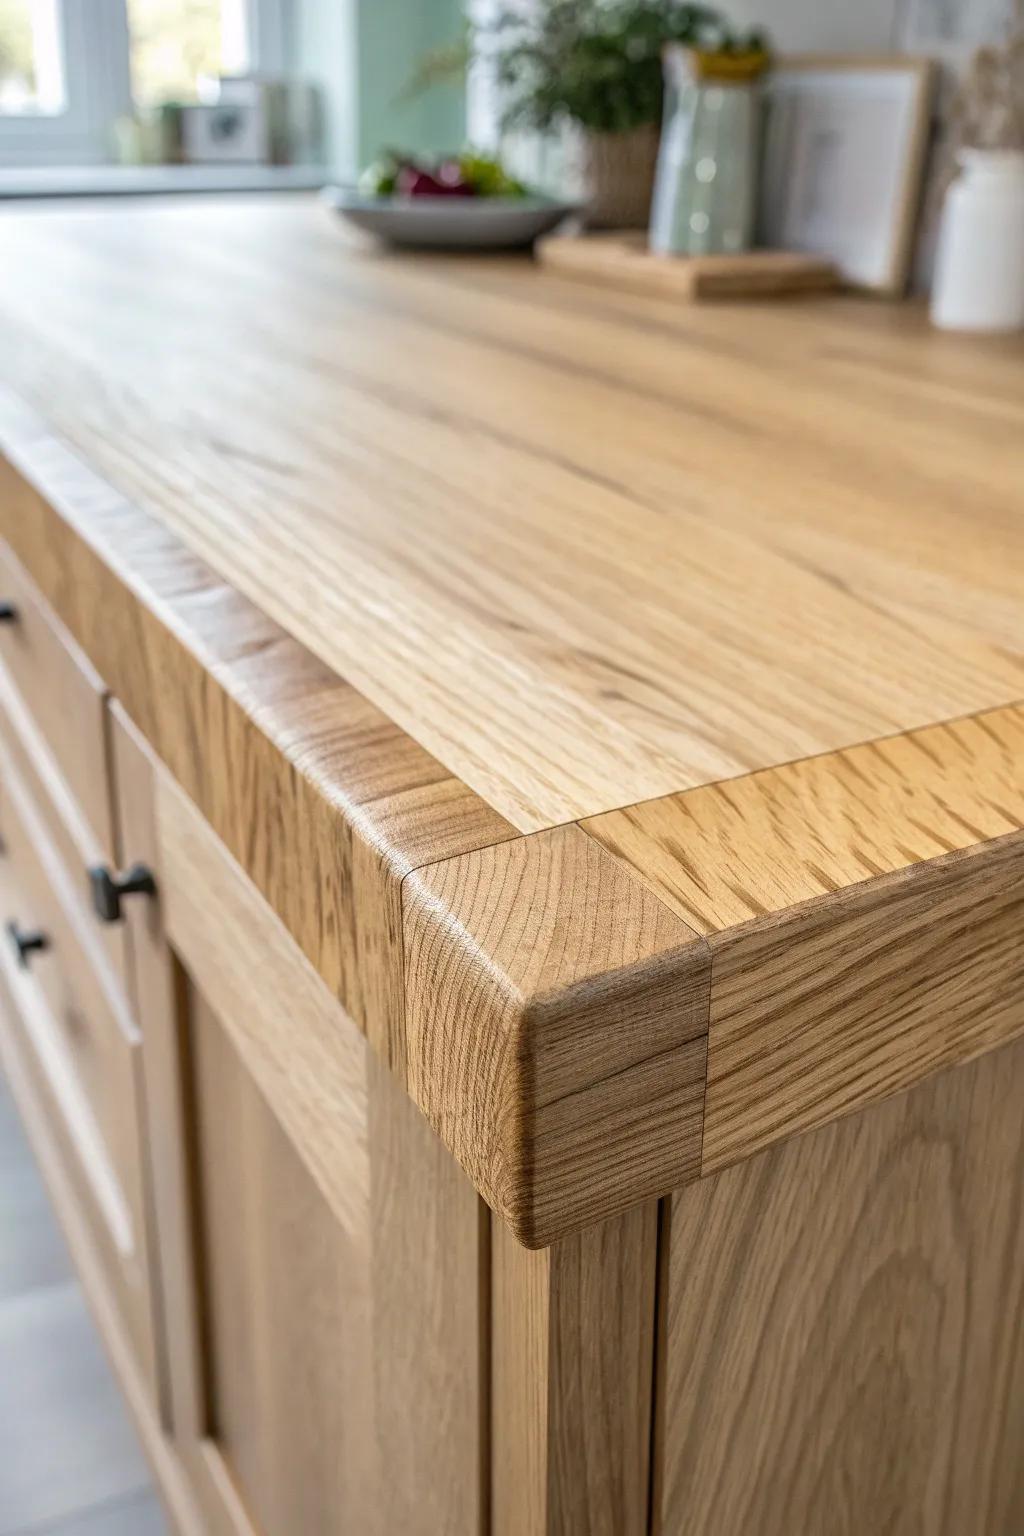
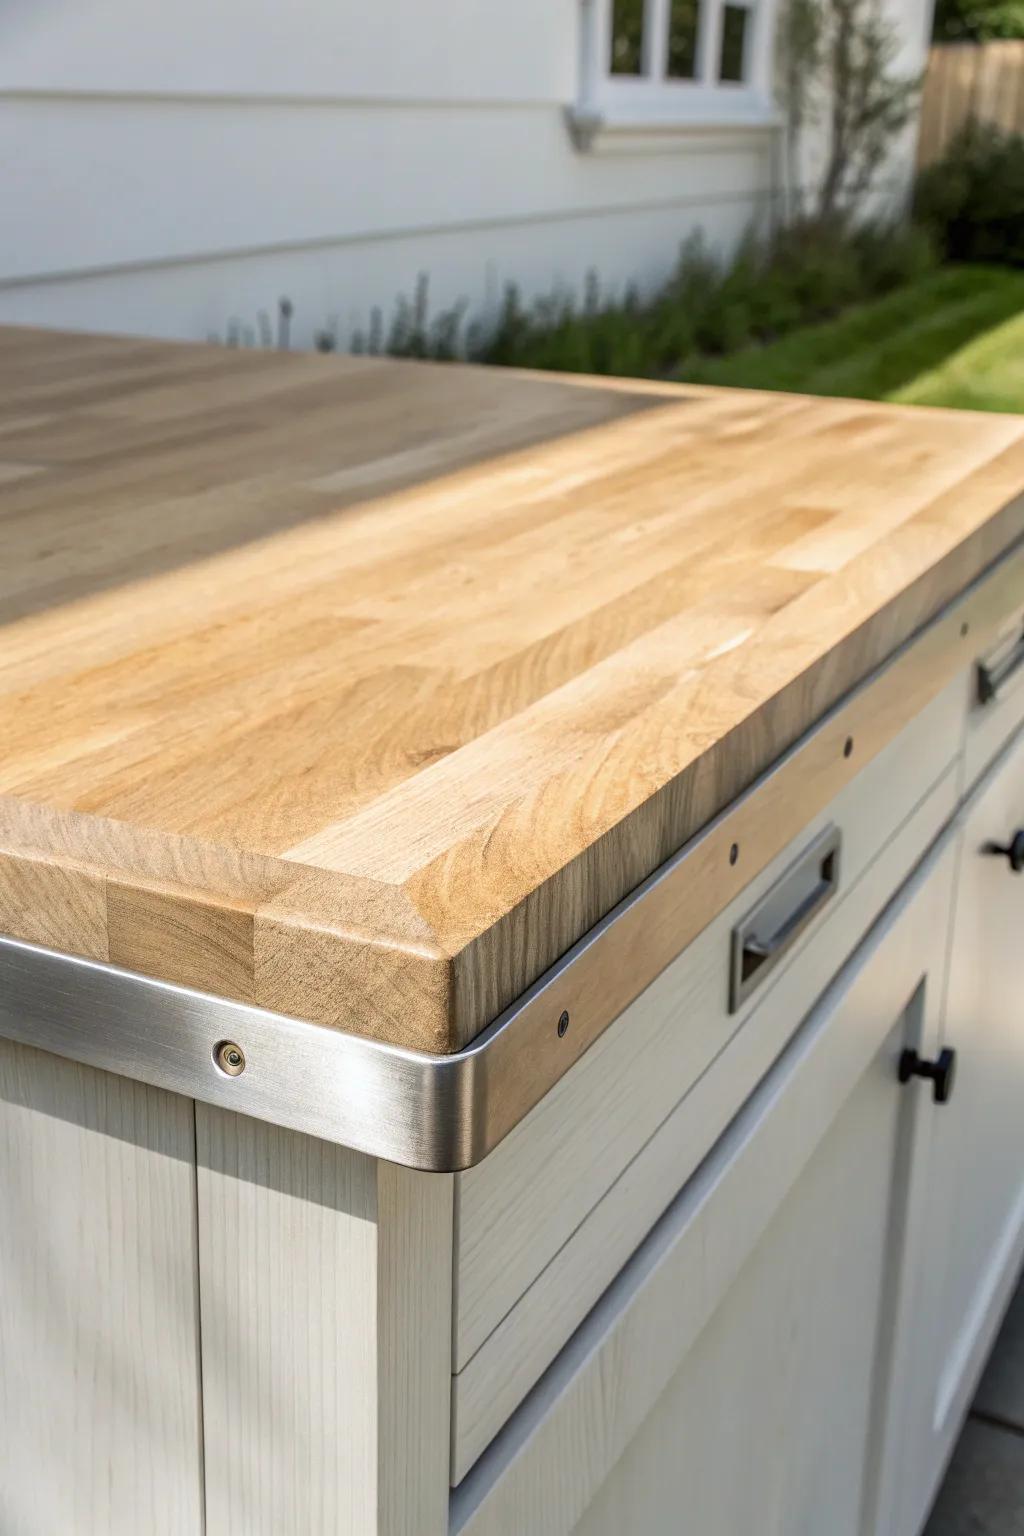
Mitered Thick-Slab Illusion
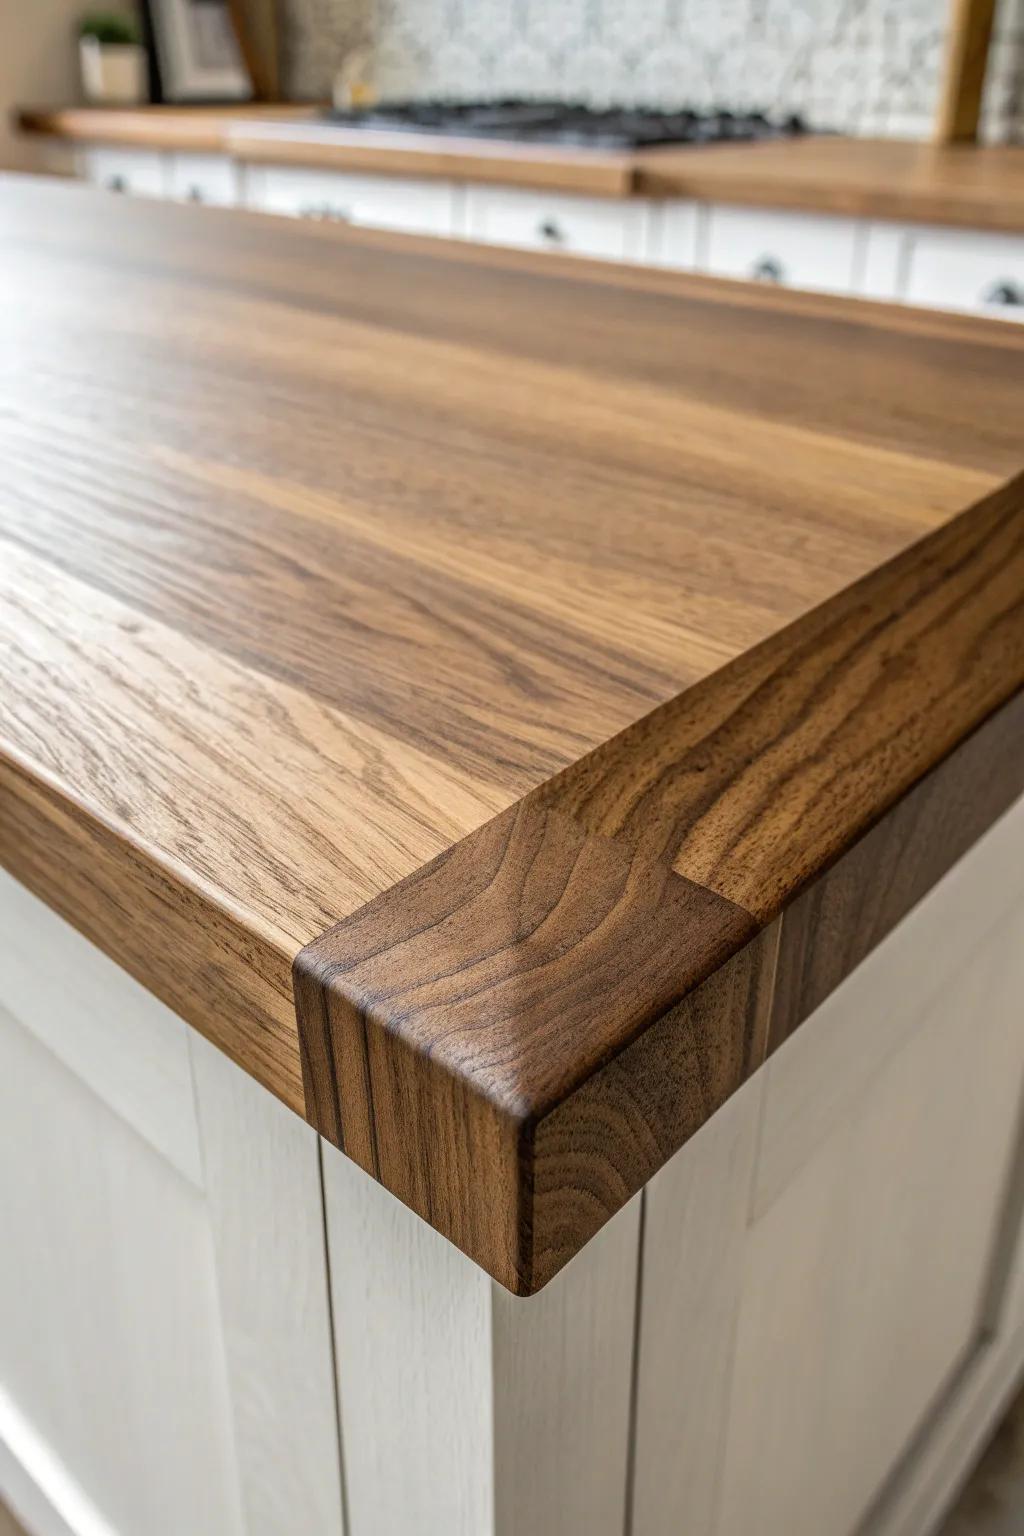
When a countertop is thin but you want it to look expensive, I build a mitered edge to create that bold, thick profile. The first time I tried it in my shop, I couldn’t stop staring because it read like one solid chunky slab.
Check if these fit your needs:
- Strong Wood Glue: Ensure a seamless, durable bond for your mitered edges to create that solid slab appearance.
- Corner Clamps (90 Degree): Hold your mitered pieces perfectly square while the glue dries for a professional-grade finish.
- Random Orbital Sander: Smooth out the joined edges to blend the seams invisibly, enhancing the thick-slab illusion.


Simple Eased Edge Trim
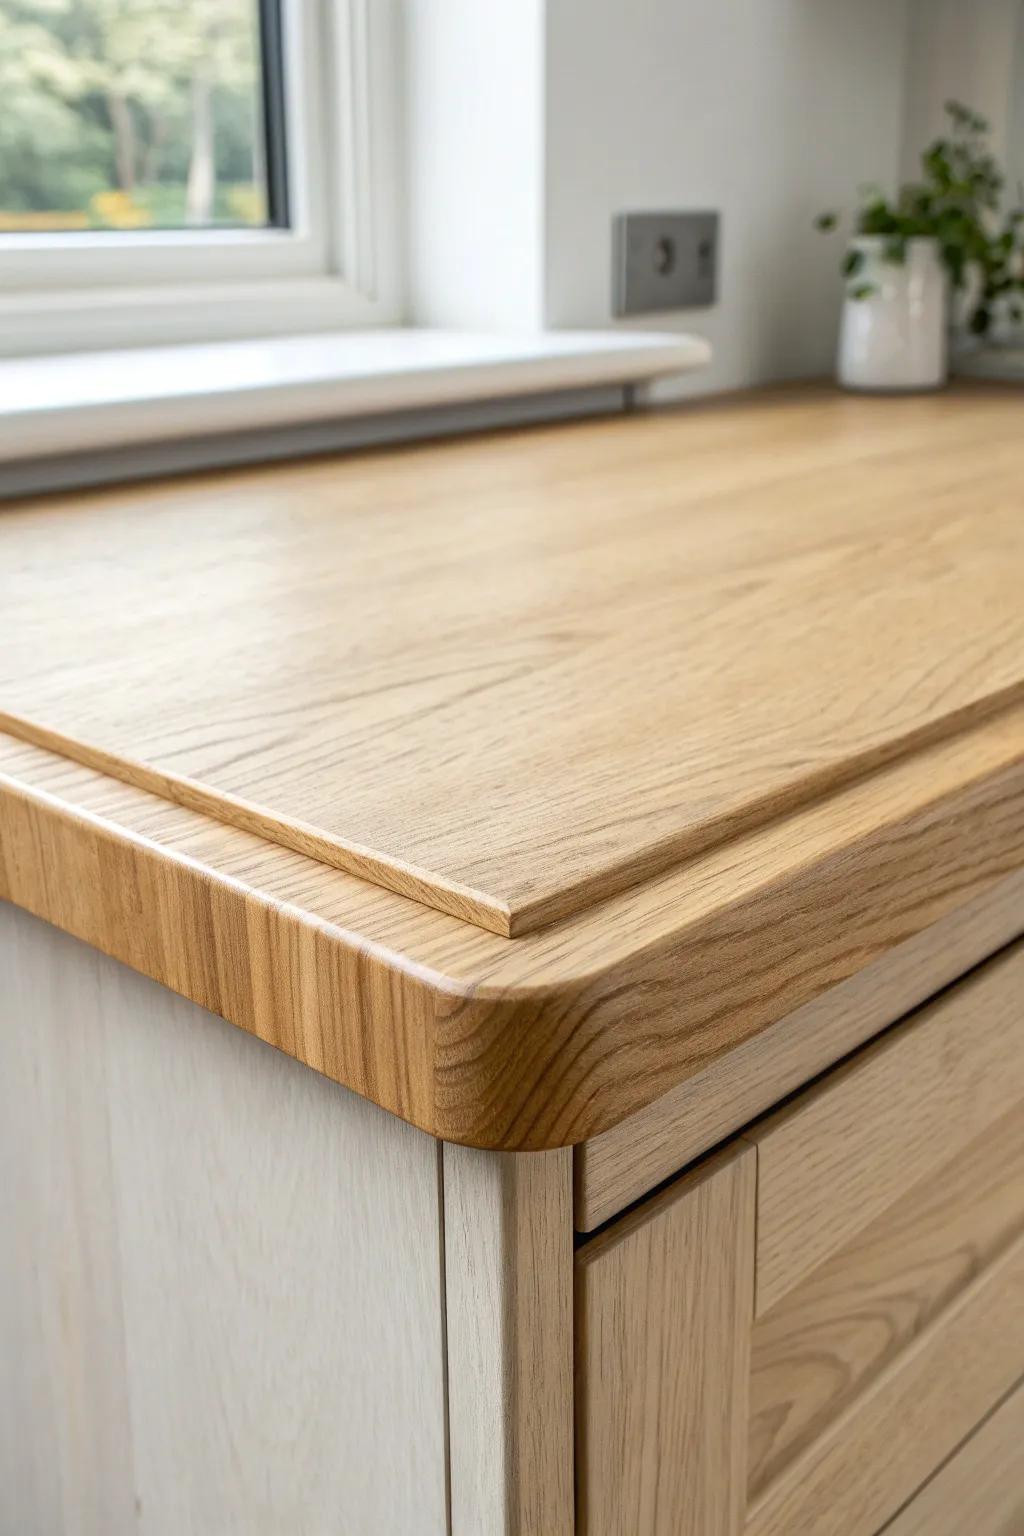
When I want a clean look fast, I soften the corner with an eased edge and add a tidy edge banding strip to protect the front. It’s my go-to for DIY upgrades because it feels modern without calling attention to itself.
Try these:
- Wood Edge Banding (Pre-glued): Apply this veneer strip easily with an iron to give plywood edges a solid, finished wood appearance.
- Edge Banding Trimmer Tool: Trim excess banding material cleanly and quickly for a perfectly flush edge without damaging your countertop surface.
- Corner Rounding Router Bit: Use this router bit to create that soft, eased edge profile on your solid wood trim pieces.
Classic Bullnose Edge Wrap
A bullnose edge is one of the comfiest trims to lean on, and I’ve used it a ton on family-friendly counters. I like how that rounded profile hides tiny dings and keeps the whole countertop edge feeling soft and finished.
Products that could assist:
- Wooden Bullnose Molding Trim: Add a smooth, rounded finish to your counters with this wood trim that helps soften sharp edges.
- Rounding Over Router Bit: Create your own custom bullnose edge on existing wood surfaces for a professional, seamless countertop look.
- Food-Safe Wood Finish & Sealer: Protect your new wooden edge trim from moisture and stains while enhancing the natural grain beautifully.

Crisp Beveled Edge Detail
I’m a sucker for a beveled edge because it catches light and makes the countertop look sharper in the best way. When I’ve added this trim in small kitchens, it instantly made the counter feel more “designed.”
You might give these a try:
- Butcher Block Countertop Oil: Protect your newly beveled edges and enhance the wood grain with this food-safe conditioning oil treatment.
- Chamfer/Bevel Router Bit: Create that precise 45-degree angled edge profile on your own solid wood slabs with this tool.
- Solid Oak Wood Edge Banding: Apply real wood veneer to raw edges if you lack solid slabs, then sand gently to shape.
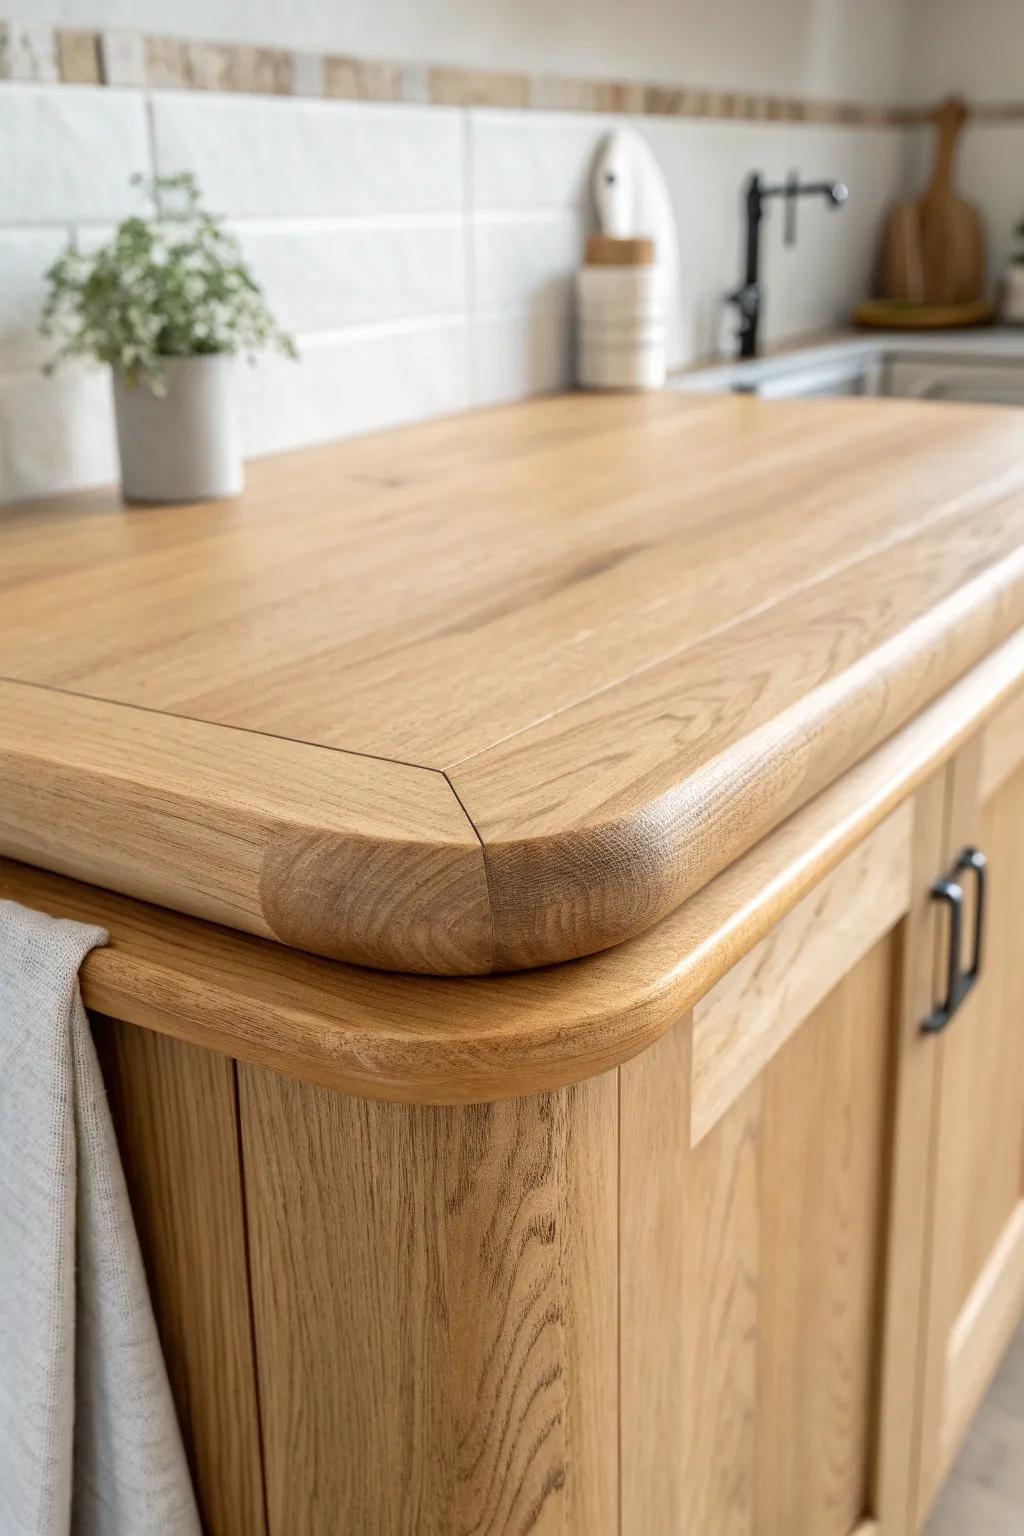
Half-Bullnose for Easy Cleanup
A half-bullnose edge gives you a gentle round on top while staying crisp underneath, and I’ve found it’s a sweet spot for busy kitchens. It’s one of those countertop edge trims that looks custom but doesn’t feel fussy.
Consider these options:
- Half-Bullnose Router Bit: Create this smooth, professional edge profile yourself on wood countertops for a custom, high-end kitchen finish.
- Butcher Block Conditioner: Protect your newly shaped wooden edges from spills and moisture while enhancing the natural grain’s beauty.
- Fine Grit Sanding Sponge: Ensure your rounded countertop edges are perfectly smooth and splinter-free before applying your final wood finish.
Waterfall Edge for Islands
A waterfall edge isn’t just a style move—it’s an edge trim strategy that protects the sides while looking ultra clean. I’ve helped friends plan this for islands, and it always turns the countertop edge into the focal point.
Check these products out:
- Marble or Quartz Contact Paper: Transform your existing island sides with peel-and-stick film to simulate that seamless, high-end waterfall stone appearance quickly.
- Stone Care & Sealer Kit: Protect your investment by using a high-quality sealer to prevent stains on your continuous stone surfaces and edges.
- Clear Corner Guards: Shield your vulnerable waterfall or cabinet edges from chips and everyday impact without hiding the beautiful stone design.
Wood Edge Banding on Laminate
For laminate counters, I love adding wood edge banding to cover that particleboard core and warm up the whole kitchen. I’ve done this with simple hardwood strips, and it’s shockingly effective for making laminate feel intentional.
Some ideas to consider:
- Real Wood Veneer Edge Banding: Apply this pre-glued iron-on veneer to exposed edges for a seamless, professional finish that warms up your laminate counters.
- Edge Banding Trimmer Tool: Use this handheld tool to easily slice off excess banding material, ensuring a flush and smooth edge every time.
- Heavy Duty Wood Glue & Clamp Set: Secure thicker hardwood strips permanently to your countertop core with reliable, strong-bonding wood glue and sturdy corner clamps.
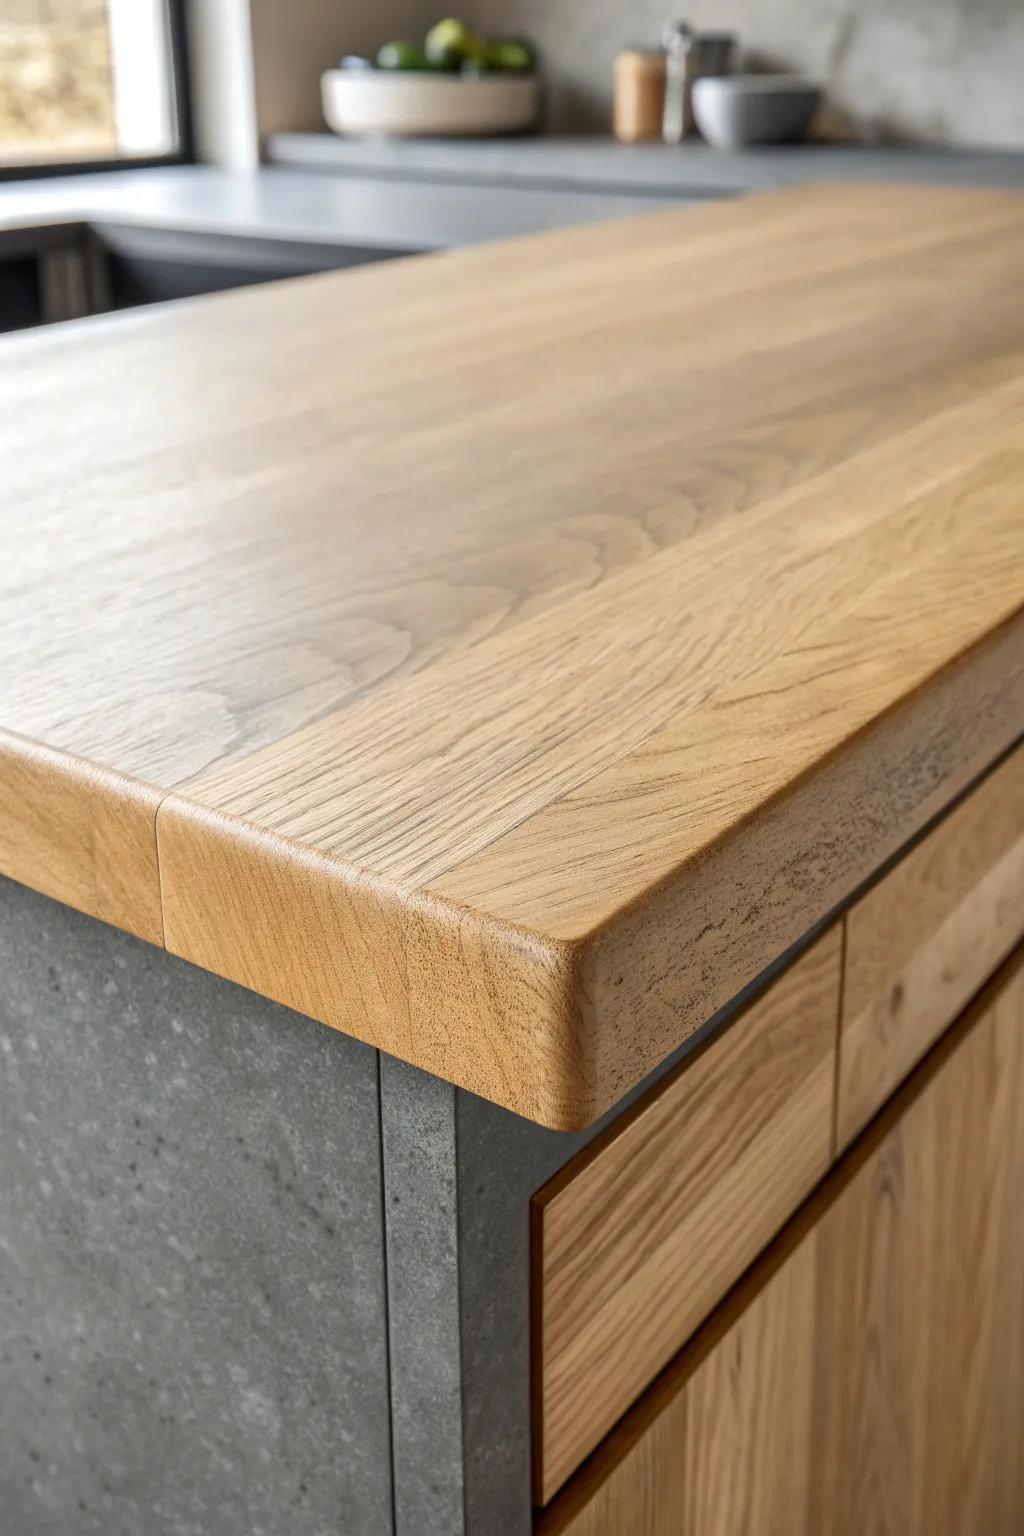
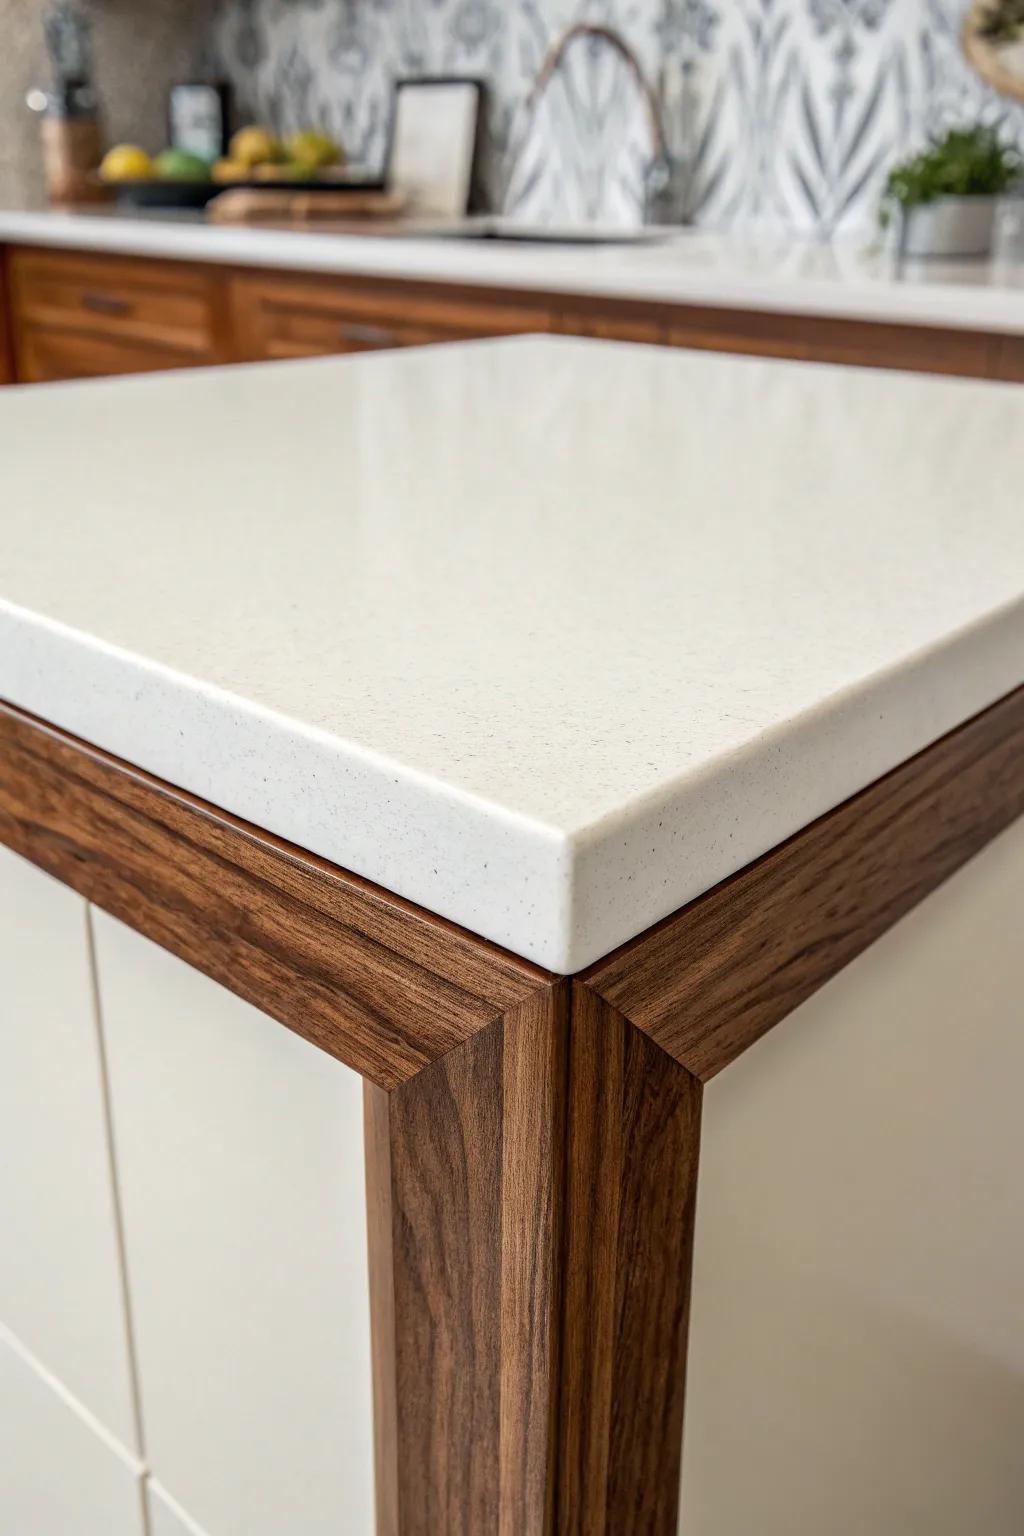
Built-Up Wood Nose Trim
If you want a thicker, sturdier front edge, I glue on a built-up edge strip and shape it into a smooth wood nose trim. I’ve used this trick on DIY wood countertops, and it adds weight and presence without replacing the top.
Give these a look:
- Titebond III Ultimate Wood Glue: Ensure a waterproof, professional-strength bond for your built-up edge pieces to guarantee long-lasting durability in kitchen environments.
- Heavy-Duty Parallel Clamps: Achieve seamless joints by applying even pressure across your wood strips while the glue cures for perfect alignment.
- Roundover Router Bit: Create that smooth, curved nose profile seen in the image by running this bit along your newly glued edge.
Tile Counter Metal Edge Trim
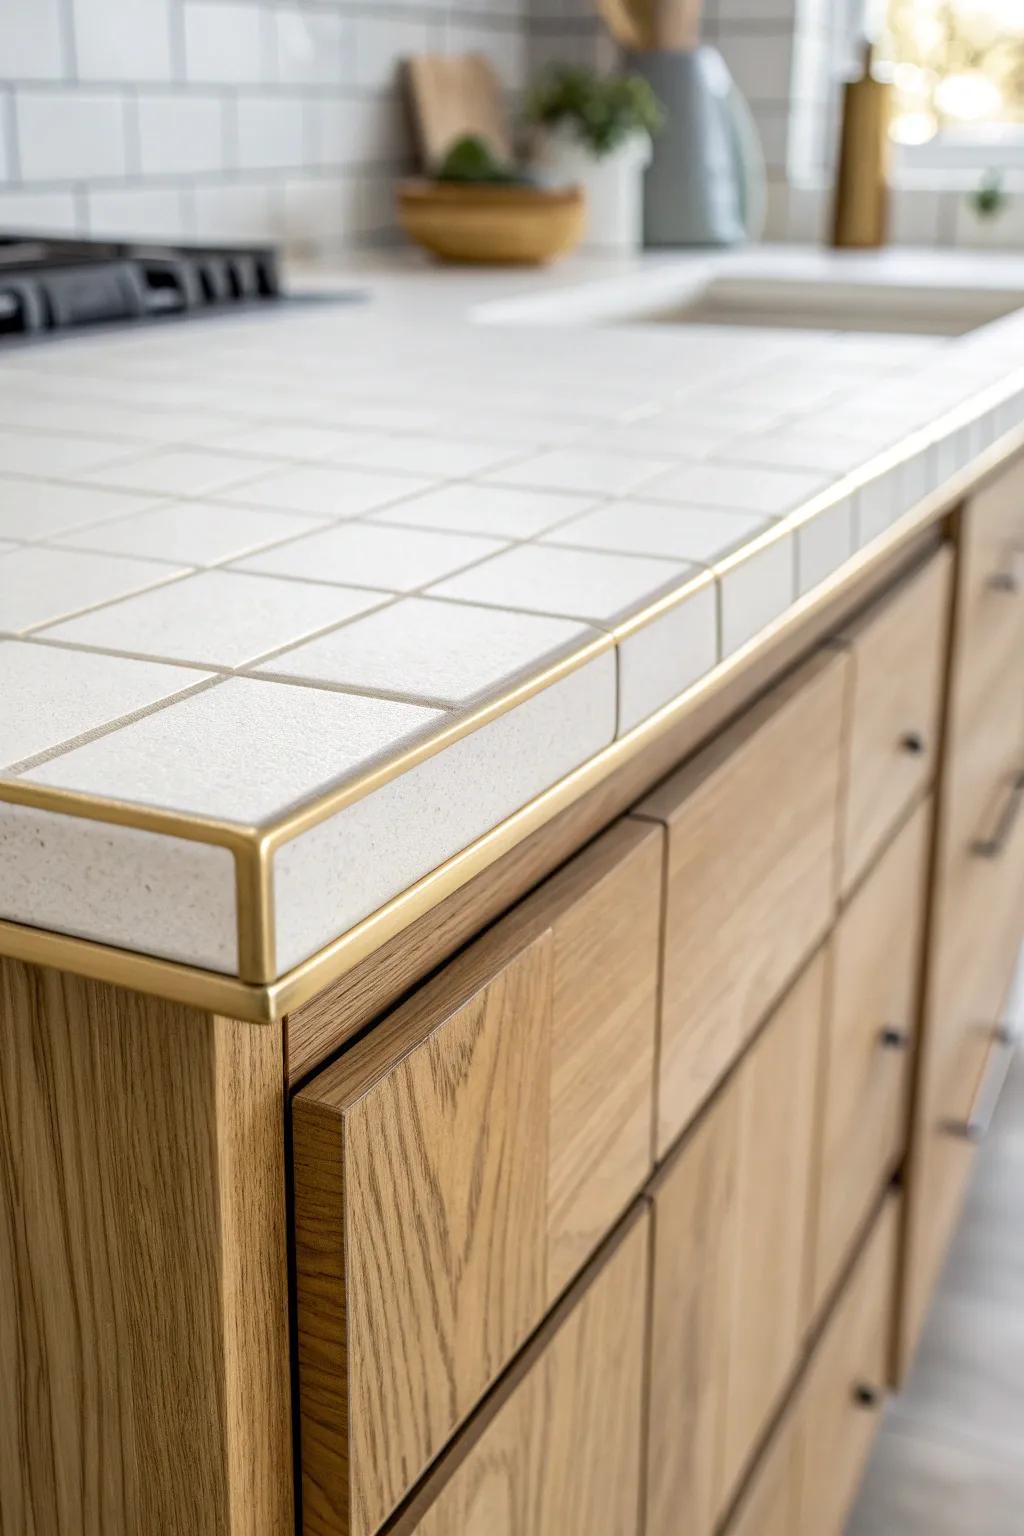
On tile countertops, I always recommend a metal tile edge trim because it protects the tile corners from chipping. I’ve installed these on a couple of makeovers, and that crisp line makes the whole tile edge look professionally finished.
Explore these options:
- Brass L-Shaped Tile Edging Trim: Protect your tile edges and achieve a sleek, premium finish with this classic brass L-shaped trim profile.
- Square Edge Metal Tile Trim: Create crisp, modern corners on your countertop while safeguarding delicate tile edges from daily wear and impact.
- Adhesive Installation Sealant: Ensure a secure, lasting bond for your metal trim installation with a high-strength, waterproof construction adhesive.
Wood Frame Trim Around Tile
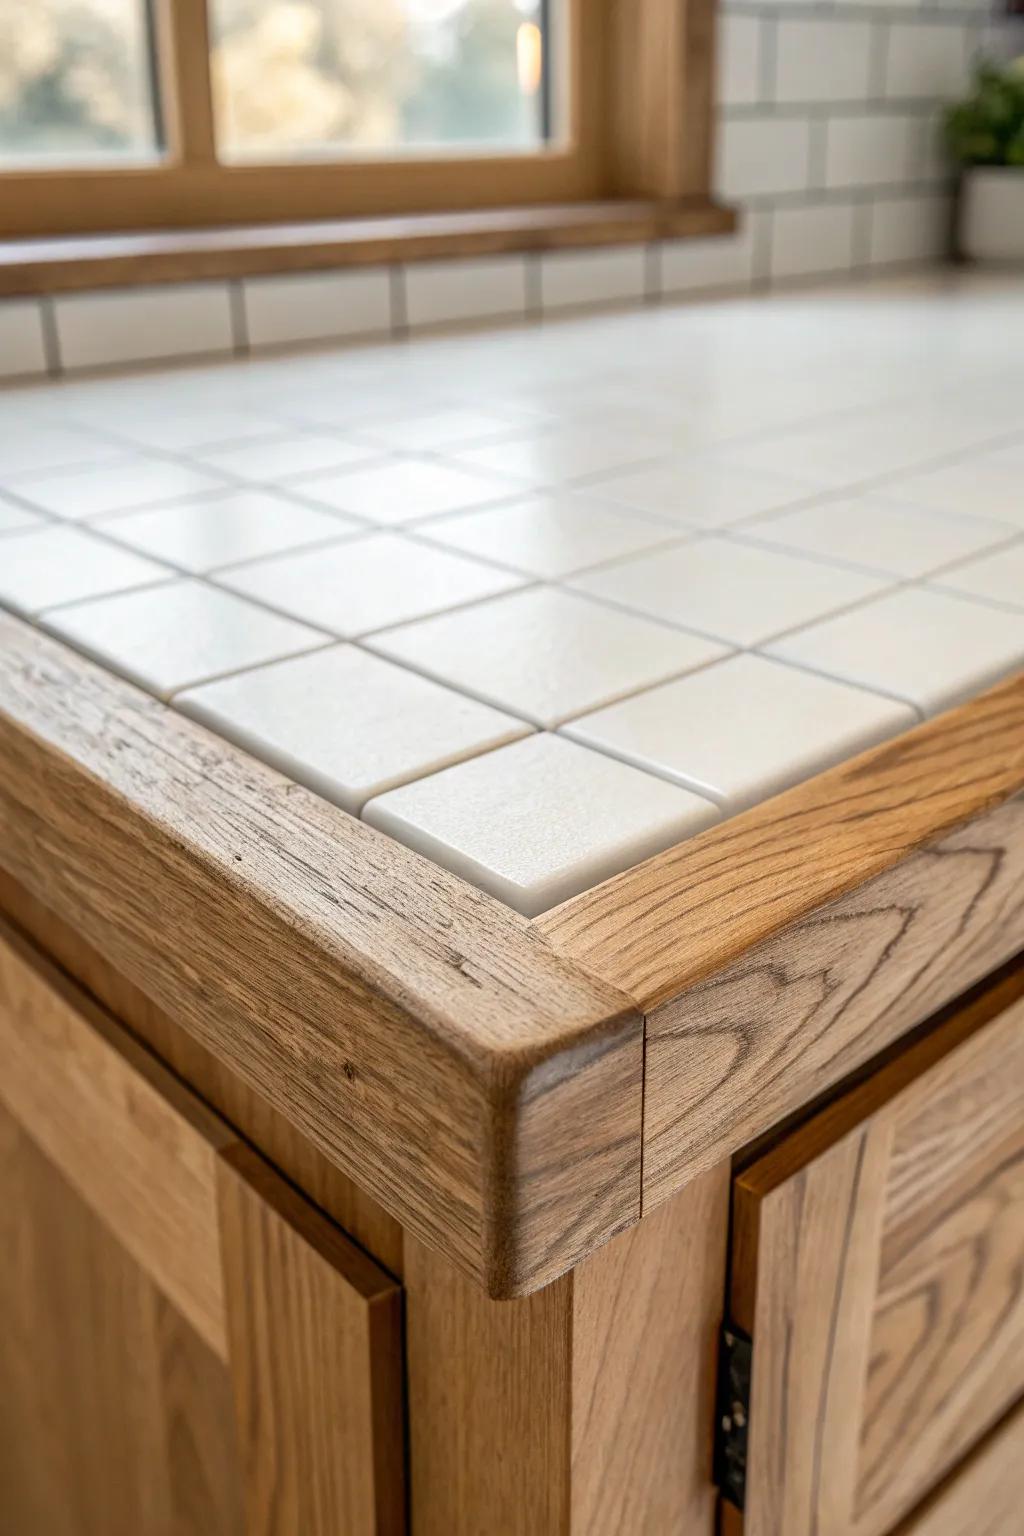
A wood border trim around a tile countertop gives you that cozy, farmhouse vibe and hides messy tile edges. I’ve done it with reclaimed wood, and the contrast between wood grain and tile is just chef’s kiss.
Might be a good match:
- Solid Oak Lumber Boards: Choose high-quality hardwood boards to create a durable, custom frame that perfectly matches your rustic kitchen aesthetic.
- Corner Braces and L-Brackets: Ensure your new wood trim stays securely attached to the countertop base with discreet, sturdy metal reinforcement.
- Food-Safe Wood Sealer: Protect your wood trim from kitchen spills and stains while enhancing the natural grain with a safe finish.
Stone-Look Laminated Edge Strip
When someone wants a seamless look on laminate, I use a matching edge strip so the countertop edge reads like one continuous surface. I’ve used this approach in rentals and it’s the fastest way to eliminate that “unfinished” side view.
Some handy options:
- Self-Adhesive Marble Pattern Edge Banding: Apply this peel-and-stick trim quickly to cover raw laminate edges with a seamless, stone-like finish.
- Iron-On Melamine Edge Banding (Stone Look): Use a household iron to fuse this durable strip onto your countertop for a professional, permanent bond.
- Edge Banding Trimmer Tool: Ensure perfectly flush and smooth edges after applying your strip by trimming excess material with this essential tool.
Retro Metal Banding Accent
A thin metal banding trim can give a countertop edge a cool vintage diner vibe, especially on lighter tops. I tried it once on a small prep counter and it instantly looked like a deliberate design choice, not a patch.
Items that may come in handy:
- Self-Adhesive Stainless Steel Flat Molding: Create a sleek, modern edge effortlessly with this peel-and-stick trim, perfect for adding instant metallic flair to counters.
- Aluminum Flat Bar Stock: Use these durable metal strips for a custom, authentic installation that offers a robust and industrial finish to edges.
- Decorative Metal Edge Banding Tape: Apply this flexible banding for a lighter-duty, cost-effective way to achieve that classic diner aesthetic on curved or straight edges.
Contrasting Dark Edge Outline
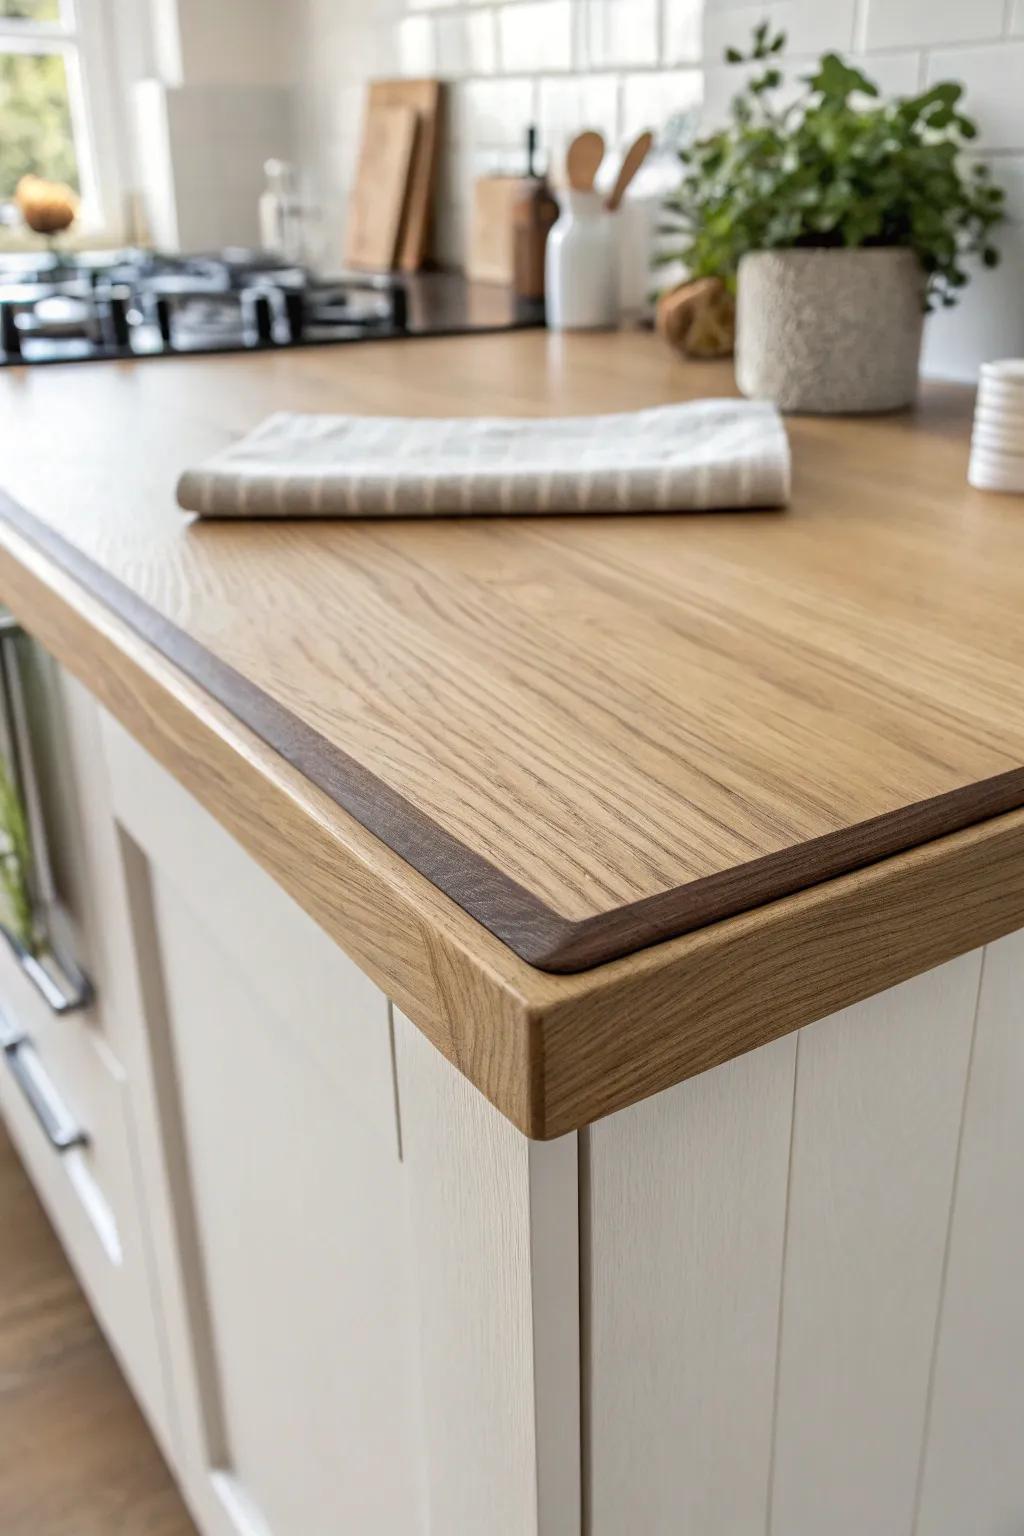
I love using a contrasting edge trim (like a darker wood strip) to outline the countertop and make the shape pop. I’ve done this on pale counters, and it’s such a simple way to add depth without changing the whole surface.
A few suggestions:
- Dark Wood Veneer Edge Banding: Apply this pre-glued iron-on banding to raw edges to quickly achieve that crisp, contrasting outline effect.
- Water-Based Dark Wood Stain: Use a small brush to carefully darken your existing wood trim for a customized, high-contrast look.
- Solid Wood Molding Trim: Attach this thin dark wood strip to your countertop edges for substantial borders and increased durability.
Rounded Safety Edge for Kids
If you’ve got little heads at counter height, I’m always pro rounded edge trim for peace of mind. I’ve softened and trimmed plenty of sharp corners, and it’s one of those upgrades you feel every day.
You might like:
- Corner Rounding Router Bit: Create your own smooth, child-safe edges on wooden countertops easily using this precision woodworking tool.
- Clear Corner Guards: Instantly soften sharp corners without tools; these adhesive bumpers provide a quick, temporary safety fix.
- Natural Beeswax Wood Polish: Keep your newly rounded wooden edges smooth and splinter-free by applying this protective natural finish.
Seam-Hiding Edge Cap Trim
For countertops with an awkward joint, I’ve used a slim edge cap trim to visually “finish” the front and distract from the seam. It’s not magic, but in my experience it makes the whole edge read cleaner and more uniform.
A few helpful options:
- Self-Adhesive Iron-On Wood Veneer Edge Banding: Apply this real wood banding to raw countertop edges for a seamless, finished look that conceals exposed grain layers.
- Flexible PVC Molding Strip with Adhesive Backing: Use this durable, peel-and-stick trim to quickly cover rough seams or damaged edges without needing specialized tools.
- L-Shaped Corner Guard Edge Protector: Install this sturdy angle trim to encase the countertop corner, hiding gaps while protecting the edge from impacts.
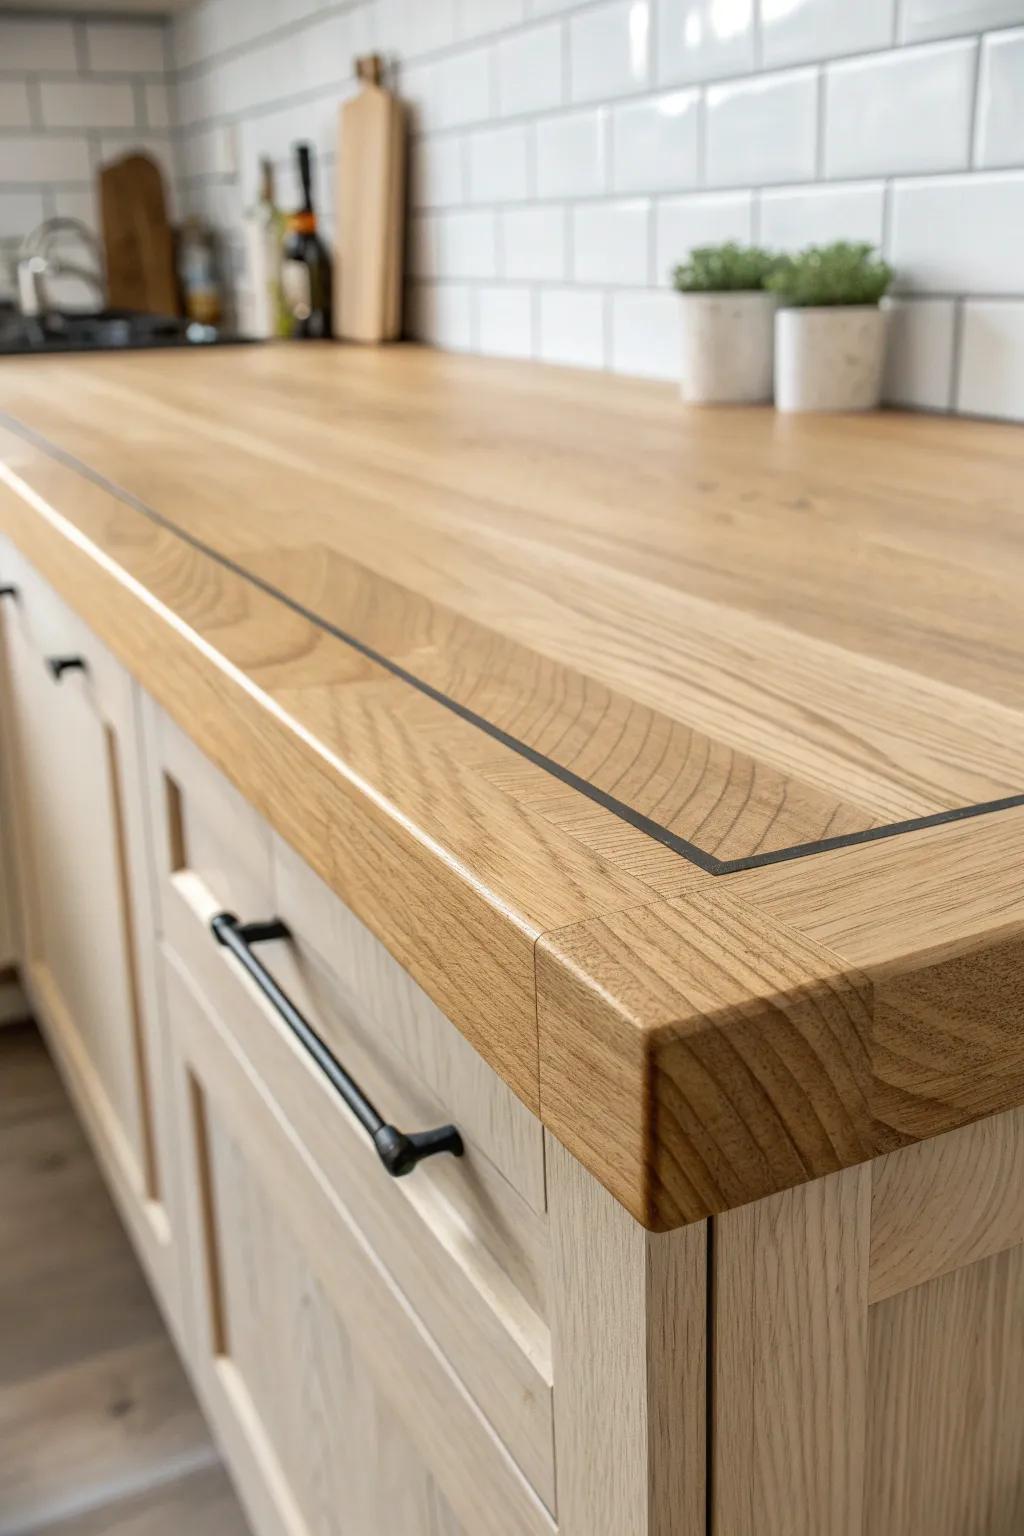
Inlaid Wood Strip Edge Detail
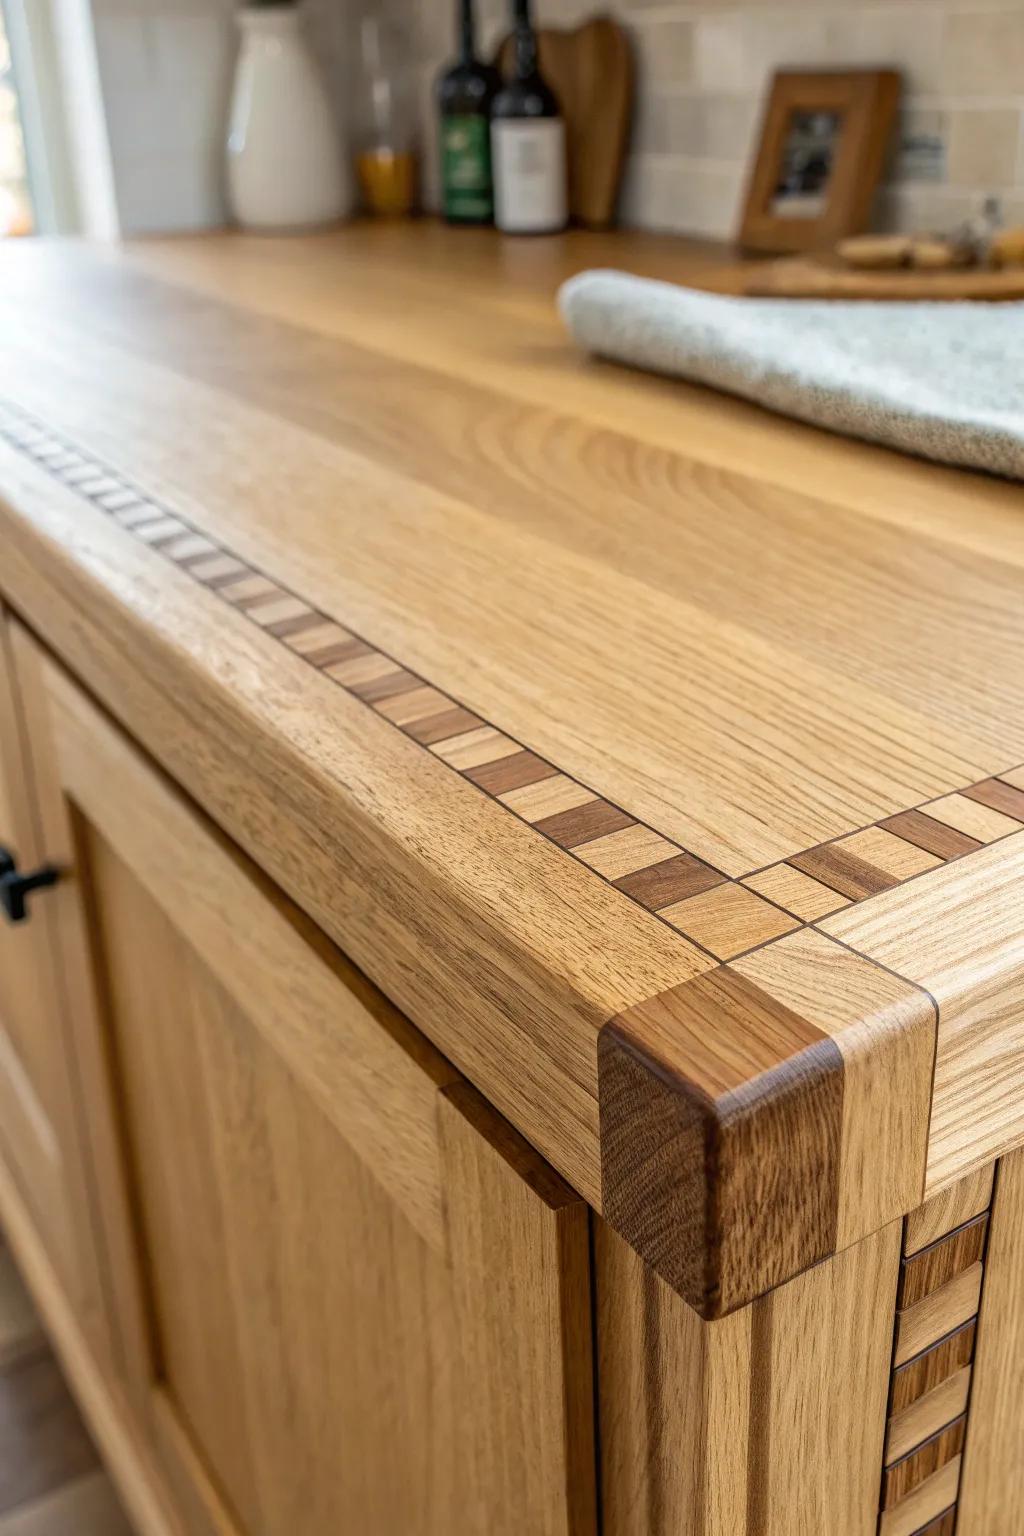
An inlay strip right along the countertop edge is a wow detail that still feels classy, especially with contrasting wood. I’ve routed a shallow channel for this before, and it turns the edge into a custom design feature.
Possibly helpful picks:
- Compact Trim Router: Carve precise channels and finish edges smoothly with a lightweight router designed for detailed woodworking tasks.
- Straight Router Bit Set: Create the perfect groove for your inlay strips with straight bits in various precise cutting diameters.
- Contrasting Wood Veneer Strips: Select beautiful, pre-cut dark wood strips to create a striking two-tone effect on your lighter countertops.
Leather-Wrapped Edge Trim
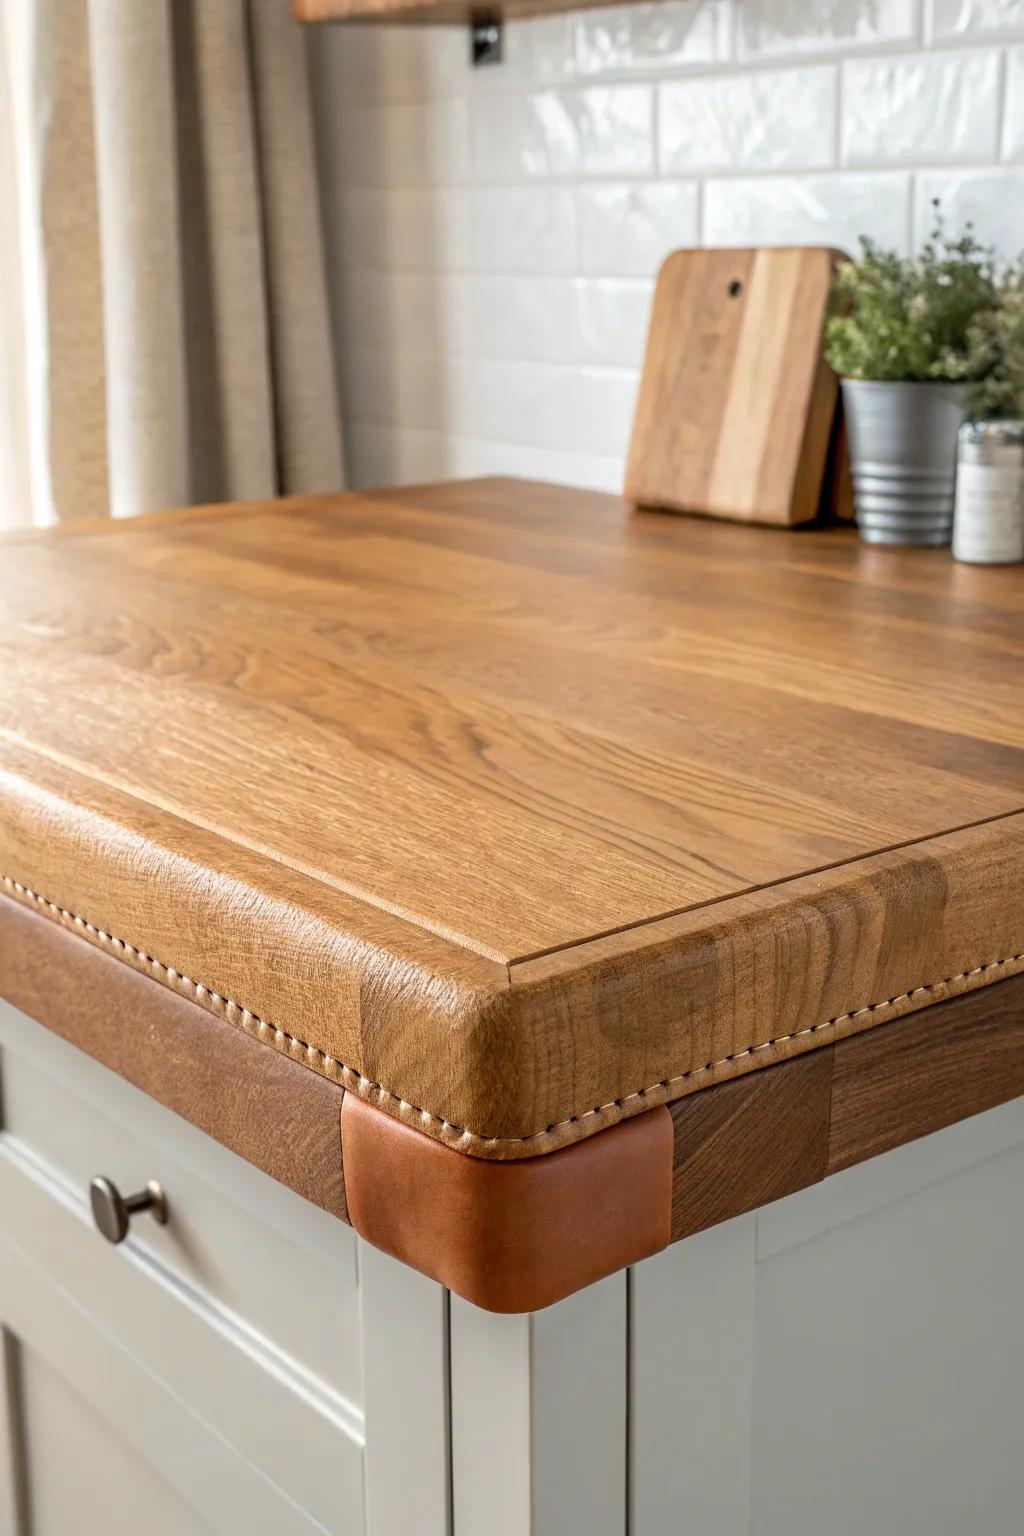
This one sounds wild, but a leather-wrapped edge trim can make a bar top or coffee station feel warm and tactile. I experimented with it on a small counter edge, and it looked like something you’d find in a high-end studio kitchen.
A few choices to try:
- Faux Leather Upholstery Tape: Wrap your countertop edges easily with this durable tape to instantly add warmth and a custom, high-end texture.
- Decorative Leather Corner Protectors: Add a distinct, stylish accent to sharp corners while protecting them from wear using these specialized leather guards.
- Heavy Duty Leather Stitching Kit: Achieve that authentic, handcrafted look by adding custom stitching details to your leather trim with these essential tools.
Rope-Inset Nautical Edge Trim
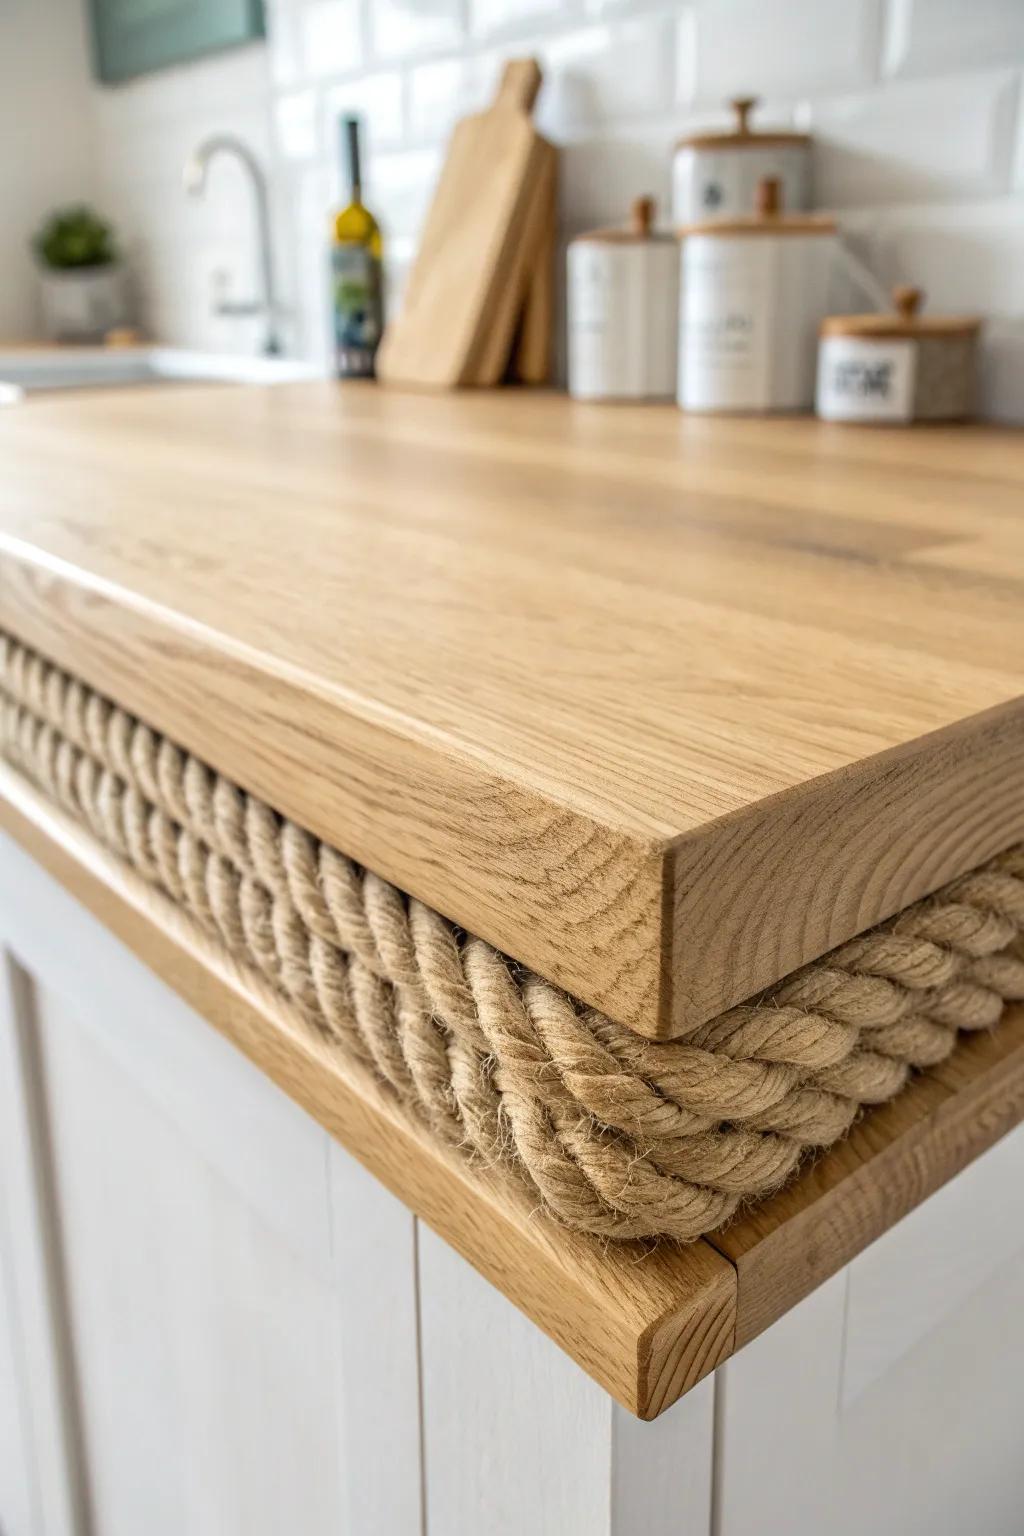
For a quirky cottage look, I’ve inset a sealed rope inlay along the countertop edge so it sits flush and protected. It’s definitely a conversation starter, and it gives the edge trim a handcrafted, vintage feel.
Maybe worth checking out:
- Thick Natural Jute or Manila Twisted Rope: Choose a thick, high-quality natural fiber rope to create that authentic nautical look for your countertop inlay project.
- Clear Waterproof Epoxy Resin Kit: Use clear, durable epoxy resin to seal the rope inlay, keeping it flush, sanitary, and protected from kitchen spills.
- Wood Router with Edge Guide: Carve the perfect channel for inset trim using a reliable router to ensure a clean, professional fit for the rope.
Embedded Stone Chips in Clear Edge
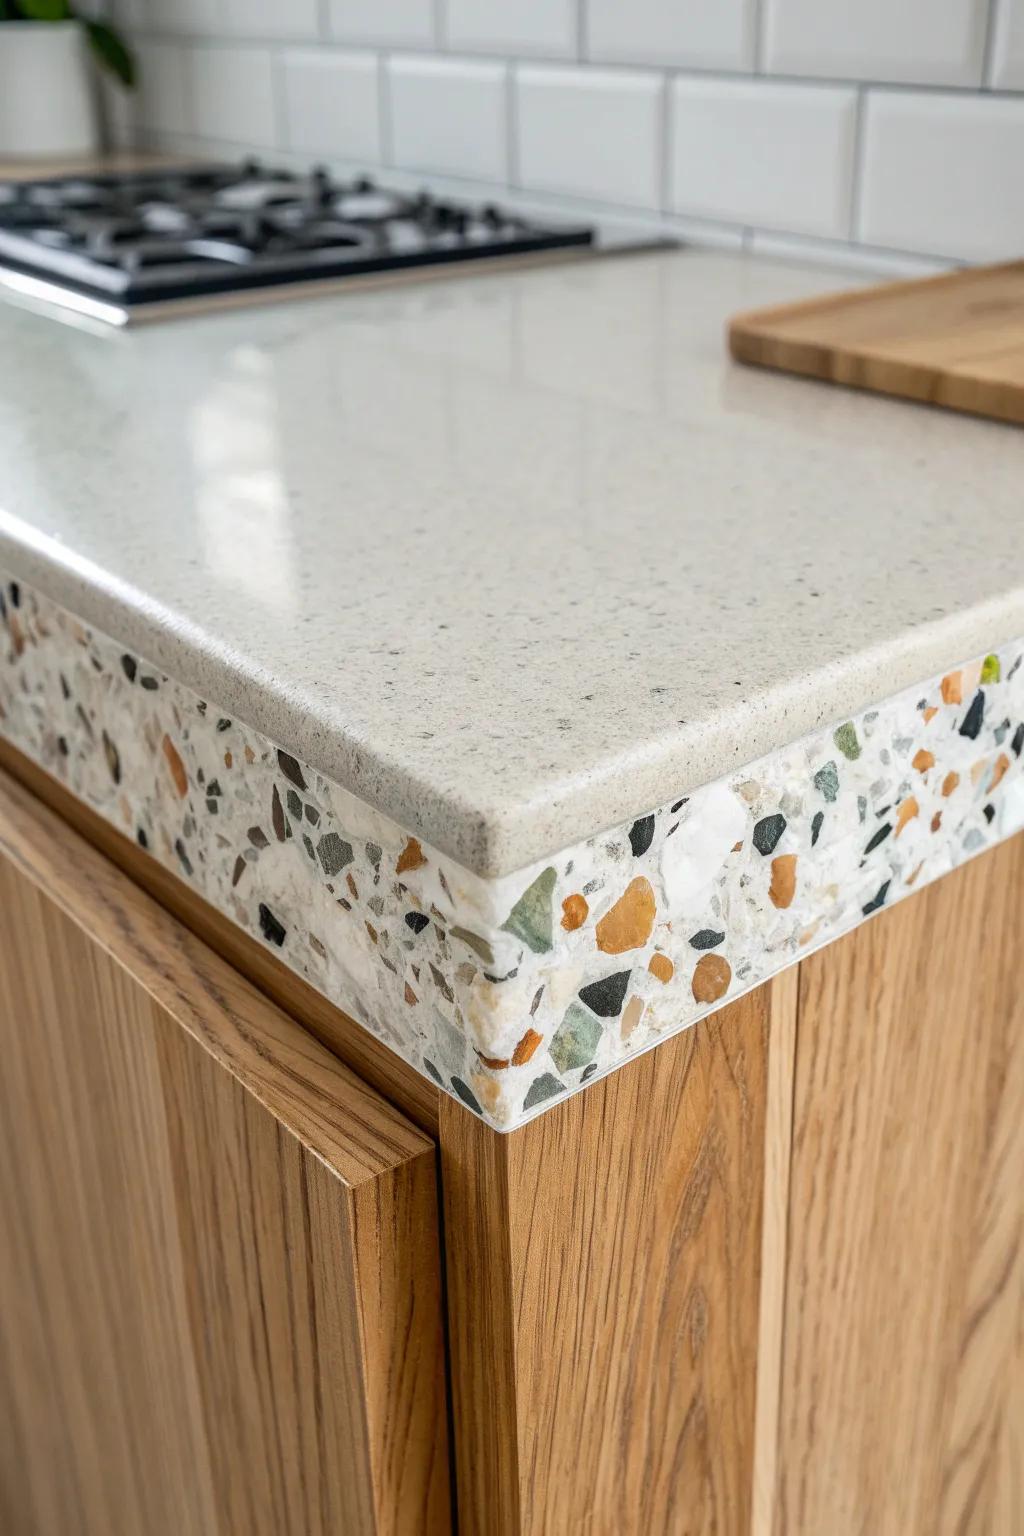
If you want maximum “whoa,” try a clear resin edge trim with tiny stone chips or wood offcuts embedded inside. I’ve played with this idea on sample boards, and it turns the countertop edge into a little gallery of texture.
Useful items to consider:
- Clear Epoxy Casting Resin: Use clear casting resin to encapsulate your stone chips and create a durable, custom decorative edge.
- Decorative Terrazzo Stone Aggregates: Select colorful stone or glass chips to mix into your resin for that authentic terrazzo aesthetic.
- Silicone Edge Molding Tape: Apply adhesive barriers to hold your resin and chips in place cleanly while the edge cures.


