
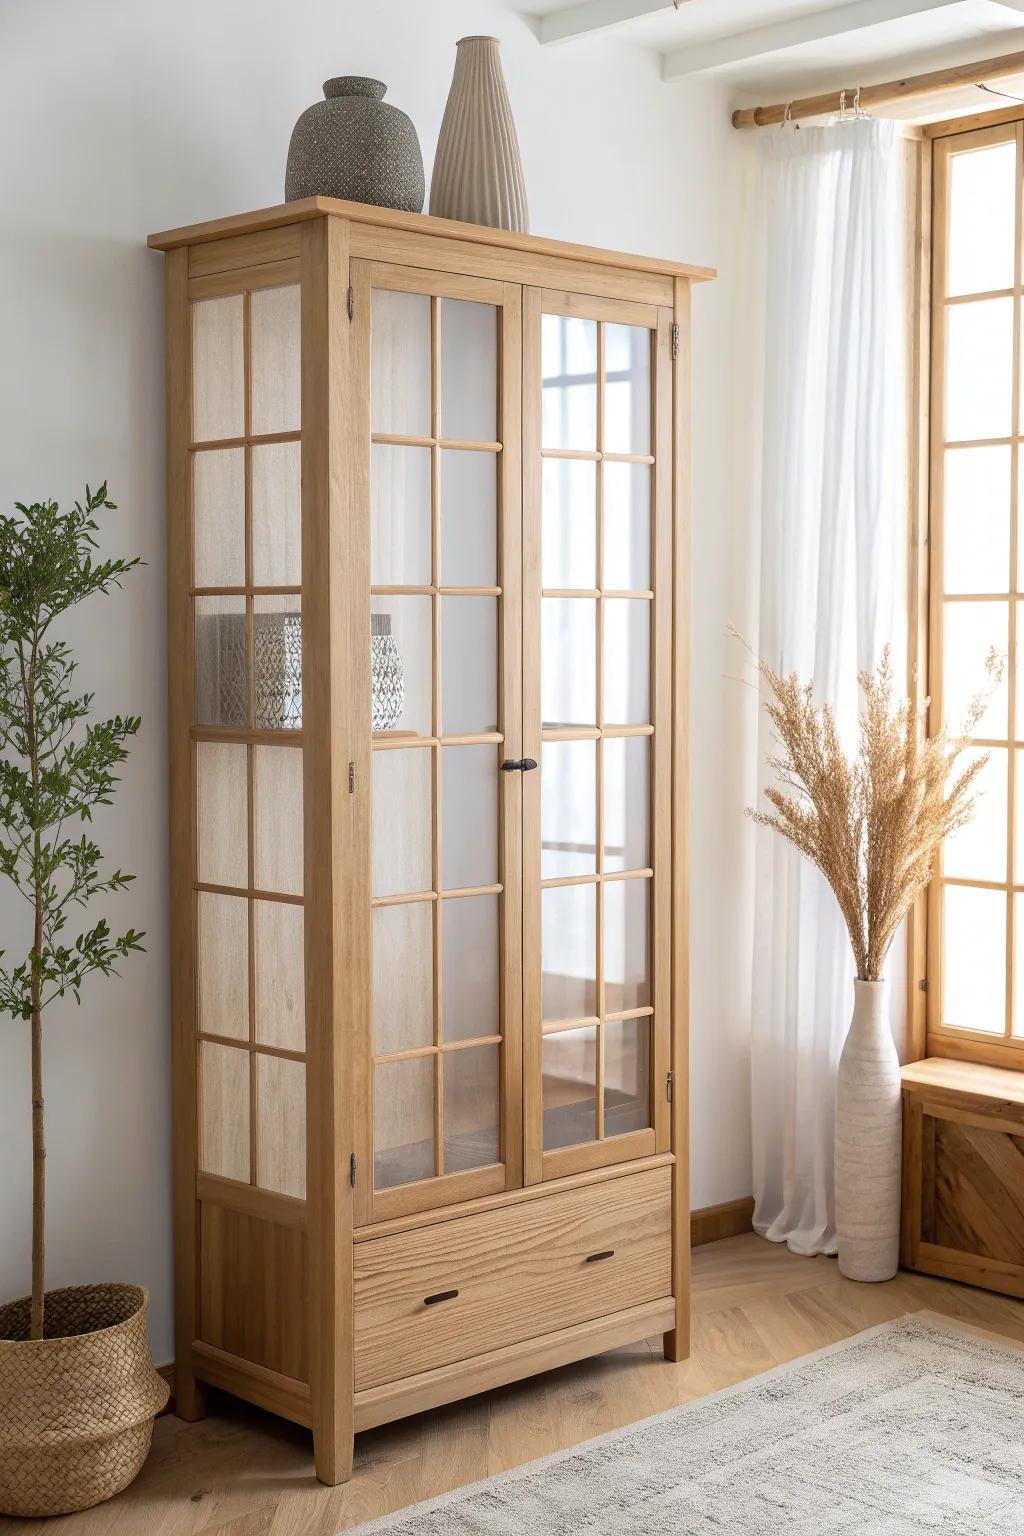
Glass cabinet doors can be pretty… right up until they start showing off the chaos you swear you’ll organize “this weekend.” I’ve covered a lot of cabinet glass in my workshop, and these ideas let you hide the clutter while adding real style without replacing the whole piece.
Patterned Privacy Film
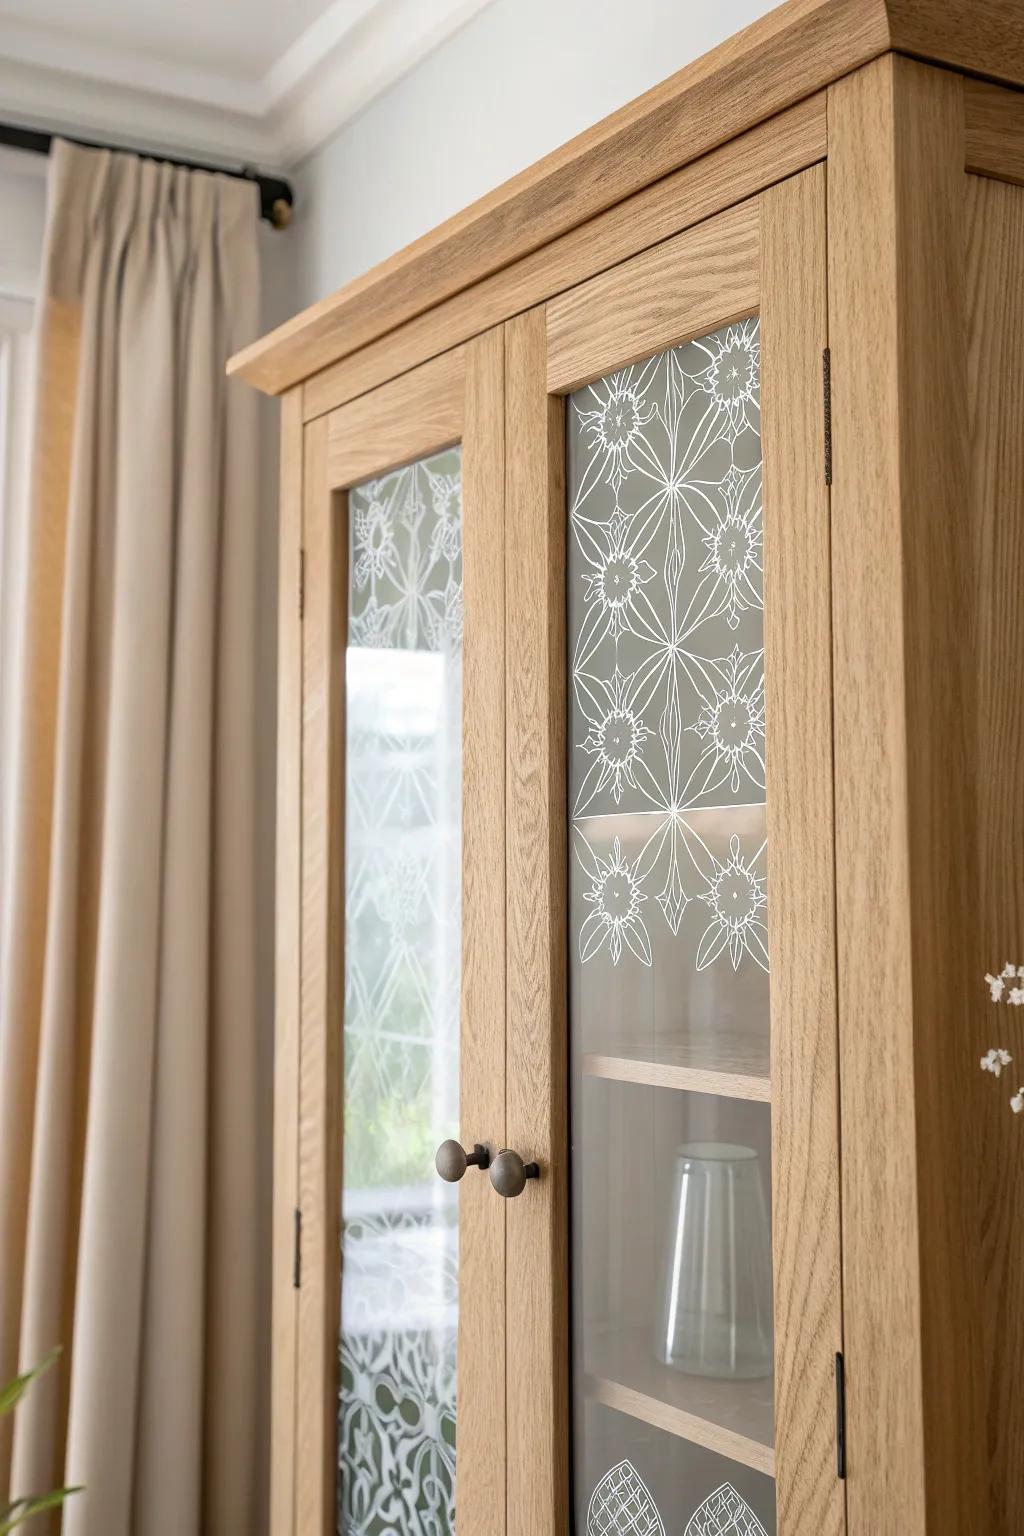
For a little more personality, I love patterned privacy film that looks like etched glass without the permanent commitment. I’ve done this on a thrifted hutch, and the pattern distracts your eye in the best way.
A few suggestions:
- Decorative Window Film: Transform clear glass instantly with peel-and-stick film that adds privacy and style without permanent alteration.
- Window Film Application Kit: Ensure a smooth, bubble-free finish by using a squeegee and spray bottle during your installation process.
- Geometric Stencil Set: Create a truly custom etched look on your glass cabinets using reusable stencils and frosting spray.
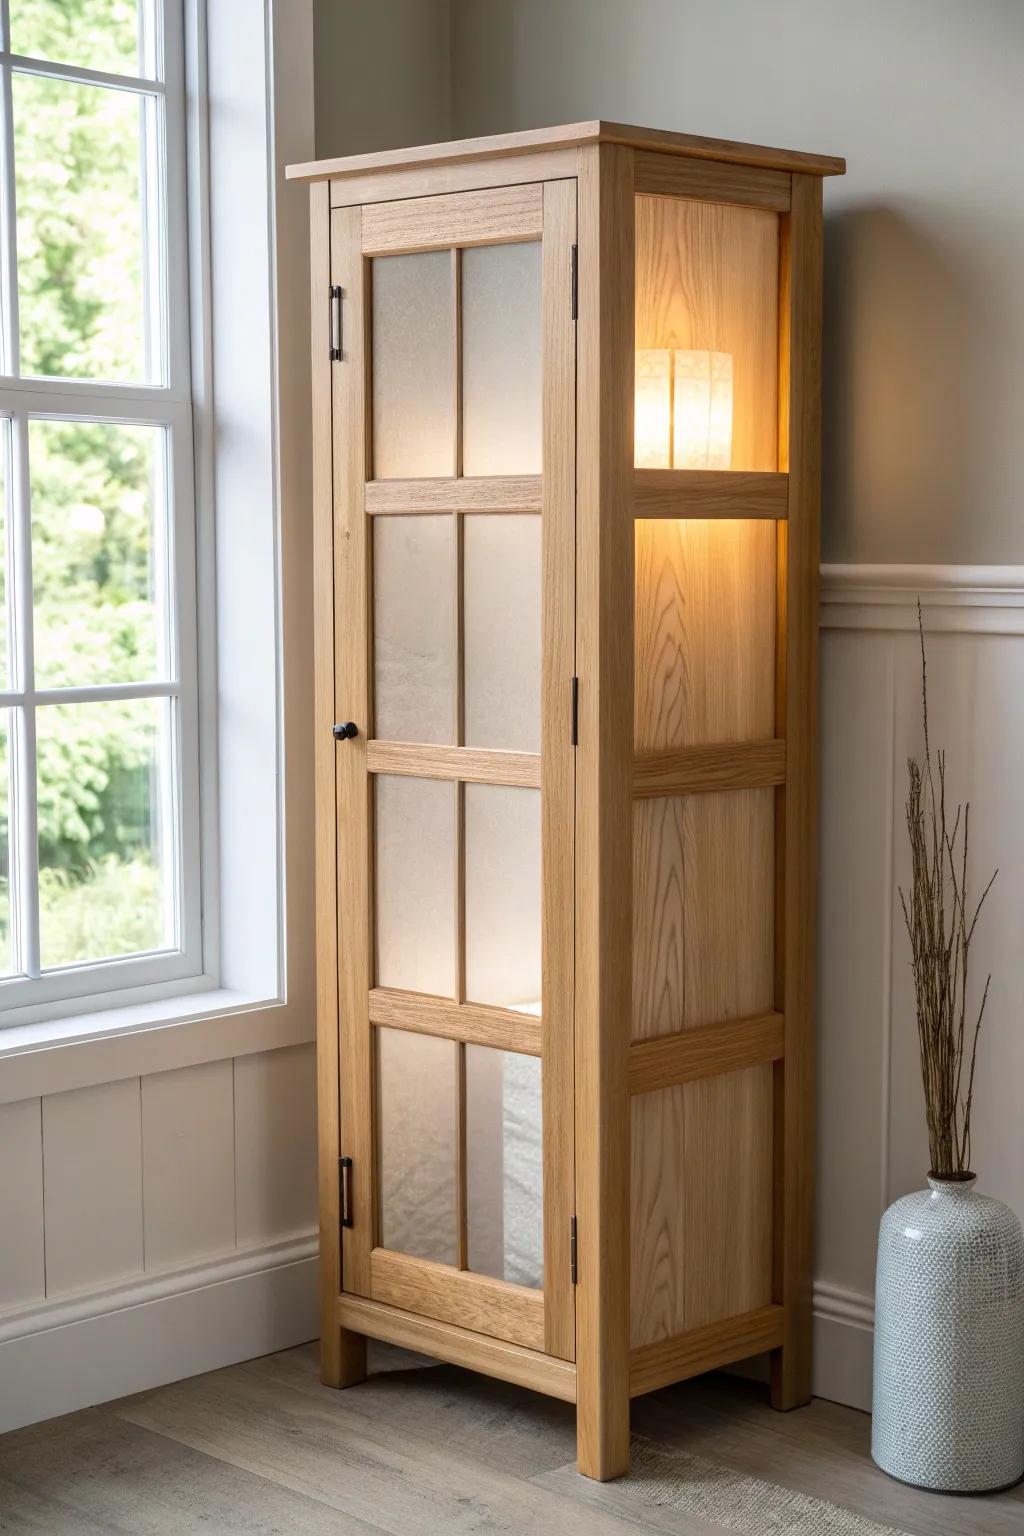
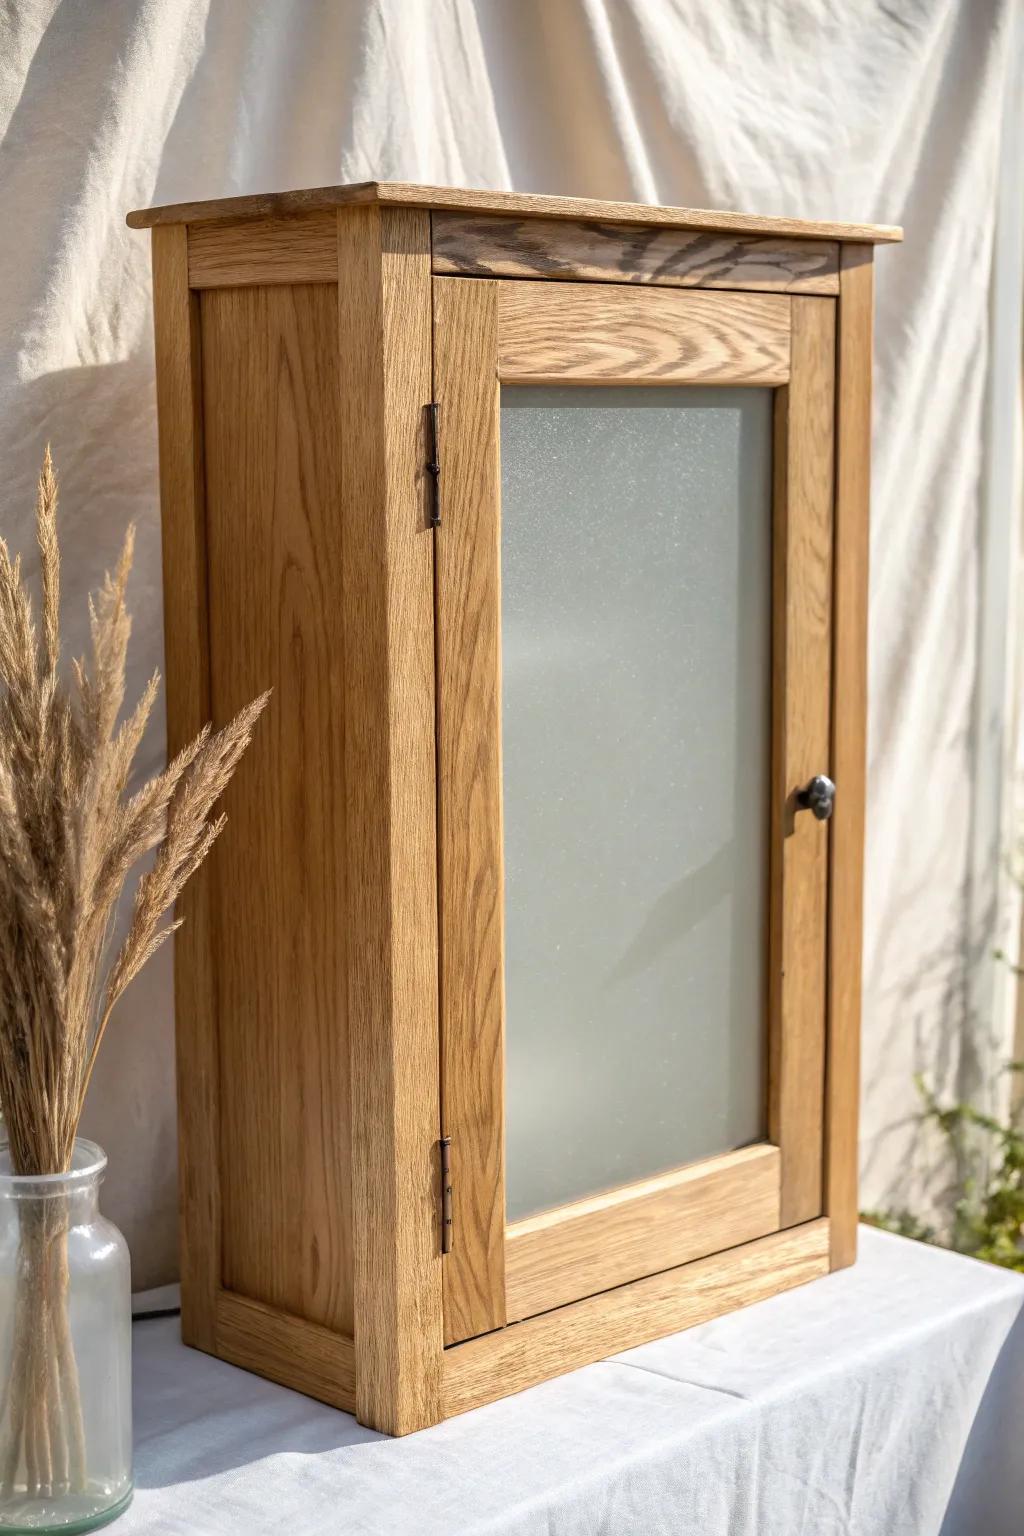
Frosted Window Film

When I need a clean, classic fix, I reach for frosted window film because it instantly blurs the mess but still feels light and airy. I’ve used it on kitchen uppers and it’s forgiving—tiny trimming imperfections disappear behind the wood frame.
Items that may come in handy:
- Decorative Frosted Window Film: Add privacy and style to glass doors easily with this decorative film featuring elegant textured patterns.
- Window Film Application Kit: Ensure a bubble-free finish on your project by using a dedicated smoothing squeegee and cutting tool.
- Patterned Privacy Glass Cling: Transform clear glass instantly with static cling film that mimics the look of expensive etched glass.
No-Sew Fabric Curtain Panels
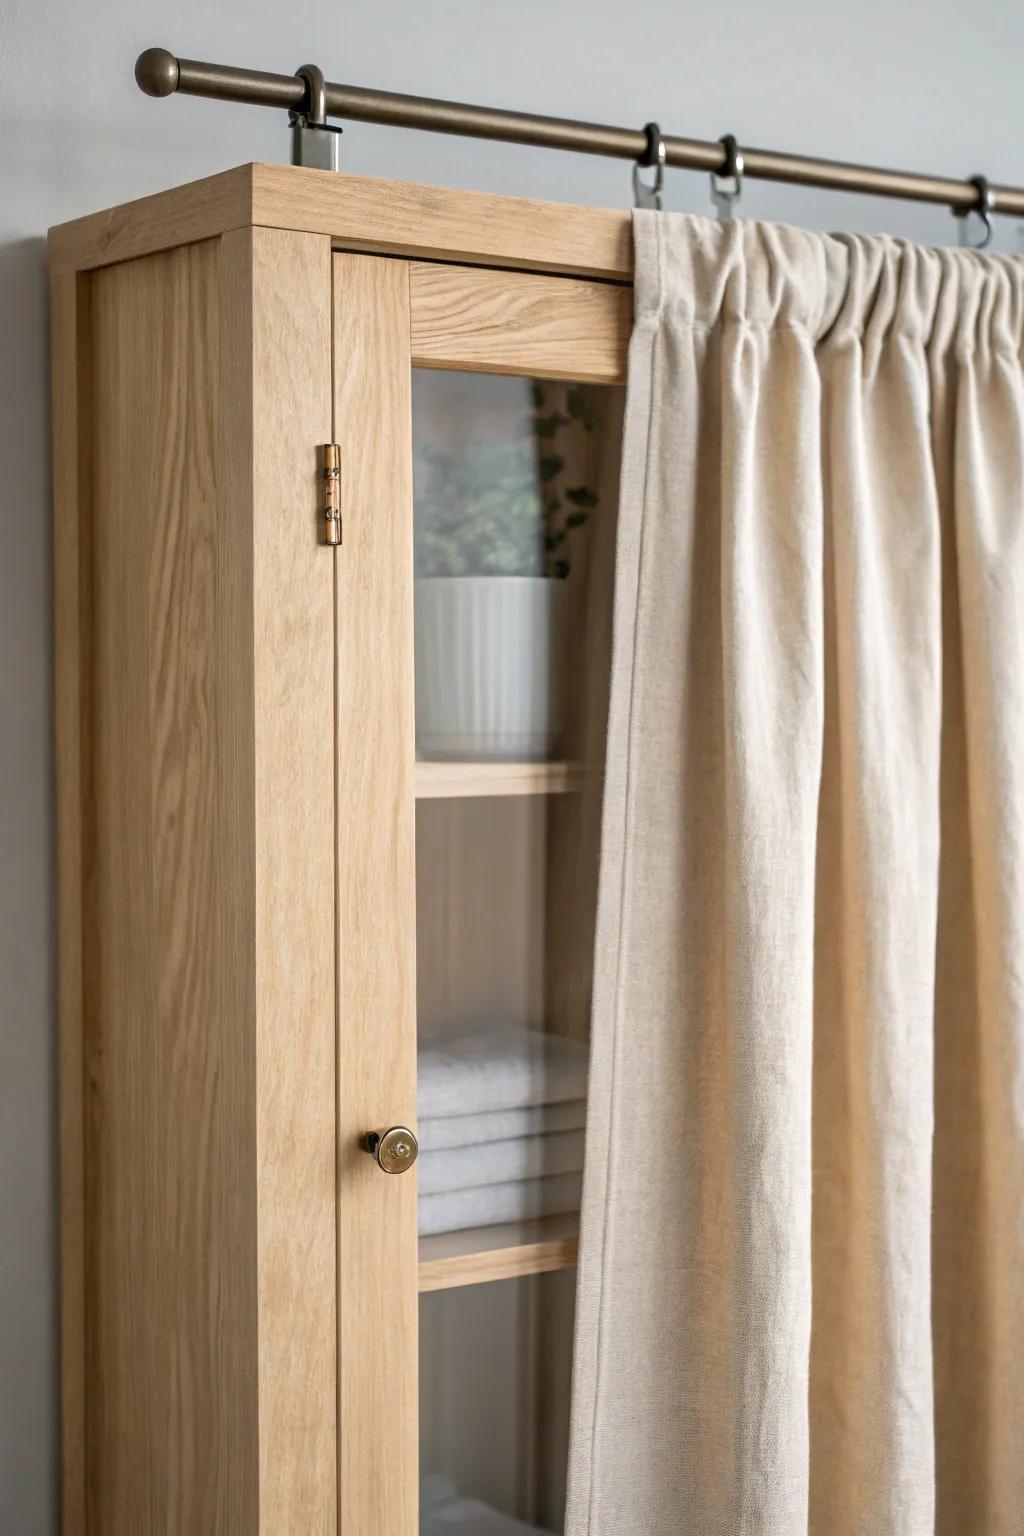
My go-to cozy look is fabric panels behind glass, especially when the cabinet is storing real-life stuff like snacks or laundry supplies. I’ve taped and clipped panels in place plenty of times, and swapping the fabric later feels like a mini makeover.
May just do the trick:
- Tension Rod for Cabinets: Secure your fabric easily inside the cabinet frame. Choose a simple rod that fits your specific measurements properly.
- Curtain Clip Rings: Attach your chosen fabric to the rod instantly. These clips let you hang panels without any sewing required.
- Linen Fabric by the Yard: Source a natural-looking textile to hide clutter. Pick a linen blend for that soft, textured farmhouse aesthetic.
Peel-and-Stick Contact Paper
When I’m working on a budget, peel-and-stick contact paper gives you tons of looks—tile, linen, geometric—without special tools. I’ve applied it right to the glass before, and it’s such an easy way to cover what’s inside.
Some ideas to consider:
- Linen Texture Contact Paper: Refresh your cabinet glass with a fabric-like texture that subtly conceals clutter while adding elegant style.
- Application Squeegee Kit: Ensure a smooth, bubble-free finish on your glass panels by using this handy smoothing tool set.
- Frosted Glass Window Film: Create a sophisticated, translucent look that maintains privacy and hides contents without blocking all light.
Rice Paper for Soft Diffusion
For a gentle, glowy cover, I’ve used rice paper on glass with a removable adhesive so it looks like a soft lantern. It’s surprisingly pretty on older cabinets where the wood grain deserves the spotlight, not the shelf clutter.
Useful items to consider:
- Rice Paper Window Film: Apply this adhesive film to glass doors to create an elegant, semi-opaque look that hides clutter beautifully.
- Double-Sided Removable Tape: Secure your paper sheets invisibly and easily with this clear tape, perfect for temporary or permanent placement.
- LED Cabinet Lighting Kit: Install these lights inside your cabinet to achieve that warm, glowing lantern effect through the diffused glass.
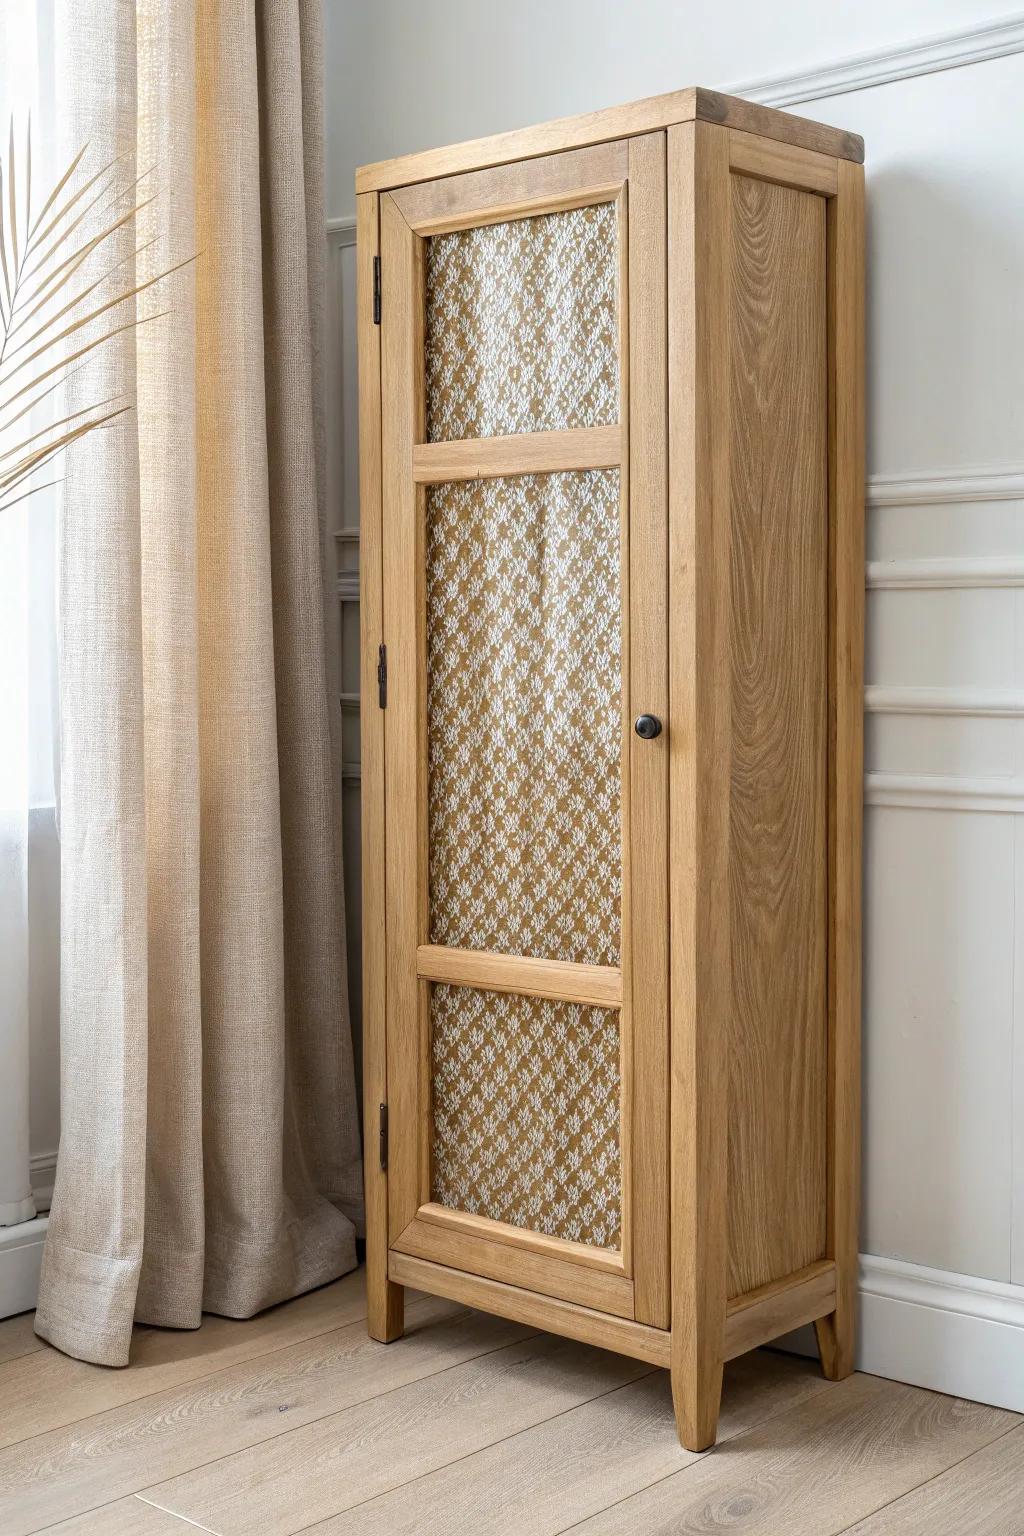
Lace Panels for Vintage Charm
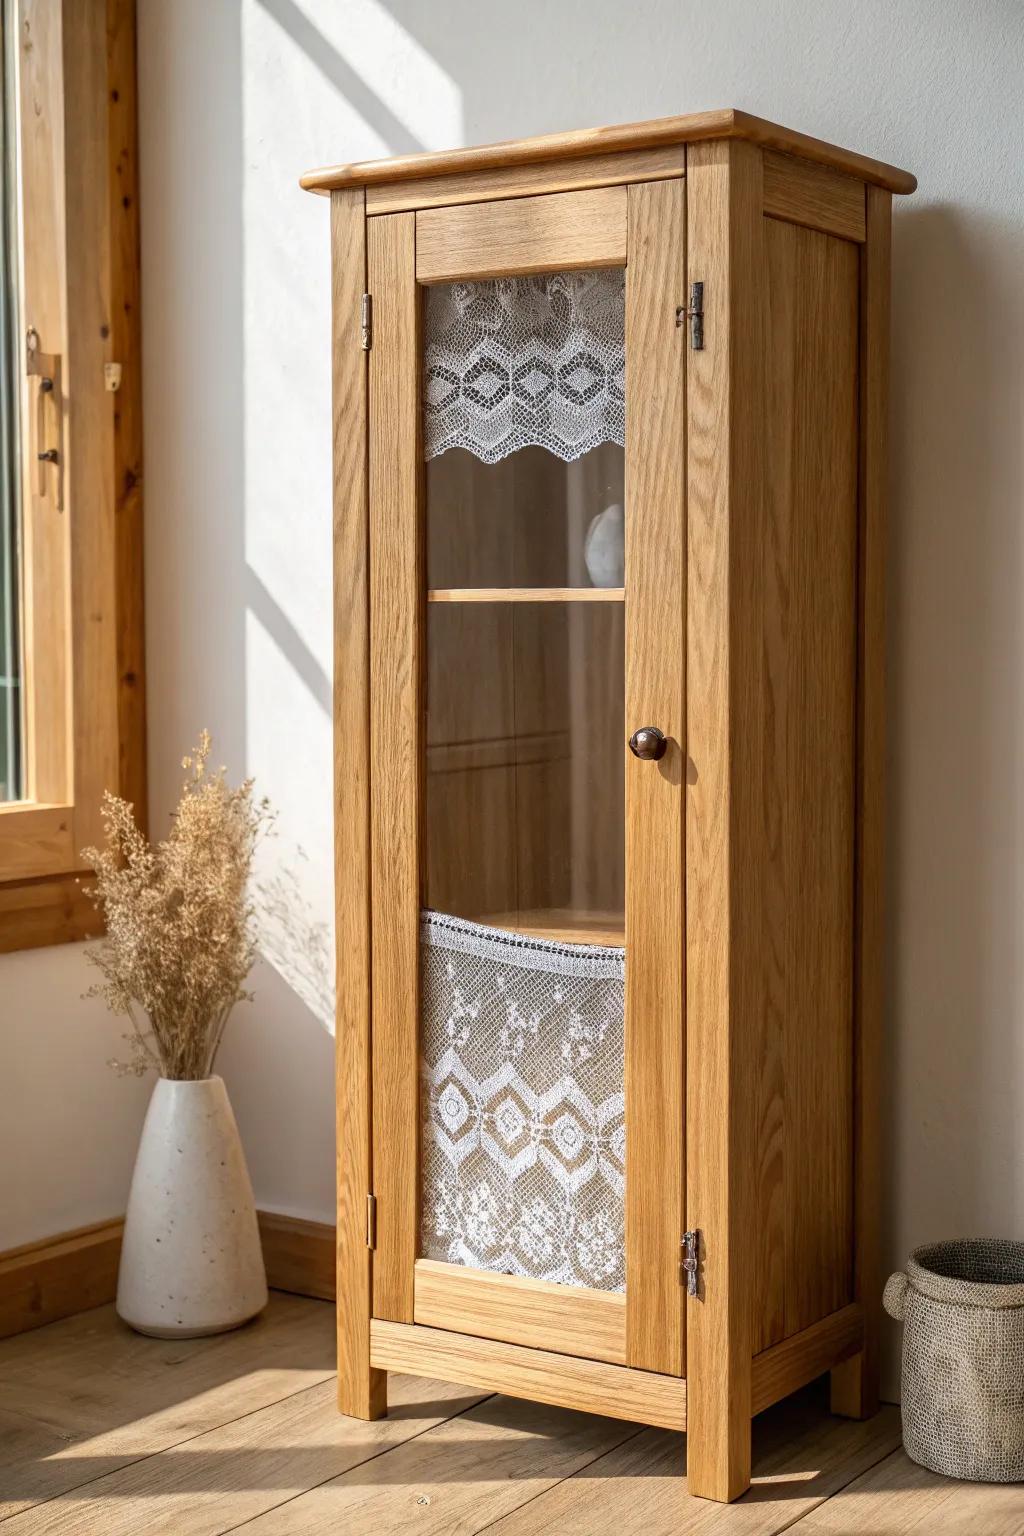
A simple lace insert behind glass gives you that sweet vintage feel while still letting some light through. I’ve clipped lace to the inside frame on an upcycled cabinet, and it made the whole piece feel collected and cozy.
Explore these options:
- Vintage-Style Lace Fabric Yardage: Choose beautiful floral or geometric lace fabric by the yard to easily cut panels to your exact cabinet dimensions.
- Small Tension Rods: Install these adjustable rods inside the cabinet frame to hang your lace panels without damaging the wood with hardware.
- Adhesive Hook and Loop Tape: Use these simple adhesive strips to secure lace directly to the inner glass frame for a flat, taut appearance.

Woven Cane-Style Insert Look
You can fake the vibe of a cane door by covering the glass with a cane-style pattern film or a thin woven-look sheet mounted behind it. I tried this on a furniture makeover, and it instantly turned “basic glass” into something designer-looking.
A few things you might like:
- Cane Pattern Window Privacy Film: Apply this adhesive film directly to existing glass for an instant, budget-friendly woven texture upgrade.
- Natural Cane Webbing Roll: Cut this authentic material to size and mount it behind the glass door for genuine texture.
- Textured Contact Paper (Woven Look): Use this versatile, peel-and-stick paper to cover glass panels with a realistic-looking faux woven pattern.
Painted Border to Frame the Cover
Sometimes I cover the center of the glass with film or paper, then add a painted border on glass to make it look custom and intentional. I’ve done this in a quick weekend refresh, and that little frame detail hides uneven edges like magic.
These products might be useful:
- Glass Paint or Multi-Surface Acrylics: Create a durable, custom border around your glass panel with paints designed specifically for smooth, non-porous surfaces.
- Painter’s Tape for Precision Lines: Ensure your painted border has crisp, professional edges by masking off the glass area before applying any color.
- Self-Adhesive Window Film: Apply a frosted or decorative film to the center of the glass to provide privacy before painting your border.
Faux Leaded Glass Lines
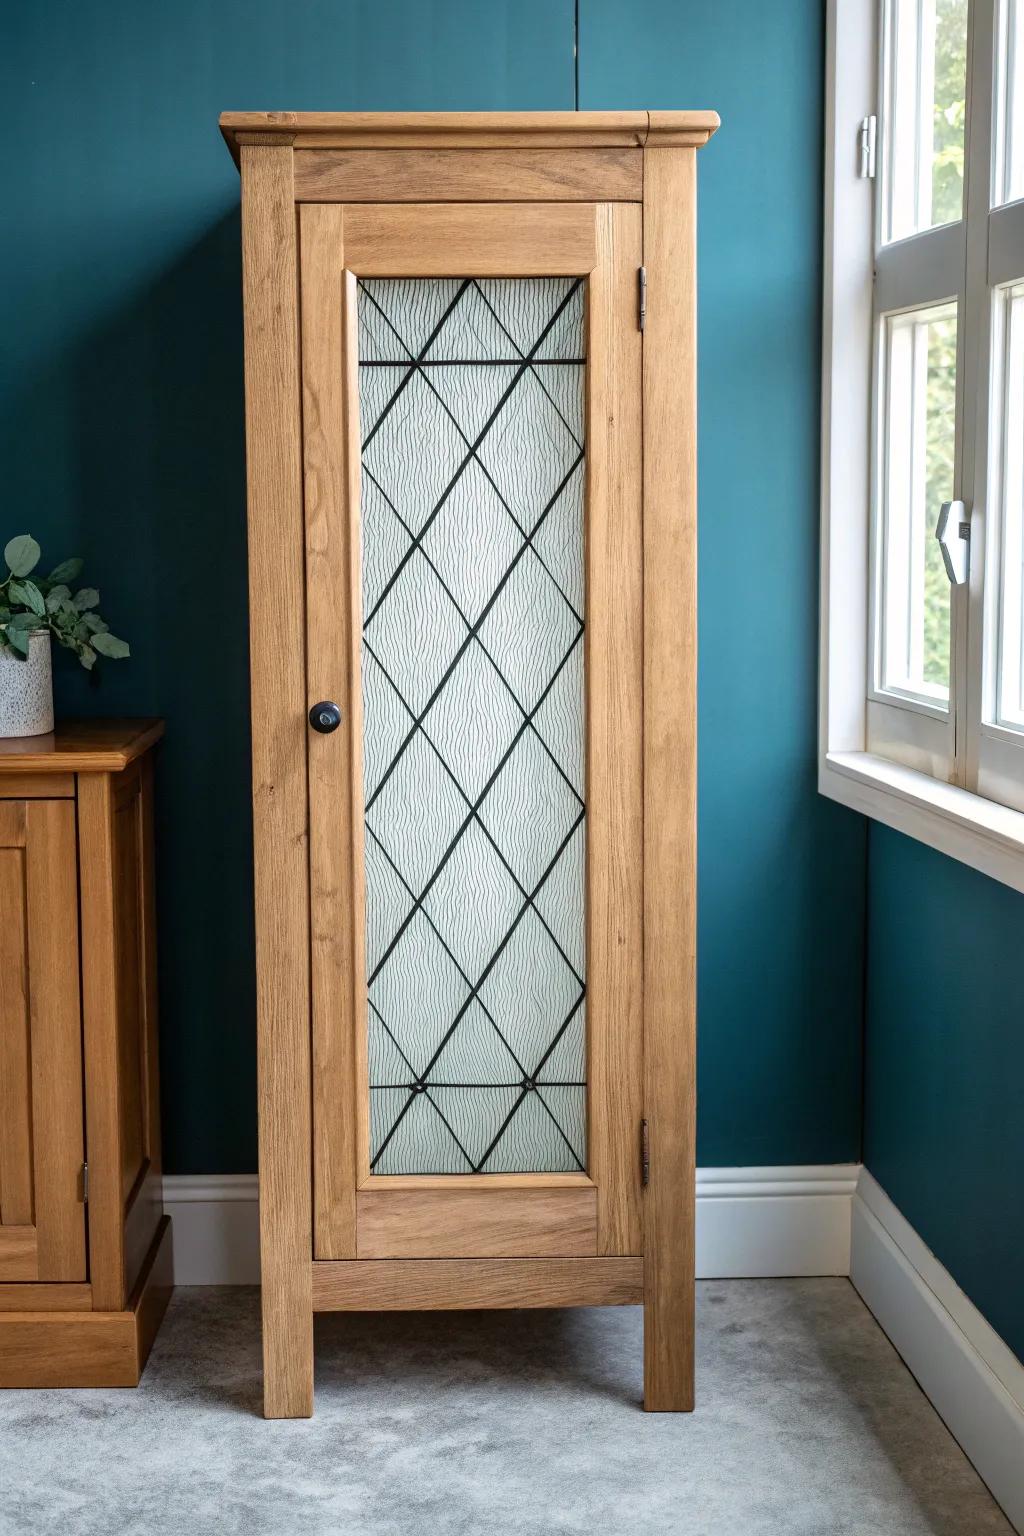
To make covered glass feel fancy, I’ll add faux leaded lines over a frosted or patterned backing for that old-world cabinet look. I’ve used this on a dated china cabinet, and it turned “grandma glass” into “vintage heirloom.”
Check these products out:
- Self-Adhesive Lead Strip Tape: Create authentic-looking leaded grid lines instantly by applying this flexible, self-adhesive strip directly to your glass.
- Frosted Glass Window Film: Apply this privacy film behind your lead lines to hide cabinet clutter while adding an elegant, textured look.
- Glass Paint Outliner Tube: Draw custom lead designs directly onto the glass surface for a permanent, artistic finish that mimics soldered joints.
Reeded Glass Effect Film
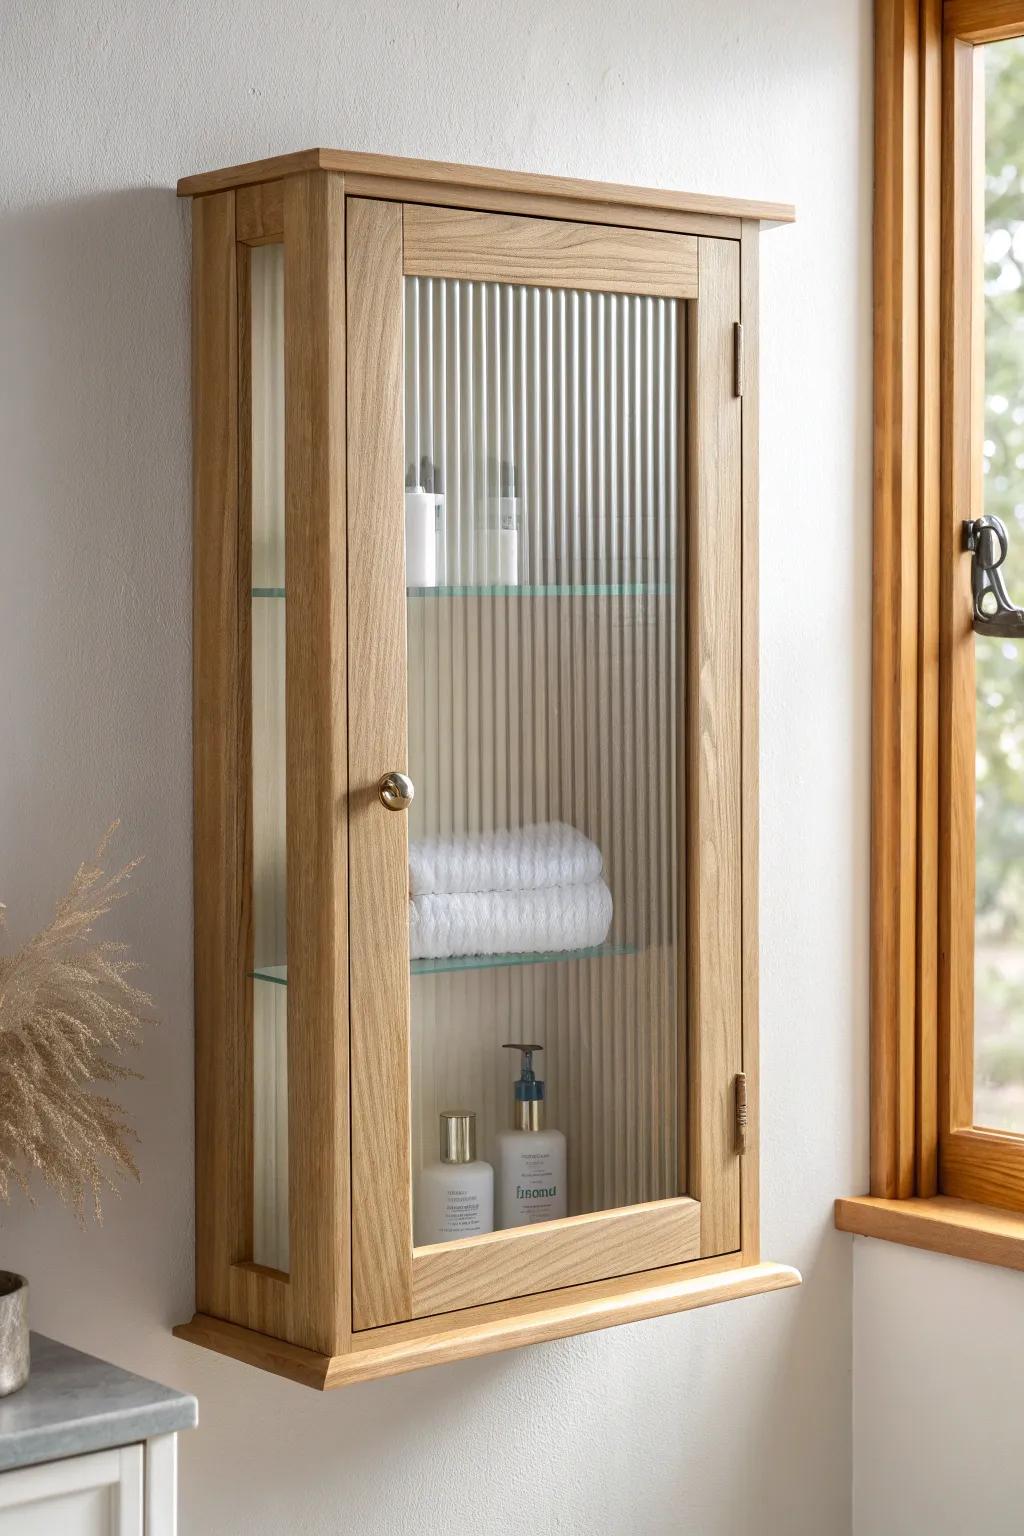
A reeded glass effect is perfect when you want modern texture but still need to hide what’s inside. I added this look to a small bathroom cabinet, and it made cheap storage feel way more elevated.
A few helpful options:
- Reeded Privacy Window Film: Transform clear glass instantly with this textured film that adds privacy while still allowing natural light into your cabinets.
- Window Film Application Kit: Ensure a bubble-free finish by using a complete tool kit designed for smooth and professional window film installation.
- Precision Craft Knife and Mat: Trim your film perfectly to size for custom cabinet doors with a reliable precision knife and cutting surface.
Stained Glass-Style Overlay
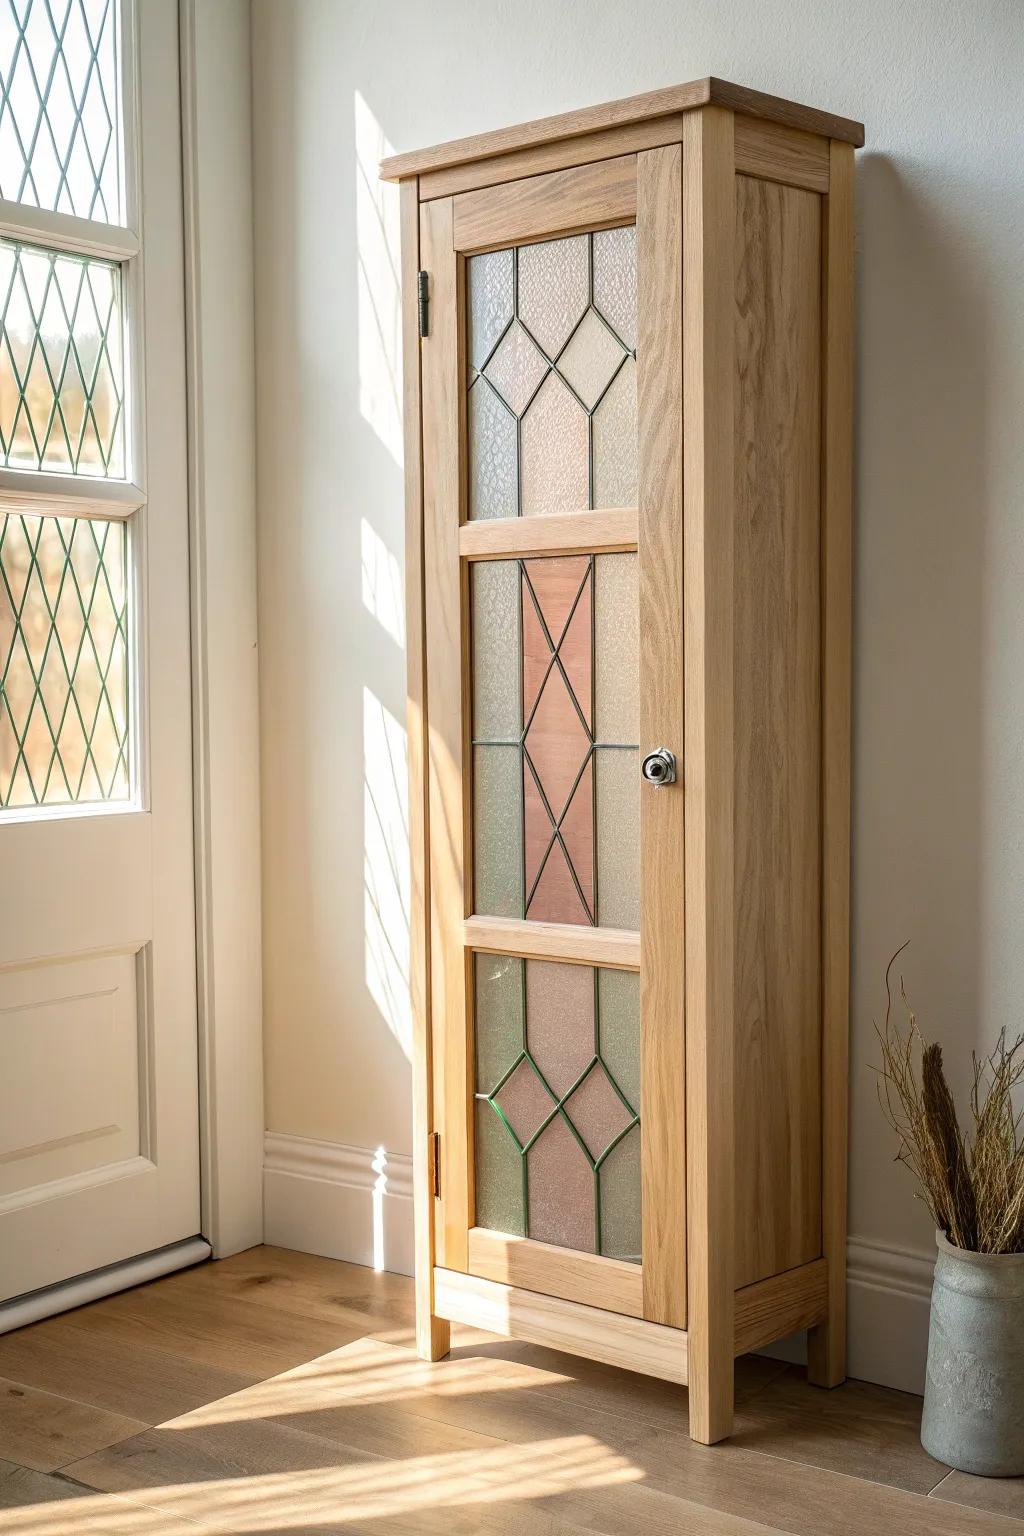
For a bold focal point, cover the glass with a stained glass-style overlay that filters light and disguises clutter. I tested this on a hallway cabinet, and it turned a boring door into actual decor.
You might give these a try:
- Stained Glass Window Film: Apply this decorative film to glass doors to create colorful privacy and mimic the look of traditional leaded glass.
- Self-Adhesive Lead Strips: Use these flexible adhesive strips to create your own authentic-looking lead lines on plain glass surfaces easily.
- Glass Paint Kit: Paint your own custom designs directly onto the cabinet glass for a unique, handcrafted stained glass effect.
Chalkboard Panel Behind Glass
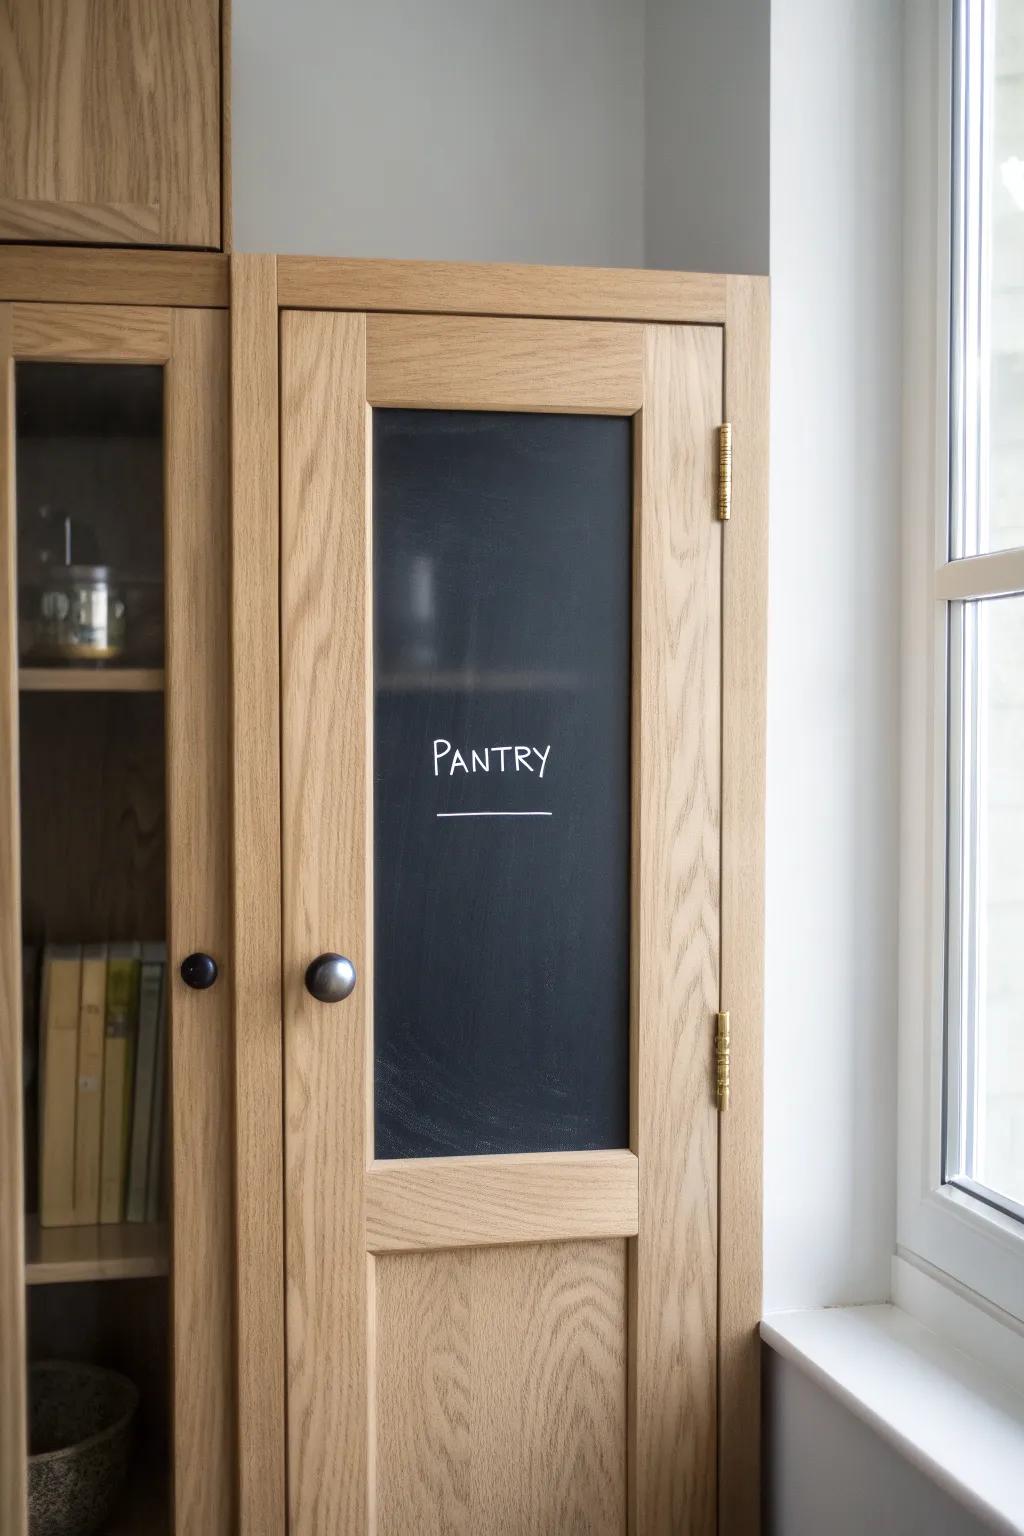
Cover the glass with a dark backing and make it a chalkboard-style insert for notes, menus, or labeling what’s inside. I’ve done this in a pantry cabinet, and it’s ridiculously handy when you’re trying to keep life semi-organized.
Possibly helpful picks:
- Chalkboard Contact Paper Roll: Apply this self-adhesive vinyl directly to glass or a backing board to create an instant writing surface.
- Matte Black Chalkboard Paint: Transform a thin plywood backing or the glass itself into a durable, writable surface with this coating.
- White Liquid Chalk Markers: Write clear, legible labels and notes on your new dark surface that wipe away easily when needed.
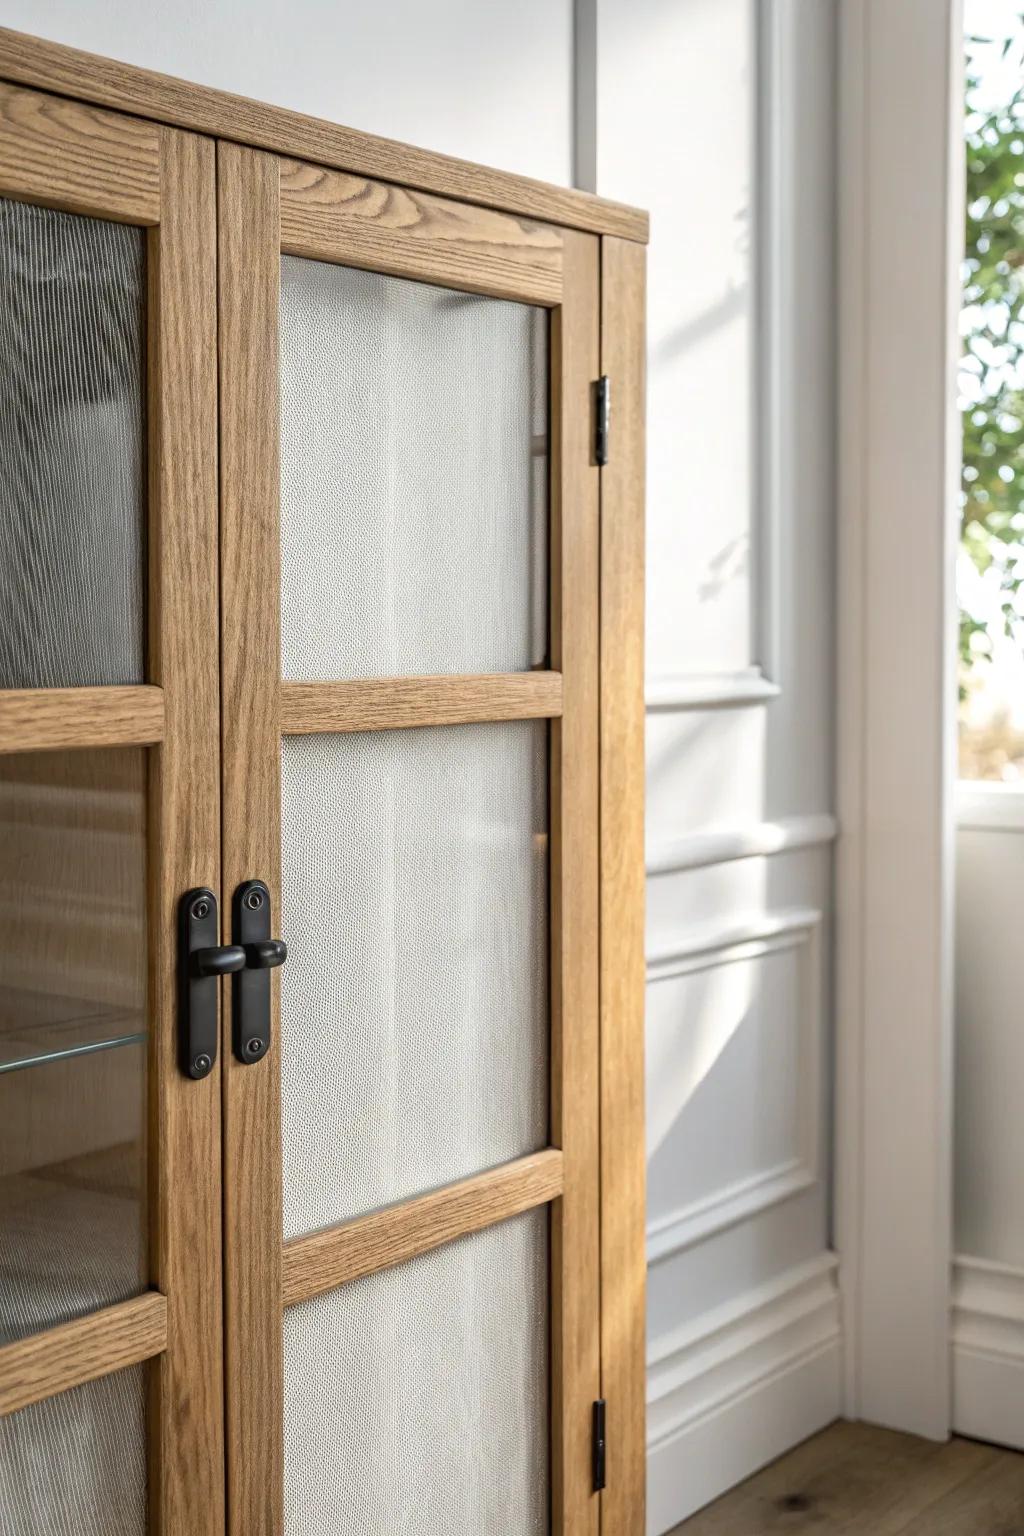
Copper or Brass Mesh Screen
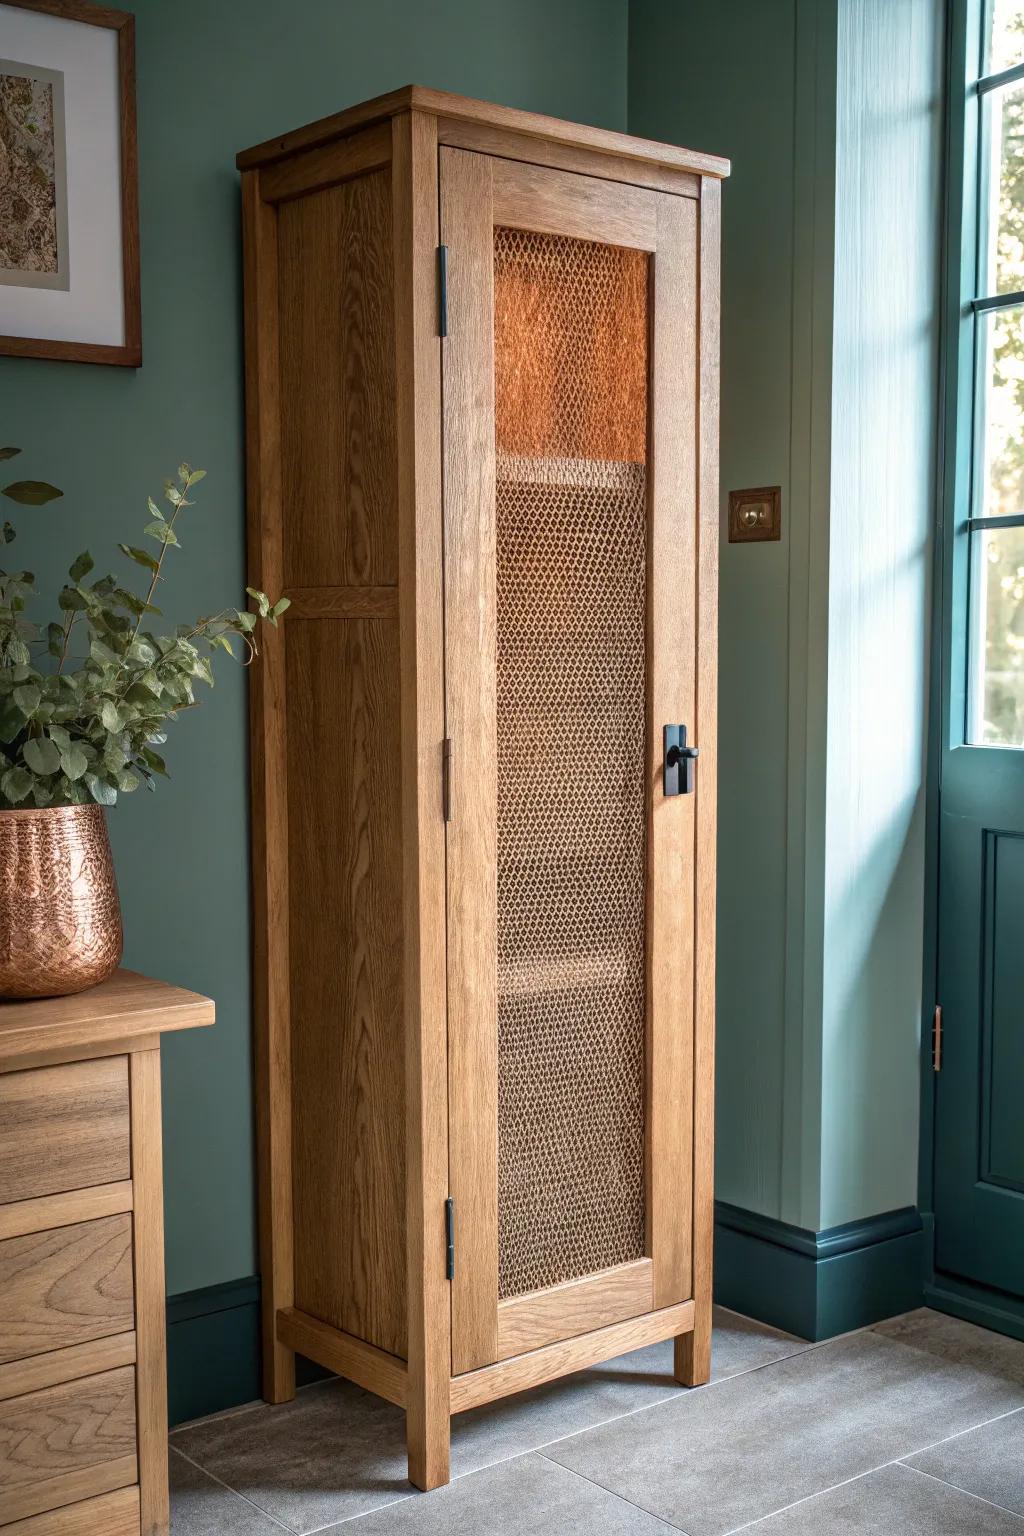
When I want industrial farmhouse energy, I cover the glass with metal mesh screening mounted inside the frame so it obscures the contents. I’ve used this on a workshop cabinet, and it looks tough while still feeling handmade.
Products that could assist:
- Copper or Brass Woven Wire Mesh Roll: Add a warm, industrial touch to your cabinets by stapling this customizable metal mesh behind the door frames.
- Heavy Duty Staple Gun Kit: Secure your new metal screens firmly into the wooden cabinet frame with this essential, easy-to-use fastening tool.
- Tin Snips or Wire Cutters: Trim your metal mesh sheets to the perfect custom size for your specific cabinet doors with these sturdy cutters.
Thin Wood Slats Over the Glass
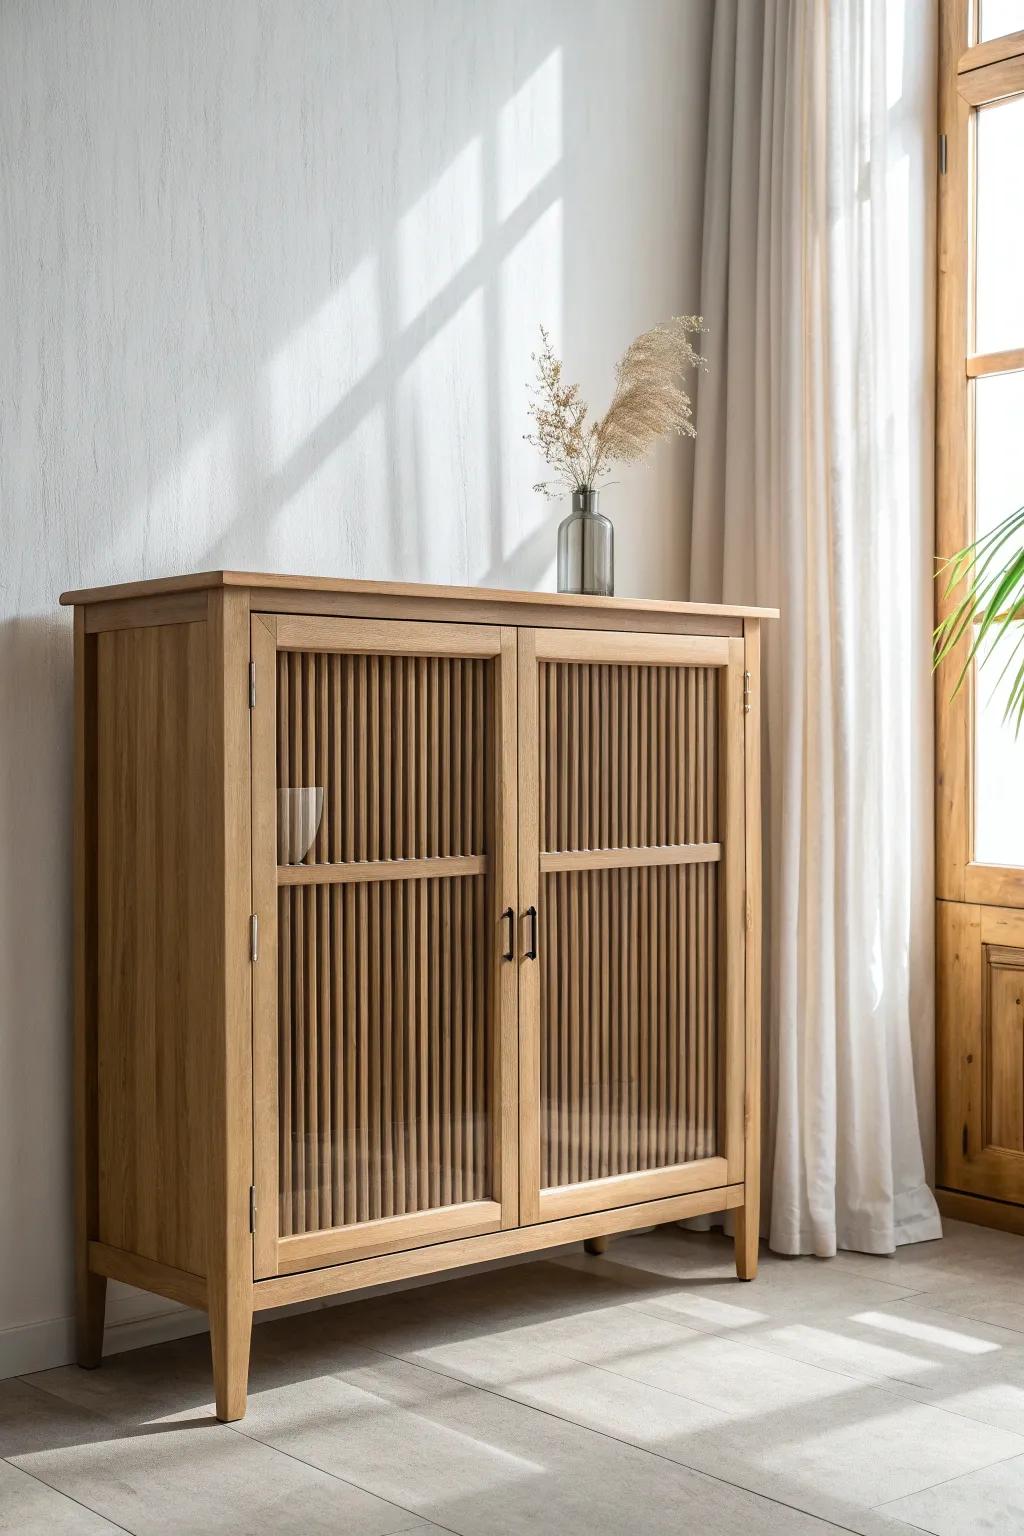
If you’re up for a wood-focused upgrade, add thin wood slats across the glass so it becomes more of a textured screen than a window. I’ve done slats on an old sideboard, and it kept the cabinet bright while hiding the visual noise.
Check if these fit your needs:
- Thin square wood dowels or balsa strips: Use these lightweight, unfinished wood strips to create the slat effect directly over your existing glass door panels.
- Clear construction adhesive or glass glue: Apply strong, transparent adhesive to securely bond your new wood slats to the glass surface without visible residue.
- Matte clear protective wood finish: Seal your new wood slats with a matte finish to protect them while maintaining a natural, modern aesthetic.
Pressed Botanical Sandwich Panel
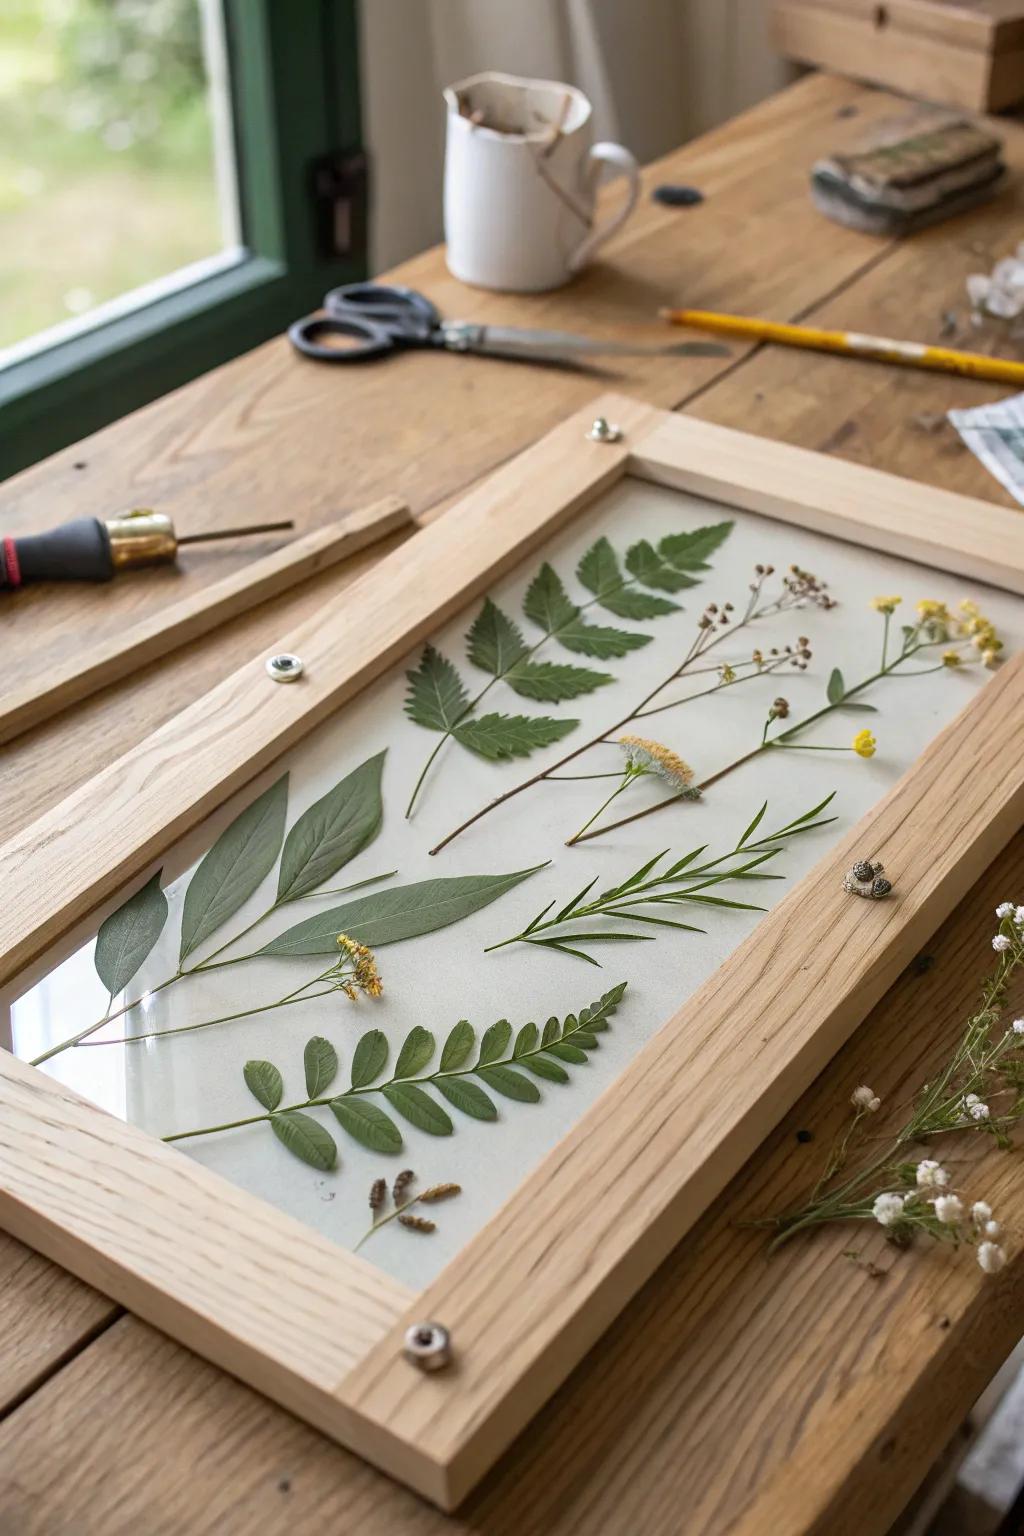
This one’s a total wow: I’ve covered cabinet glass by “sandwiching” pressed leaves and botanicals between two thin clear layers inside the door. It still counts as covering the glass because it blocks the view, and it feels like nature art built into your cabinet.
Give these a look:
- Clear Acrylic Sheets: Use these durable, transparent sheets to safely sandwich your botanical arrangements against existing cabinet glass.
- Dried Pressed Flowers & Leaves: Skip the foraging and start creating immediately with a variety of pre-pressed greenery and colorful florals.
- Wood Framer’s Points & Driver: Secure your new botanical panels firmly into the cabinet door frame with professional-grade glazing points.
Shoji-Inspired Paper Grid
For a calm, unexpected look, cover the glass with shoji-style paper and add a slim wood grid over it. I tried this on a tall cabinet makeover, and it made the whole piece feel serene and intentionally designed.
Some handy options:
- Rice Paper Window Film: Apply this adhesive film directly to your glass for an instant, translucent Japanese-inspired rice paper effect.
- Balsa Wood Strips: Create your custom grid overlay easily with these lightweight, cuttable wood strips that mimic traditional framing.
- Double Sided Adhesive Tape: Secure your new lightweight wood grid to the glass or frame cleanly without messy liquid glues.
Textile Weave Panel Behind Glass
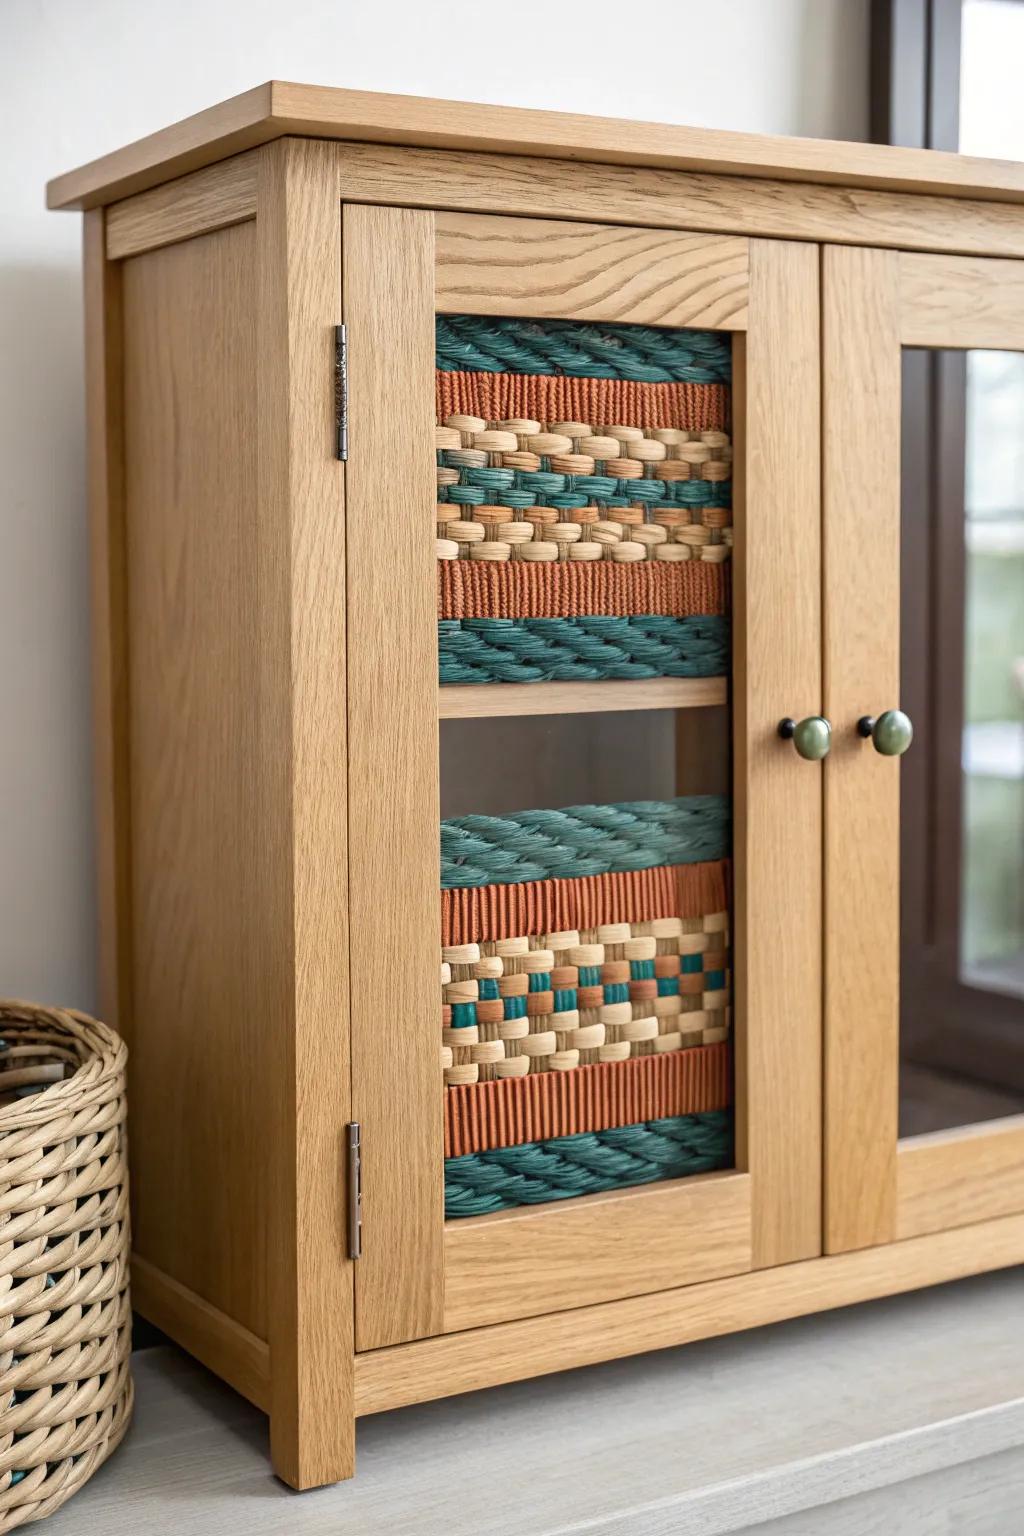
If you want something truly unique, weave fabric strips or leather lacing into a panel and mount it behind the glass to fully cover what’s inside. I’ve done a scrap-fabric weave in my shop, and it turned a clutter-hiding solution into a conversation piece.
A few relevant products:
- Assorted Macramé Cord Bundles: Create chunky, textured rows in your weave by utilizing these versatile cotton cords for a bold look.
- Pre-Cut Fabric Quilting Strip Rolls: Save preparation time and get coordinating colors instantly by using these convenient pre-cut fabric strips for weaving.
- Faux Leather Ribbon Spools: Add a modern, durable accent to your cabinet panel by integrating these sleek leather strips into the design.


