
If your island feels a little builder-basic, a good kitchen island wrap can turn it into the star of the whole room without a full remodel.
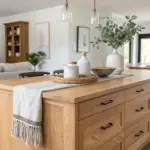
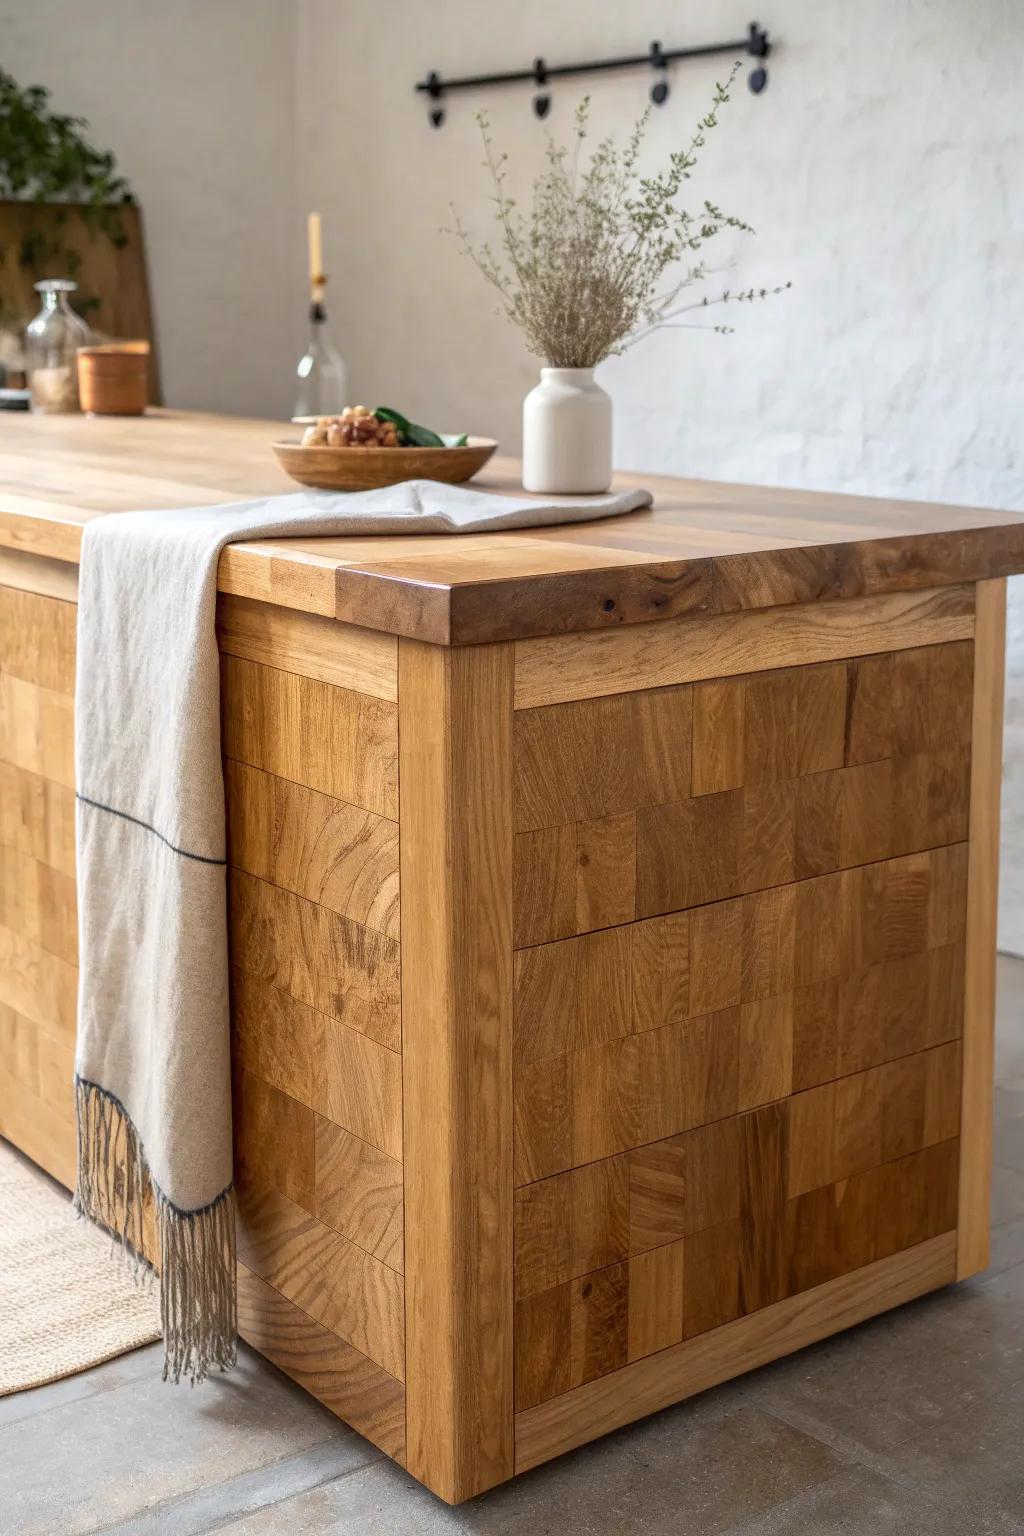
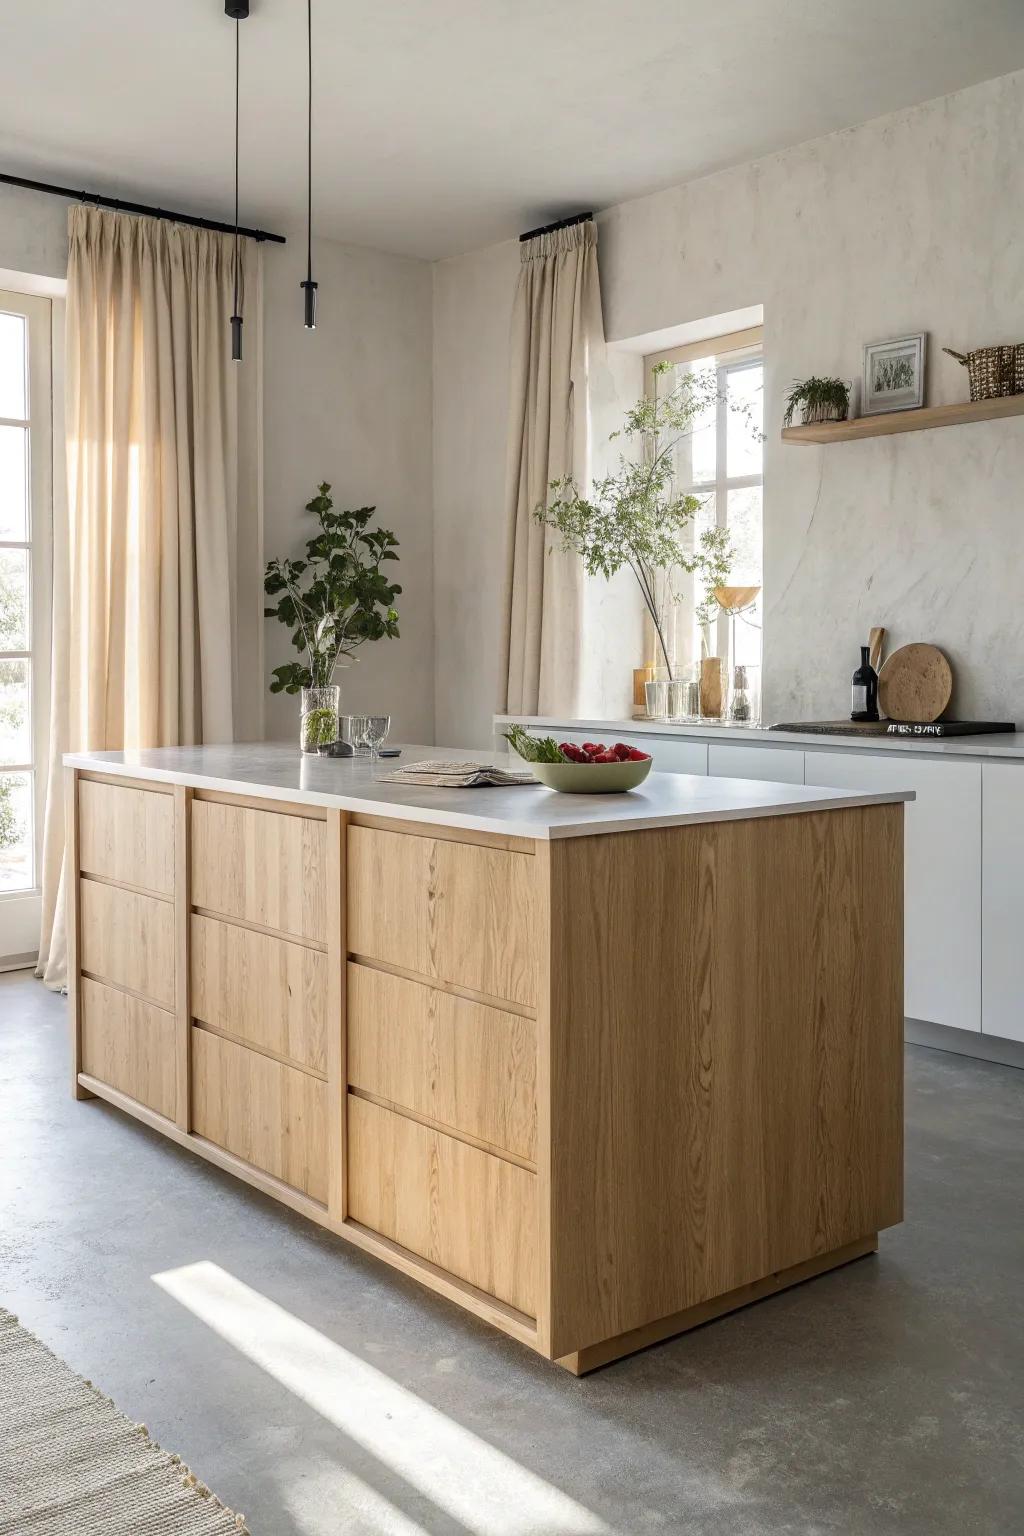
Clean Plywood Slab Wrap
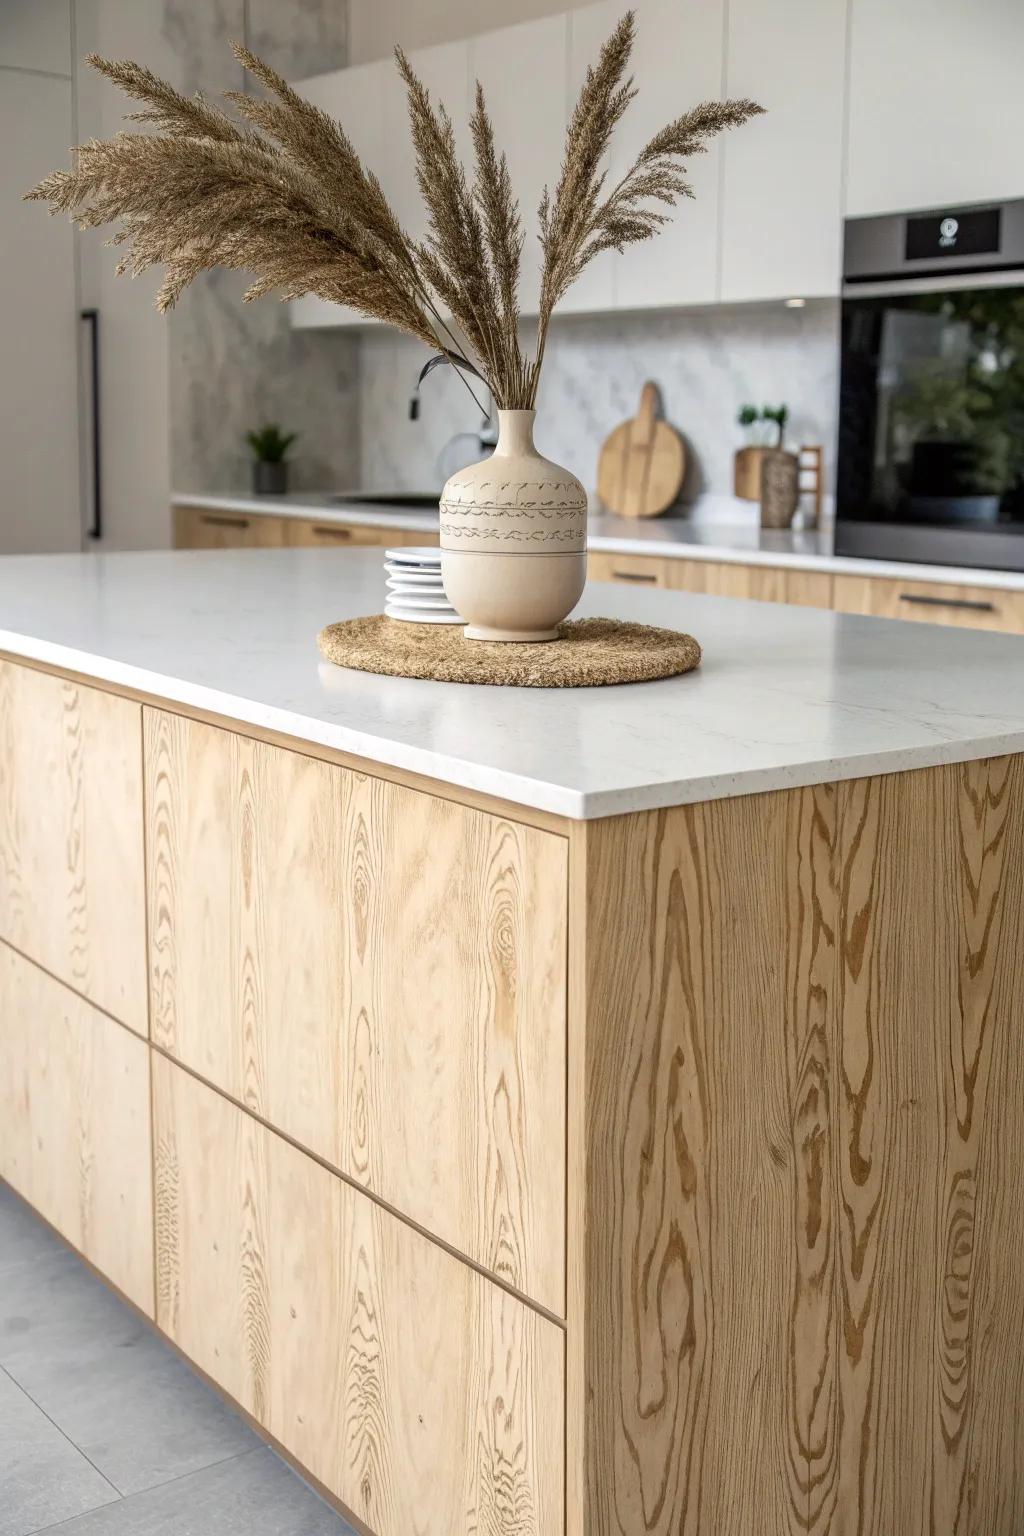
For a modern-but-warm look, I’ve wrapped islands in smooth plywood panels with tidy, intentional edges. A good clear coat is key here—I learned the hard way that kitchens demand a finish that can handle splashes and wipe-downs.
Items that may come in handy:
- Water-Based Polyurethane Clear Coat: Protect your wood panels from kitchen spills and wear by applying a durable, non-yellowing protective finish.
- Self-Adhesive Wood Veneer Sheets: Achieve the look of solid oak or maple on existing surfaces easily with peel-and-stick real wood veneer.
- Edge Banding Trimmer Tool: Ensure your plywood edges look professional and clean by trimming excess veneer tape accurately and smoothly.
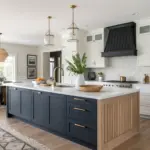
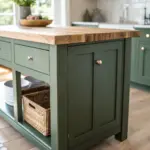
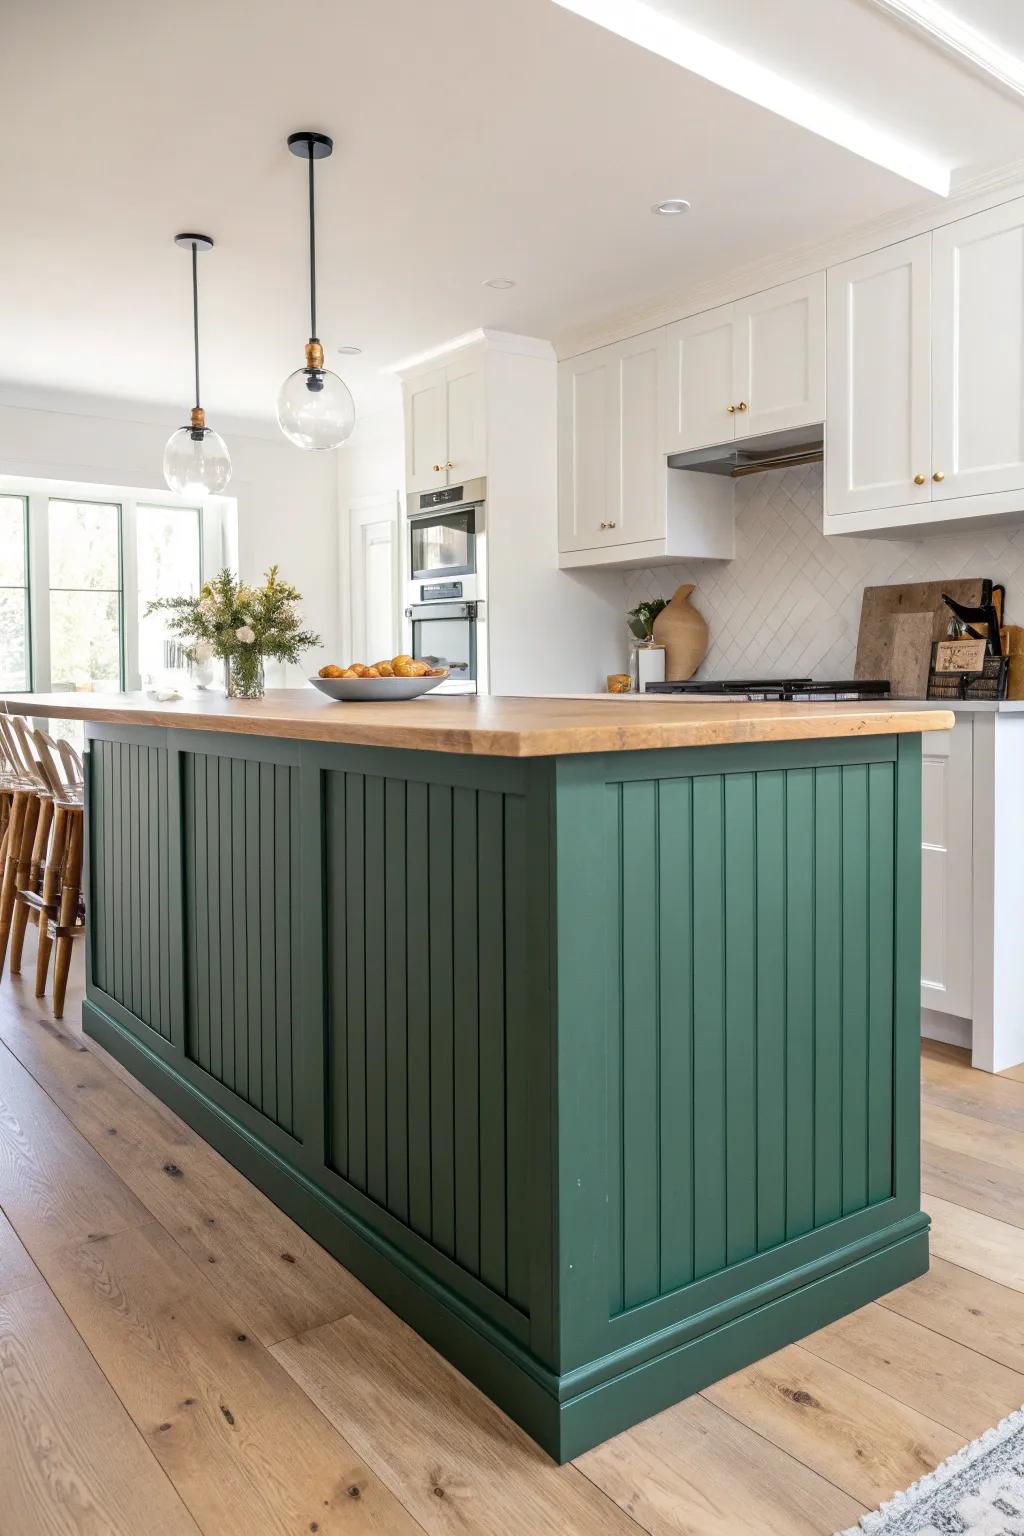
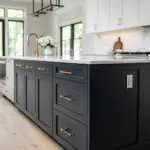
Contrasting Paint Wrap
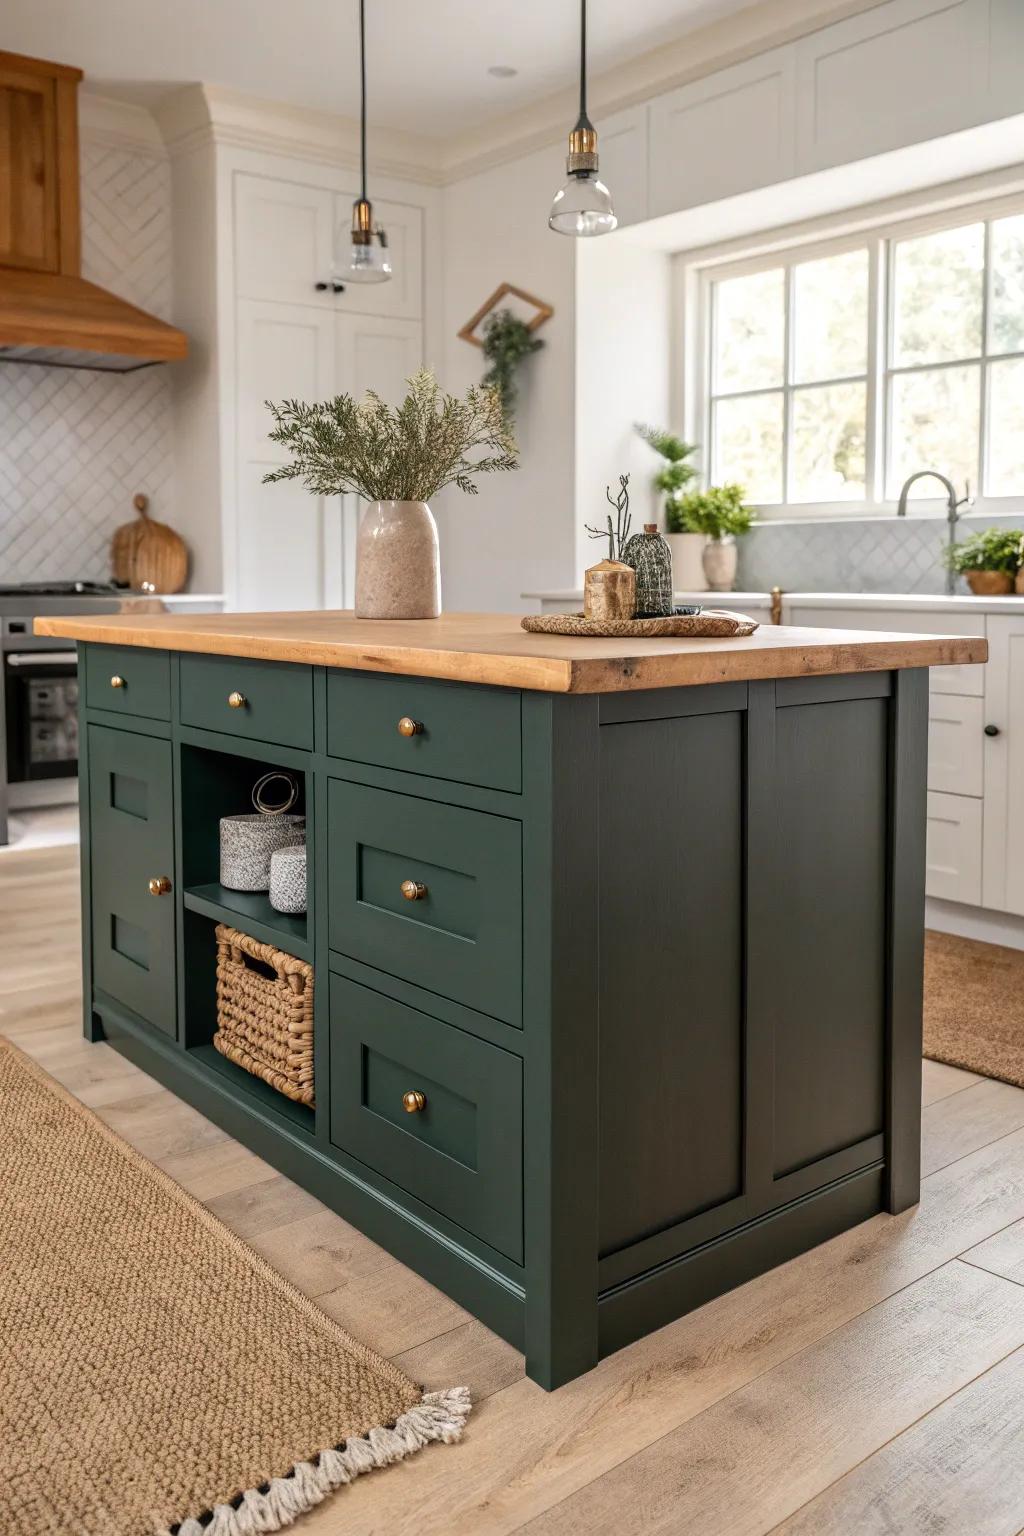
My go-to quick upgrade is wrapping the island sides and back in a bold contrasting paint color while keeping the perimeter cabinets light. I’ve done this on a few makeovers, and it instantly makes the island feel like a real furniture piece.
A few things you might like:
- Dark Green Cabinet Paint: Transform your kitchen island with a deep emerald hue for a sophisticated, furniture-style finish that hides wear.
- Brass or Gold Cabinet Knobs: Add these warm metallic accents to pop against dark paint and instantly elevate the island’s overall appearance.
- Wood Conditioner and Stain: Refresh or finish your butcher block countertop to create a warm, natural contrast against painted cabinetry below.

Classic Shiplap Panels
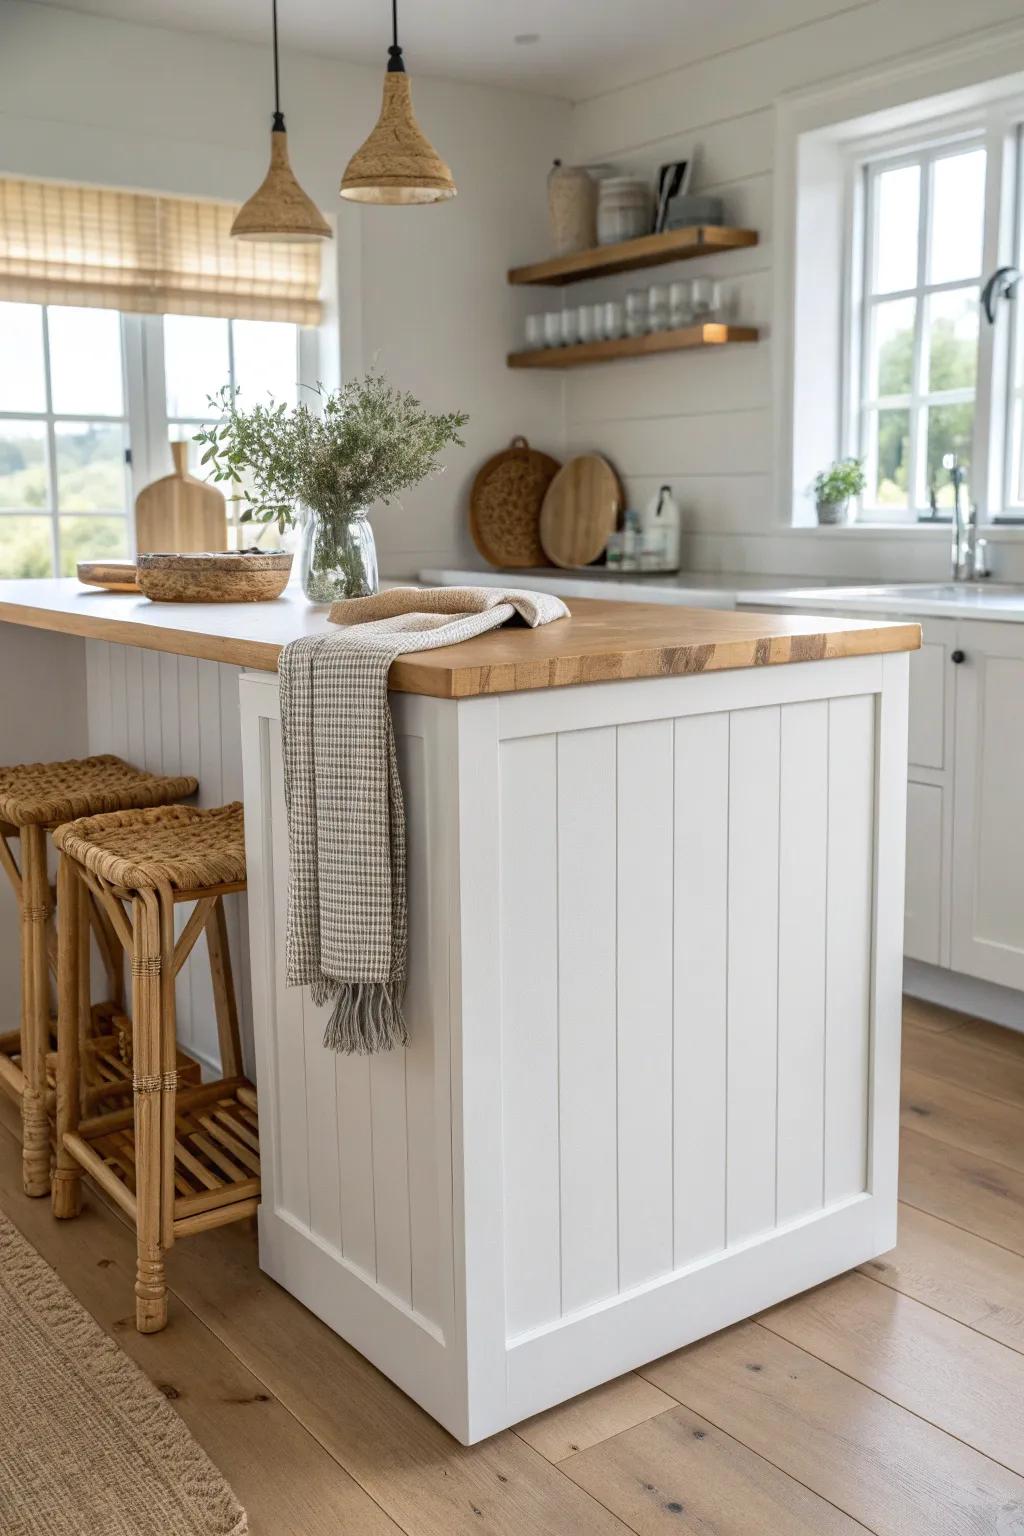
A simple shiplap wrap on the back of the island gives that cozy farmhouse texture without getting too fussy. I like using thin tongue-and-groove boards because I’ve found they stay flatter and look cleaner at the seams.
A few choices to try:
- Tongue and Groove Paneling Kit: Create that cozy farmhouse look on your island effortlessly with these easy-to-install, paintable wood paneling boards.
- Construction Adhesive: Secure your paneling firmly to the island base for a long-lasting and seamless installation without nails.
- Paintable White Caulking: Finish those seams and edges professionally to achieve that clean, built-in look for your kitchen renovation.

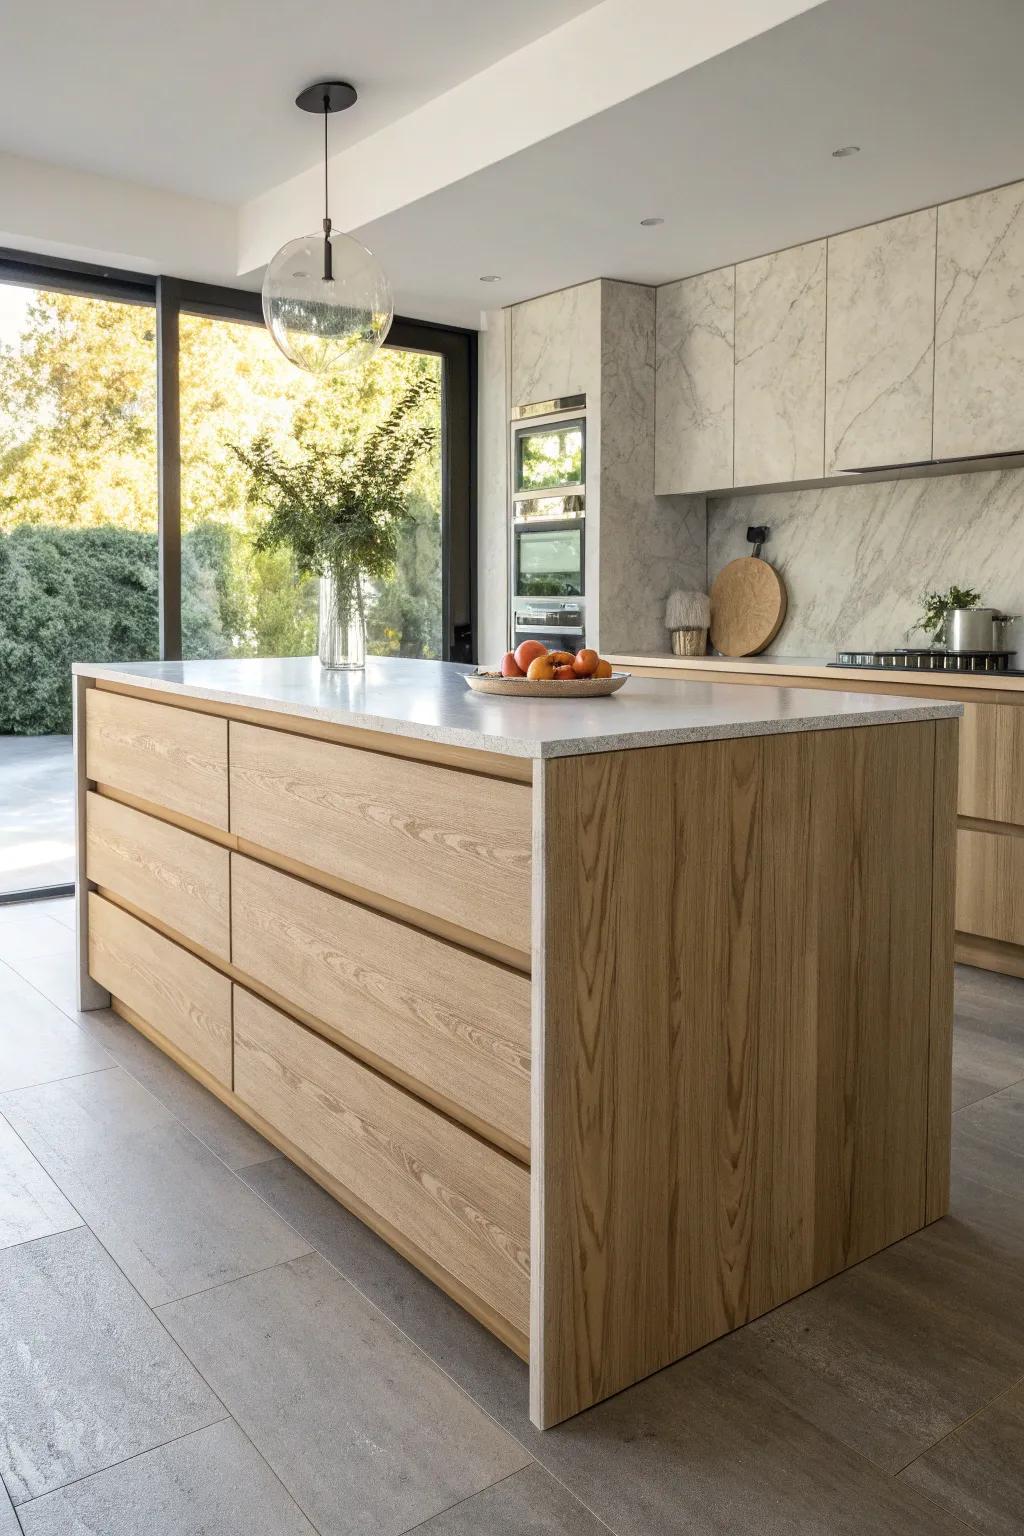
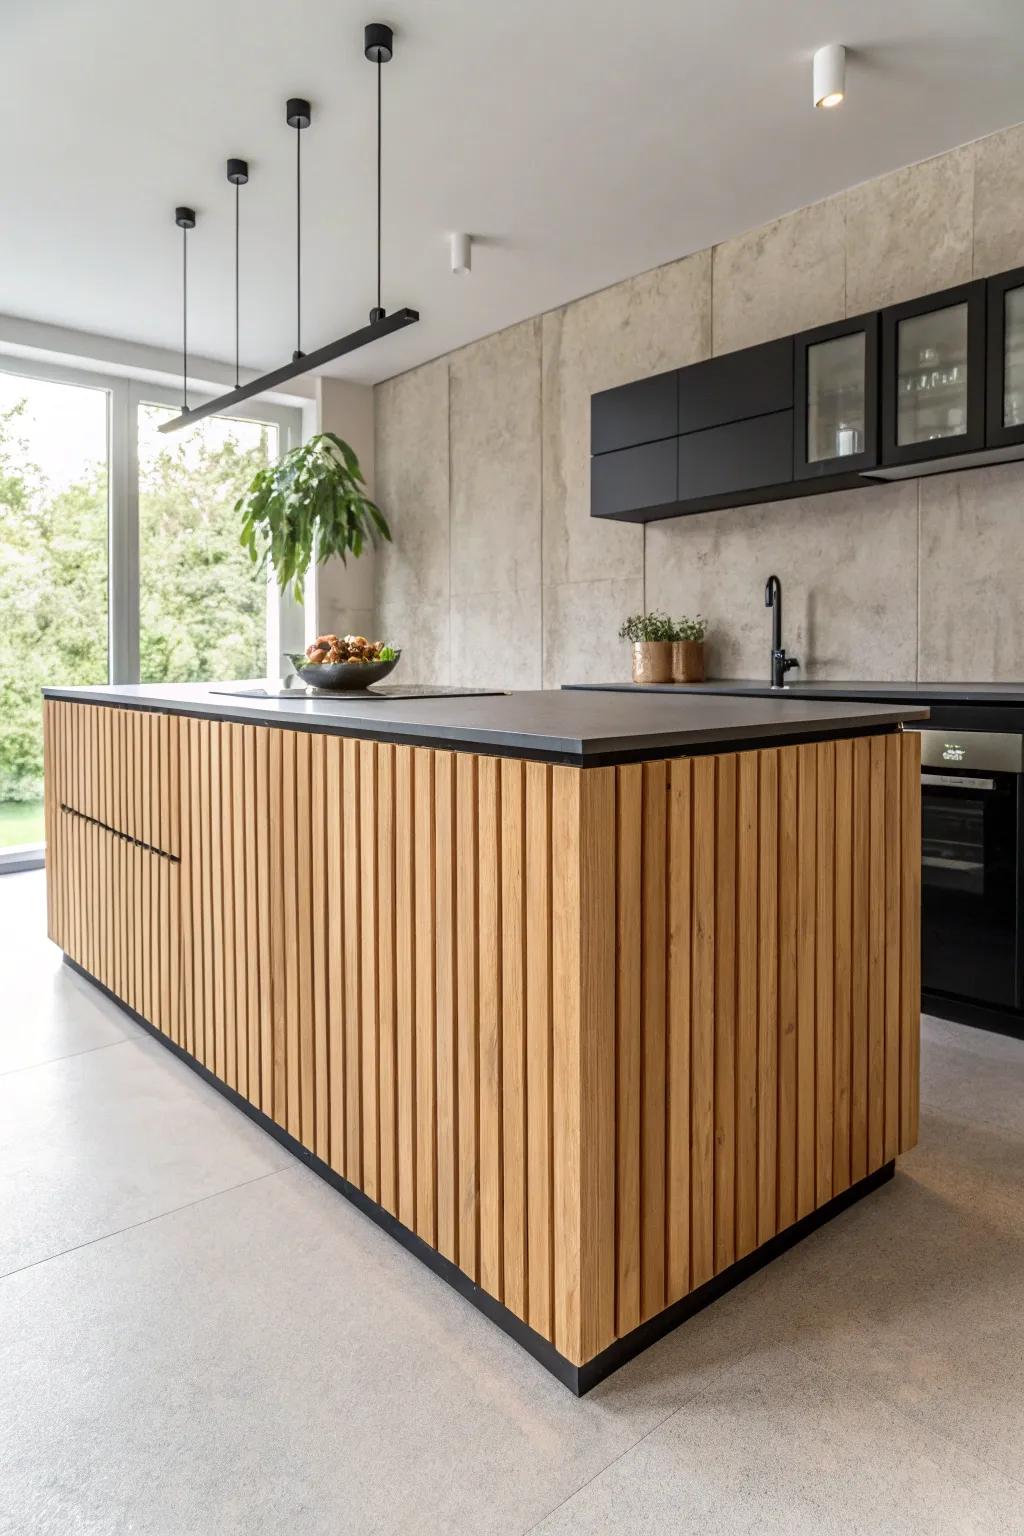
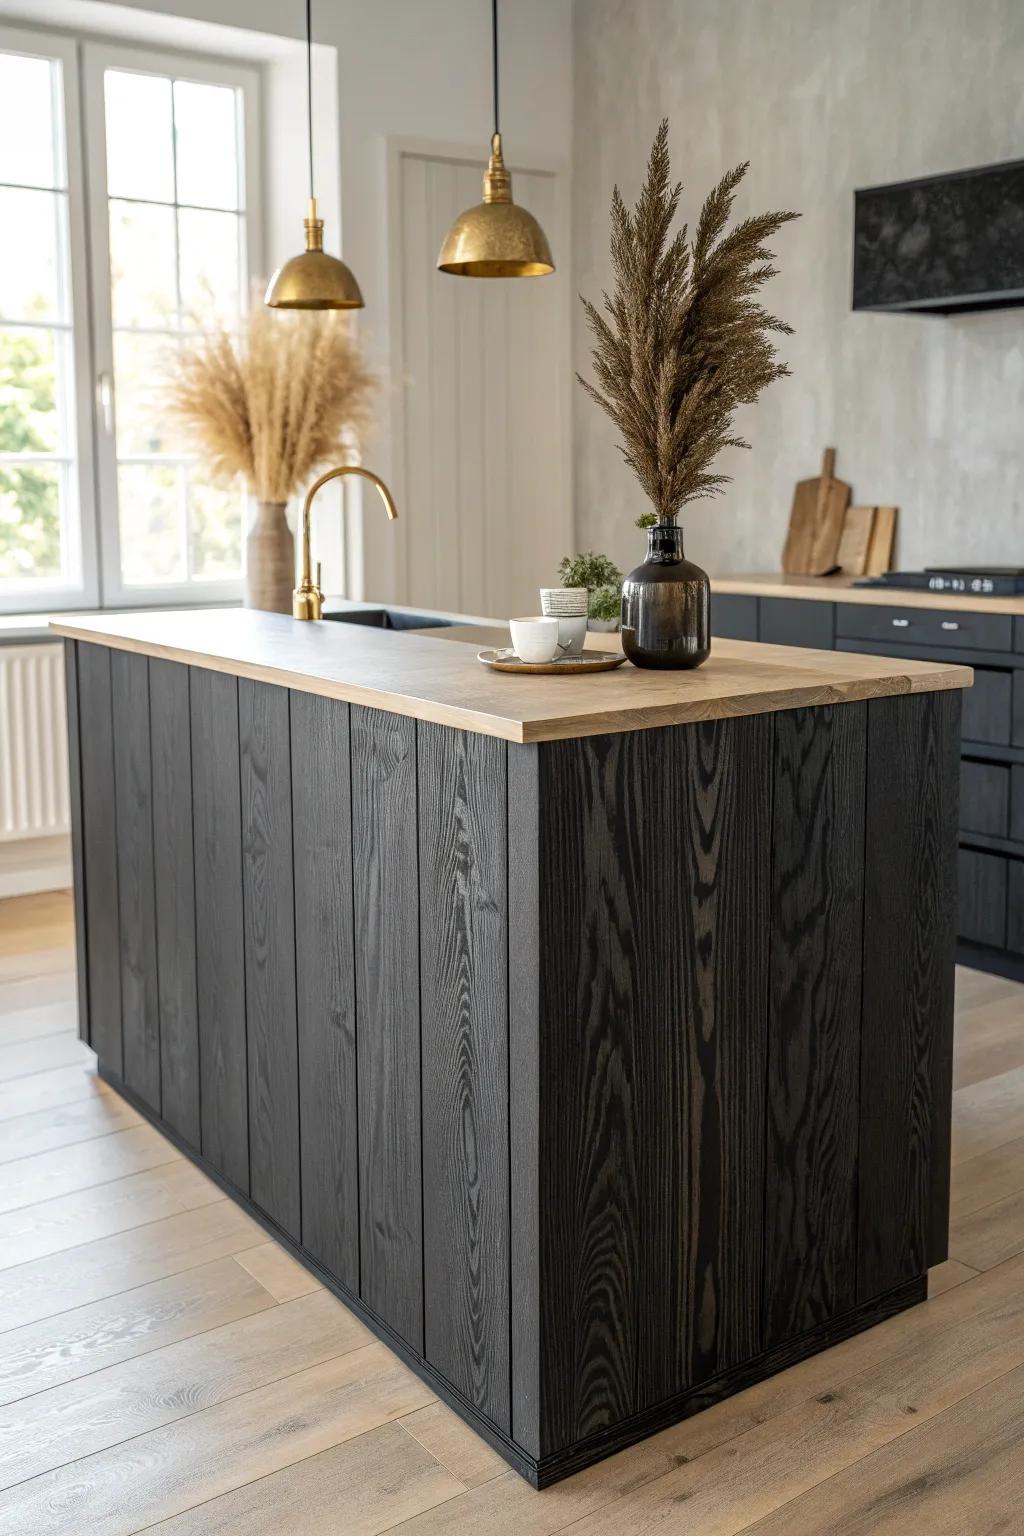
Vertical Plank Wrap
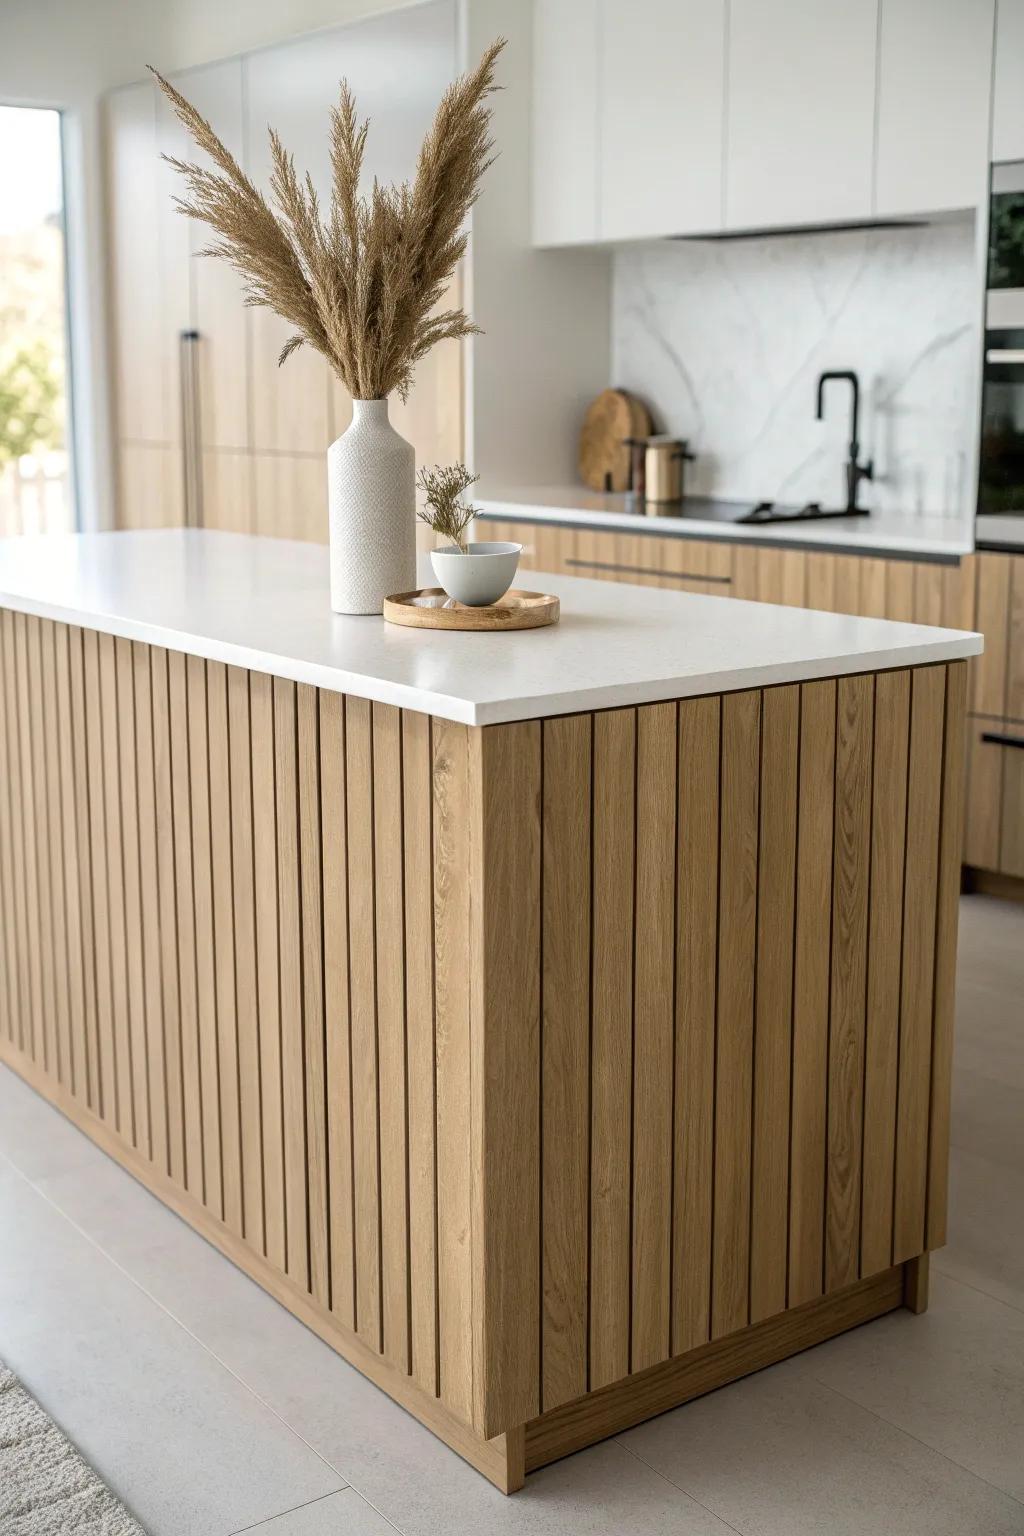
If you want the island to feel taller, wrap it with vertical wood planks from toe-kick to countertop overhang. I tried this in a smaller kitchen once, and the height illusion was way stronger than I expected.
Products that could assist:
- Tambour Wood Wall Paneling: Transform your island quickly with flexible fluted panels that mimic the look of individual vertical slat woodworking.
- Construction Adhesive: Secure your wood planks firmly to the existing island structure for a durable, long-lasting vertical installation.
- Unfinished Oak Slats: Create a custom look using individual real wood slats that you can stain to match your specific cabinetry.
Board and Batten Wrap
A board and batten wrap is my favorite “custom millwork” look on a budget, especially on the seating side. I’ve built these grids with basic trim, and once it’s painted, people swear it was part of the original cabinetry.
Useful items to consider:
- Primed Pine or PVC Lattice Molding: Create the batten grid pattern easily with pre-primed strips that are ready to cut, install, and paint.
- Construction Adhesive: Ensure a secure, long-lasting bond for your trim pieces without relying solely on nails for installation.
- Cabinet & Furniture Paint: Finish your project with a durable, smooth coat that resists scuffs and blends the trim seamlessly.
Beadboard Island Wrap
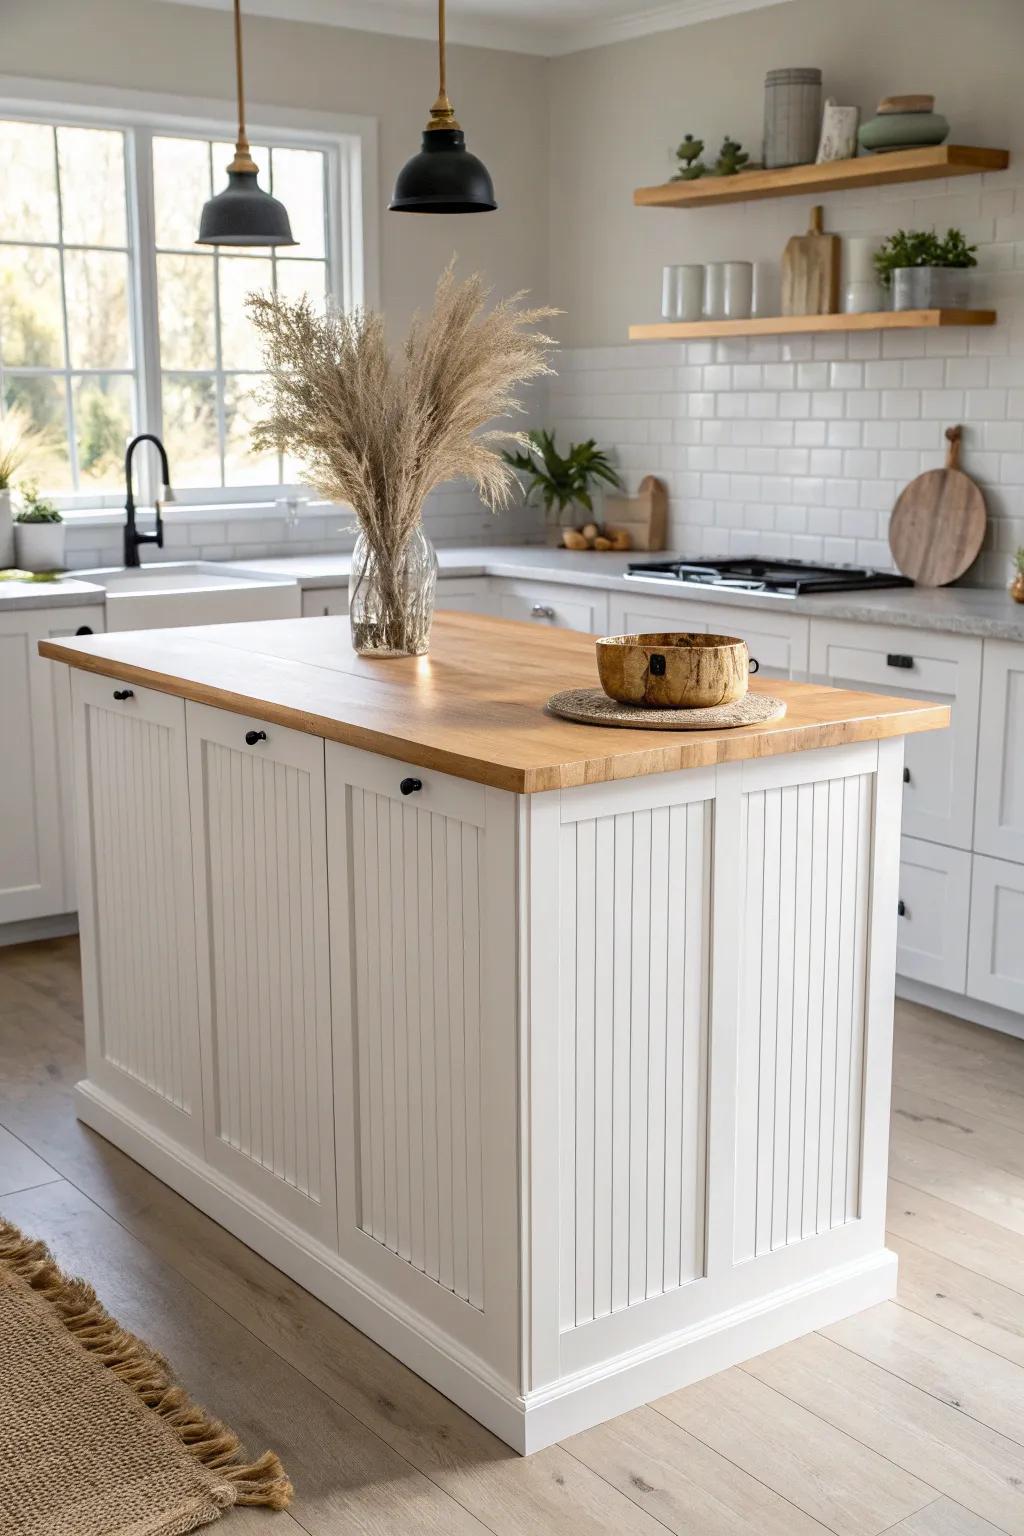
Wrapping an island with beadboard paneling adds instant cottage charm and hides minor dings really well. I used it on a family’s high-traffic island, and it still looked great after plenty of shoe scuffs and barstool bumps.
Possibly helpful picks:
- Paintable Beadboard Paneling Sheets: Transform your kitchen island instantly with these classic grooved panels that add durability and cottage style.
- Semi-Gloss White Cabinet Paint: Ensure your new paneling withstands daily wear by applying a durable, easy-to-clean semi-gloss white finish.
- Construction Adhesive: Secure your beadboard panels firmly to the existing island structure for a long-lasting, professional installation.
Picture-Frame Trim Wrap
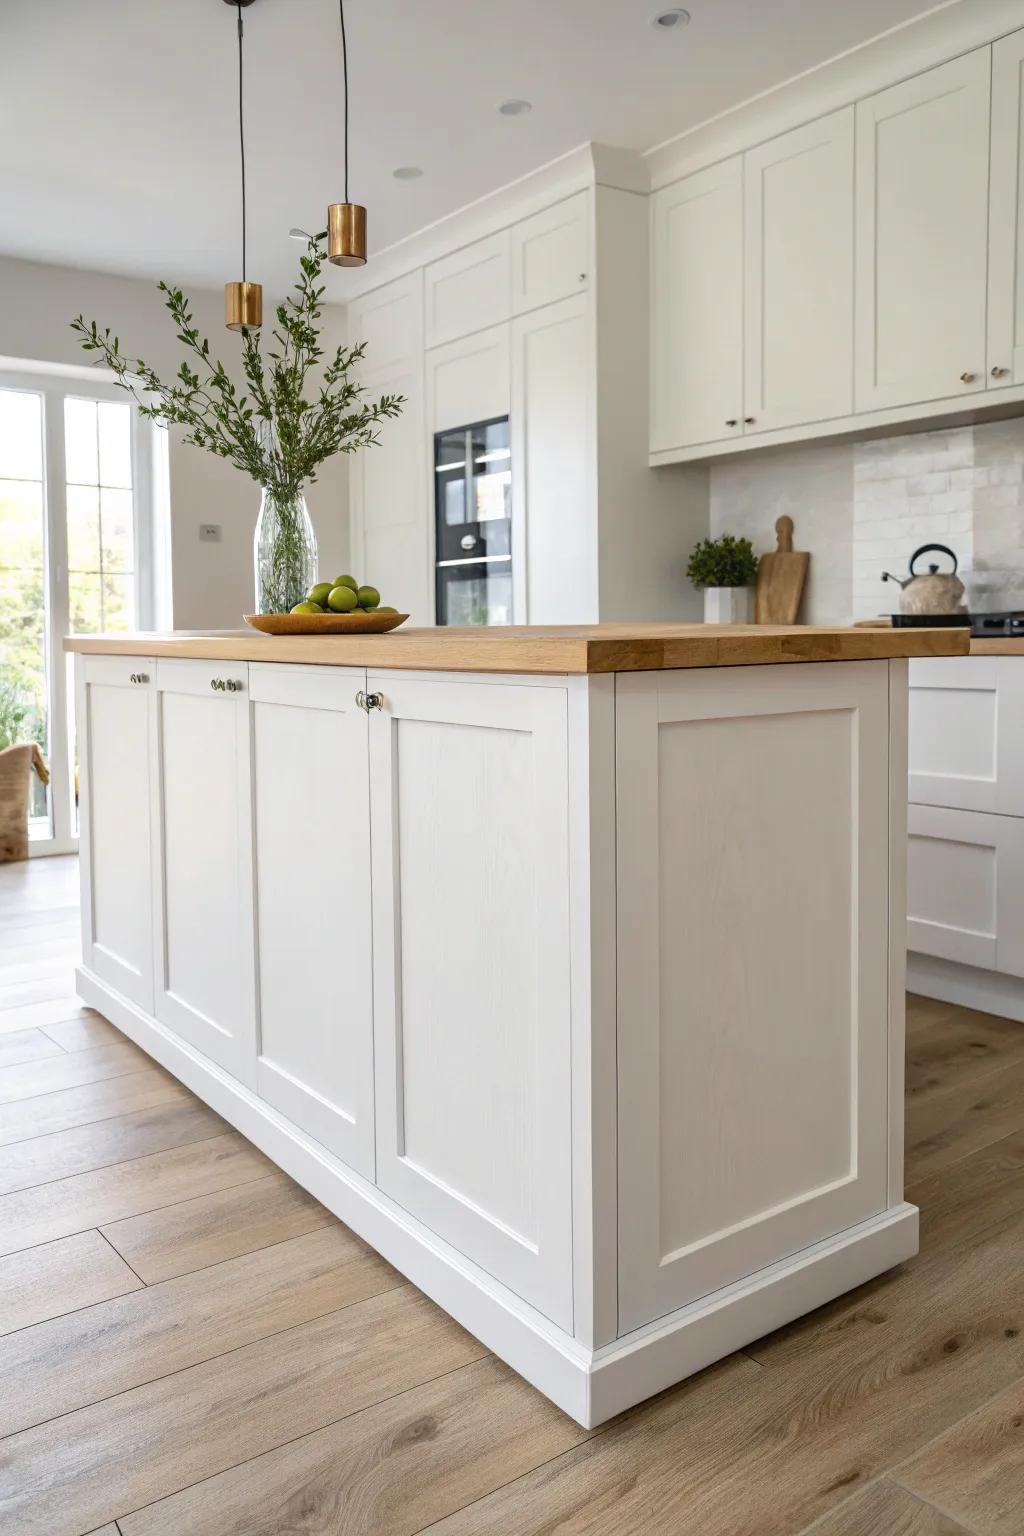
For a clean, classic look, I wrap the island with flat panels and add picture-frame trim to fake recessed doors. I’ve done this when the existing island was totally plain, and it’s amazing how “high-end” it reads with just trim and paint.
Consider these options:
- Pre-Primed Pine Moulding: Use this trim to create the classic picture-frame borders; it’s paint-ready for a seamless, custom finish.
- Brad Nailer Kit: Secure your trim pieces neatly without splitting wood using this essential tool for professional-looking carpentry projects.
- Cabinet Paint and Primer: Achieve that durable, high-end white finish shown in the photo with a quality semi-gloss cabinet enamel.
Reclaimed Wood Plank Wrap
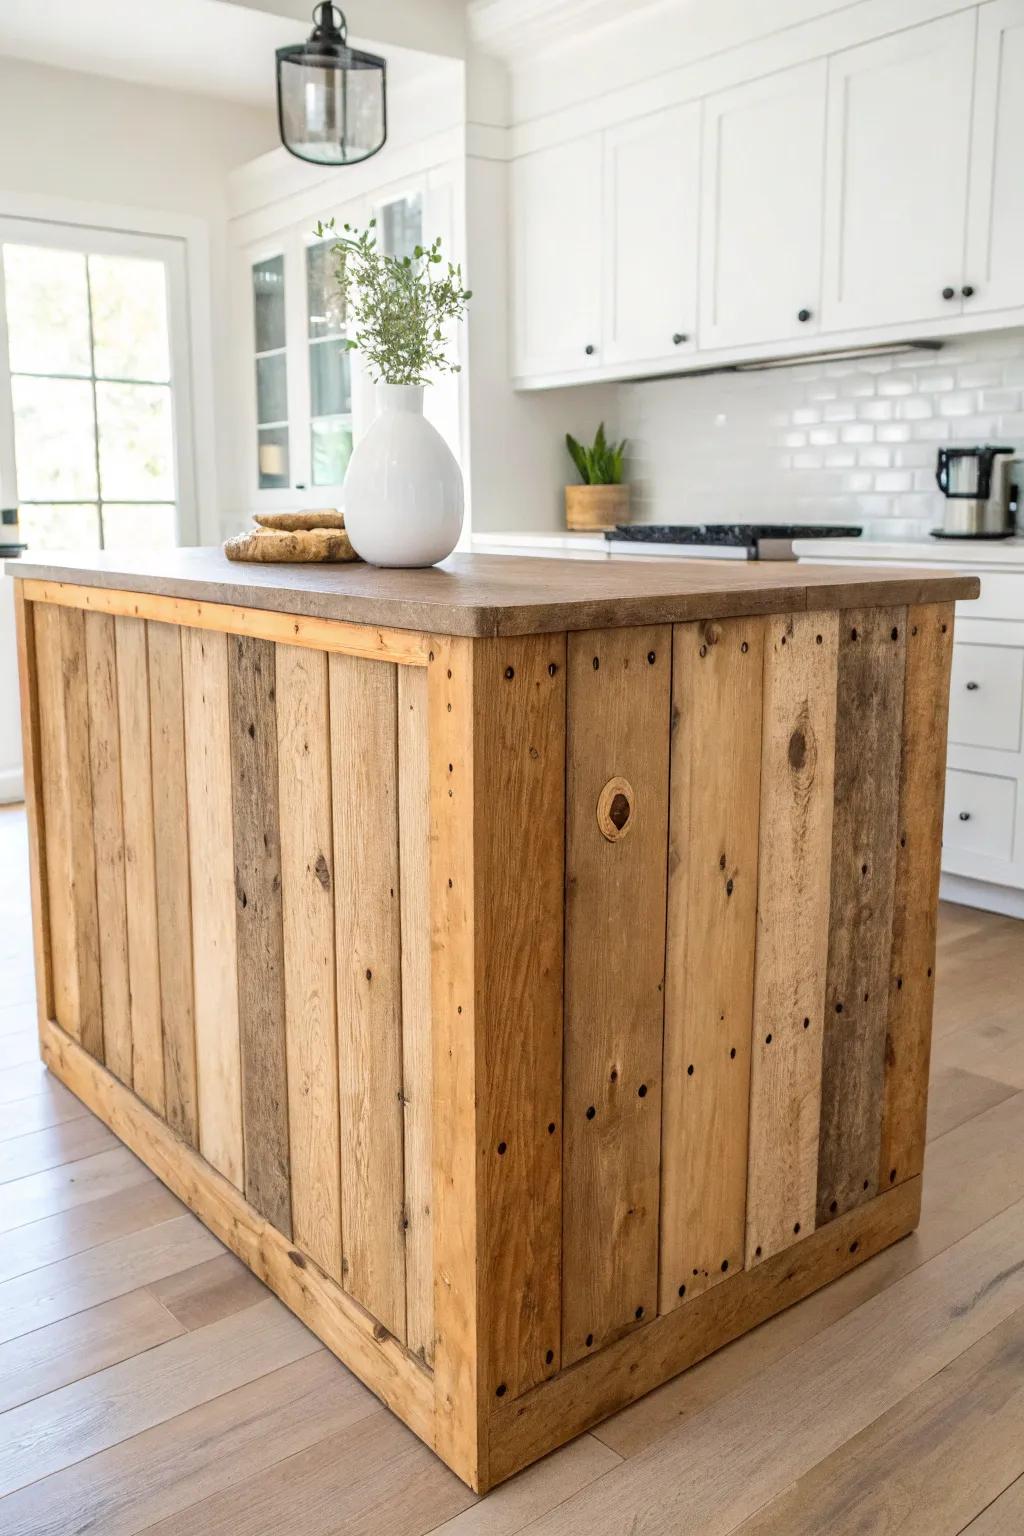
A reclaimed wood wrap is perfect when you want warmth and character, especially against simple white cabinets. I’ve used salvaged boards with nail holes and all, and once they’re sealed, that imperfect grain becomes the whole vibe.
Some ideas to consider:
- Reclaimed Wood Wall Panels: Instantly add rustic charm by applying these authentic peel-and-stick wood planks to your island’s base.
- Clear Matte Polyurethane Sealer: Protect your new wood surface from kitchen spills while keeping that raw, natural finish intact.
- Construction Adhesive & Caulk Gun: Ensure a permanent, sturdy hold for heavier reclaimed boards that require more than just finishing nails.
Two-Tone Wood and Paint Wrap
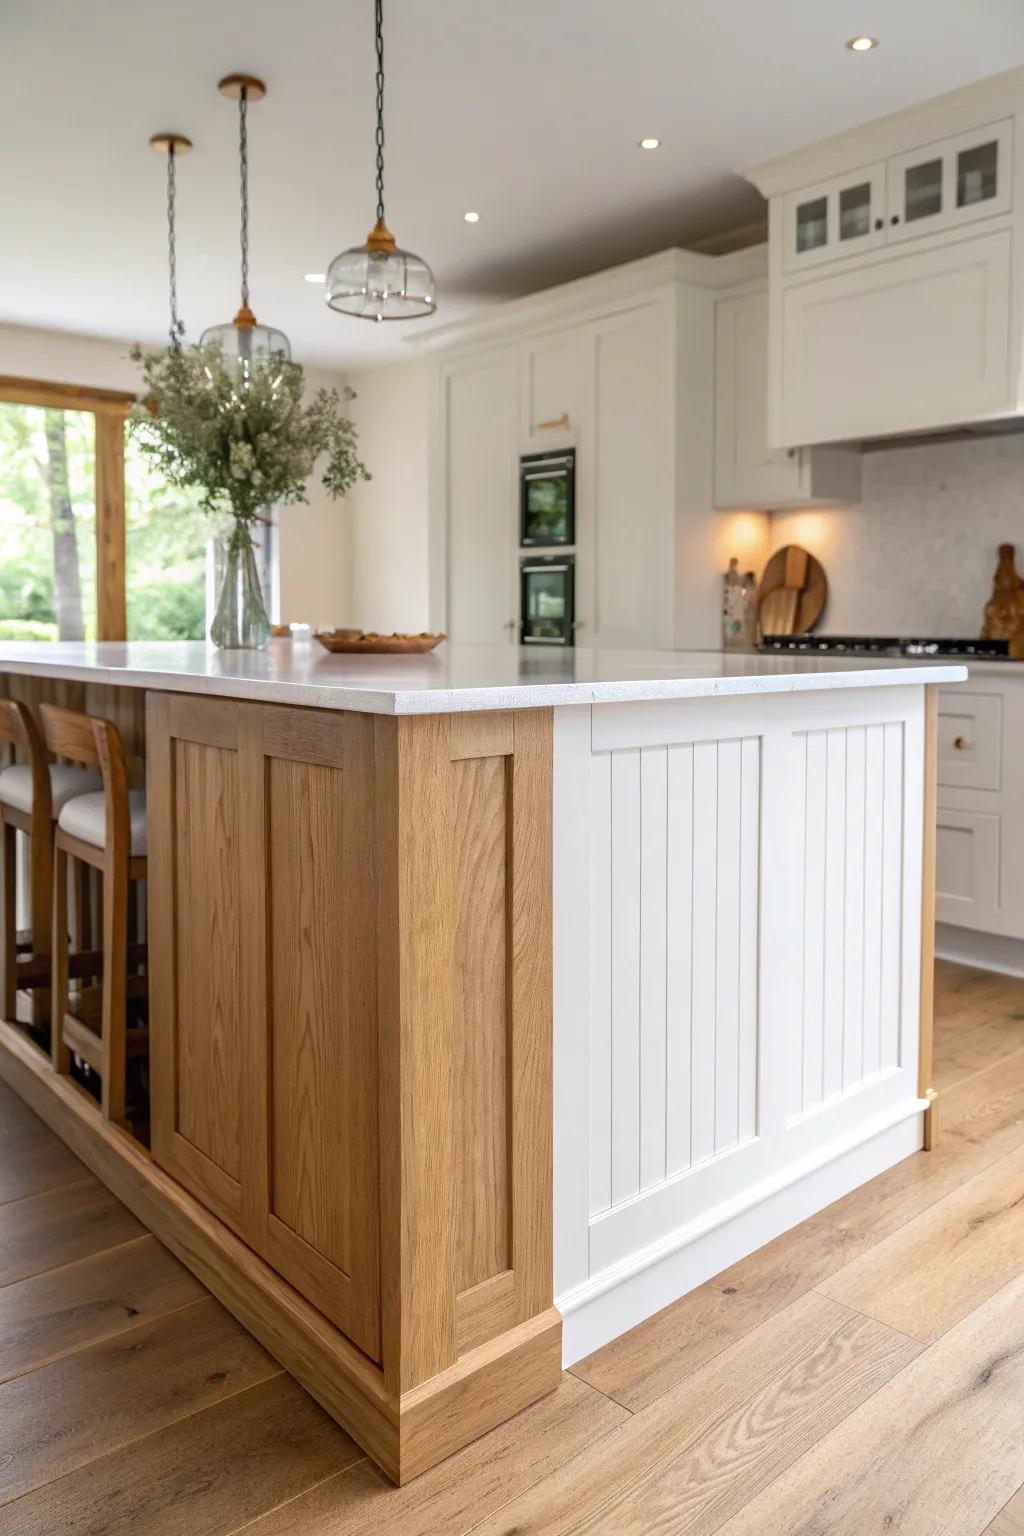
One of my most repeated combos is a painted island wrap with a stained wood accent panel on the seating side. I’ve used this to tie in open shelving or ceiling beams, and it makes the whole space feel pulled together.
Maybe worth checking out:
- Oak Wood Veneer Sheets: Add warmth to your island by applying real wood veneer sheets to create that stunning custom accent panel.
- Beadboard Paneling Kit: Replicate the crisp painted look easily with beadboard paneling that adds instant texture and classic cottage charm.
- Wood Stain and Sealer: Achieve the perfect rich tone to match your flooring or beams with a high-quality, durable wood stain.
Waterfall-Look Side Panels
If you love the waterfall edge look but not the price, try wrapping the island ends with a faux “countertop” panel that visually drops down the sides. I’ve done this with carefully matched sheet material, and it gives that sleek slab vibe from across the room.
These products might help:
- Marble-Effect Contact Paper: Transform sleek panels quickly; apply this durable adhesive film to mimic a high-end stone waterfall edge affordably.
- Wood Veneer Sheets: Achieve the exact wood-match look shown; use these veneer sheets to create seamless, custom-colored side panels.
- Panel Adhesive Construction Glue: Secure your new side panels firmly; use this heavy-duty adhesive to ensure a long-lasting, professional installation.
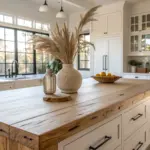
Butcher Block End Wrap
Wrapping the island ends with a thick-looking butcher block panel makes it feel like freestanding furniture. I’ve faked the thickness with layered material and a beefy edge, and nobody guesses it’s a wrap instead of a full rebuild.
Possibly handy products:
- Butcher Block Countertop Slab (Unfinished): Use a solid wood slab to create the main panel; cut to size for a custom end-wrap finish.
- Edge Banding or Wood Veneer Wrap: Apply matching wood veneer to exposed edges to fake the appearance of a thicker, solid timber construction.
- Wood Conditioner and Sealer: Protect your new wood surface and enhance the grain patterns with a quality food-safe oil or conditioner.
Tile Wainscot Wrap
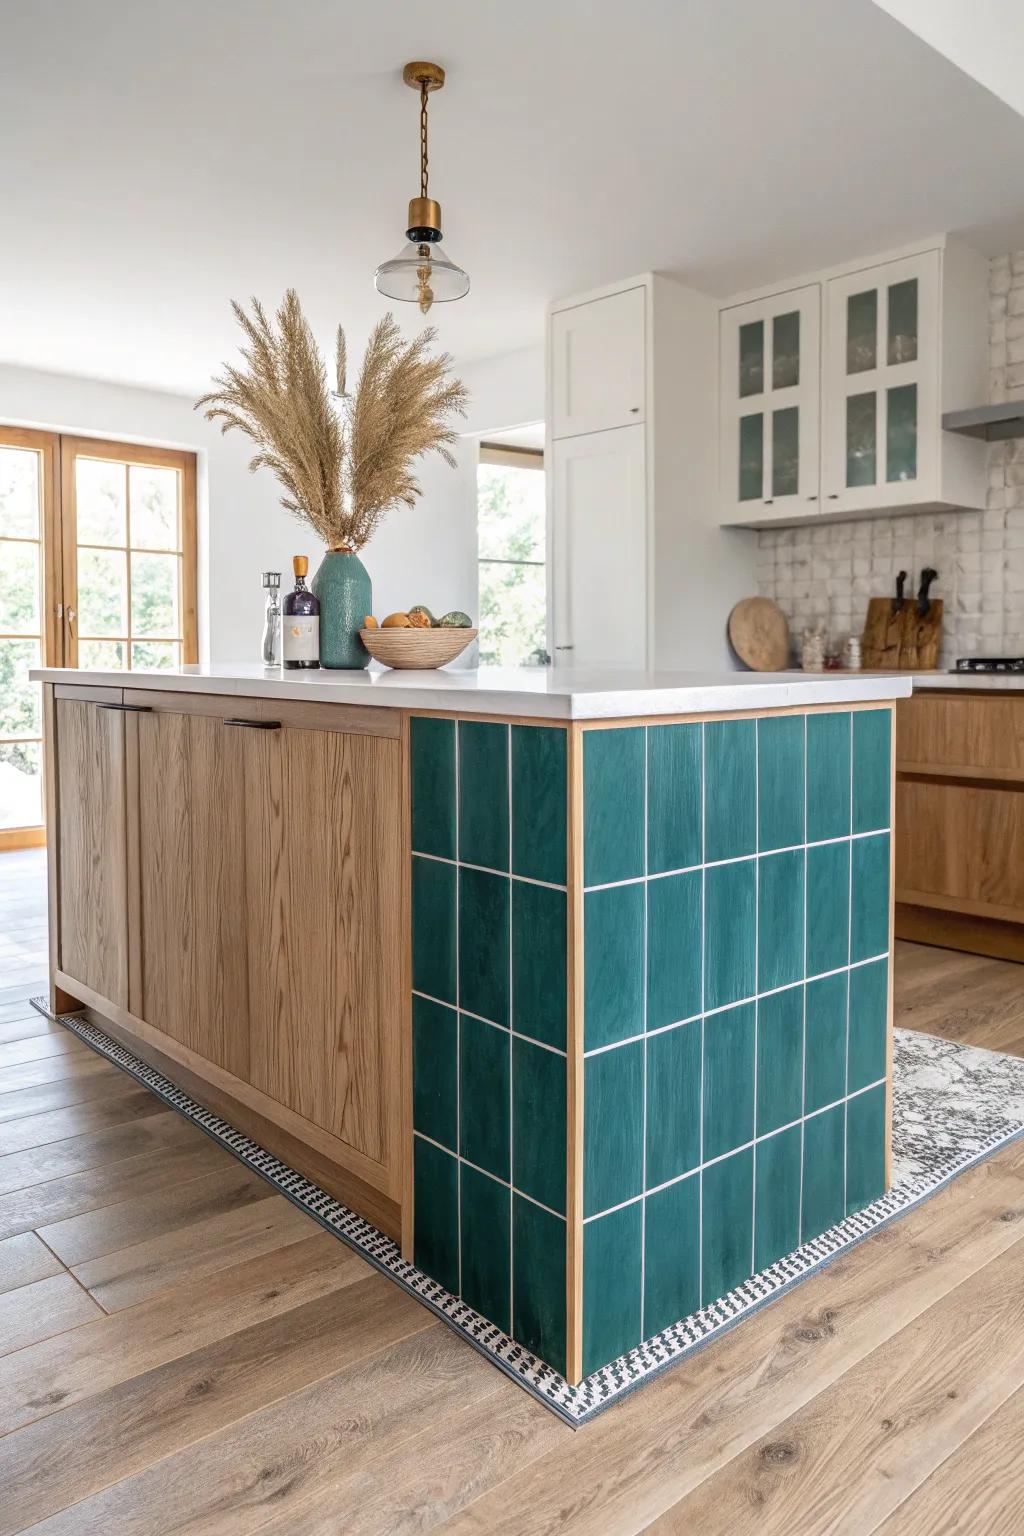
A tile wrap on the island base is awesome if your kitchen gets messy, because it wipes clean like a dream. I’ve done this on islands near sinks, and it saved the panels from water spots and mop splashes.
A few relevant products:
- Green Peel and Stick Backsplash Tiles: Achieve that stunning island look instantly and protect your surfaces with these easy-to-apply adhesive tiles.
- Ceramic Tile Adhesive / Mastic: Ensure your new tile wrap stays perfectly in place on your island with this strong, durable adhesive.
- White Pre-Mixed Grout: Finish your tile wrap project cleanly and seal out moisture with this convenient, ready-to-use grout mixture.
Thin Stone Veneer Wrap
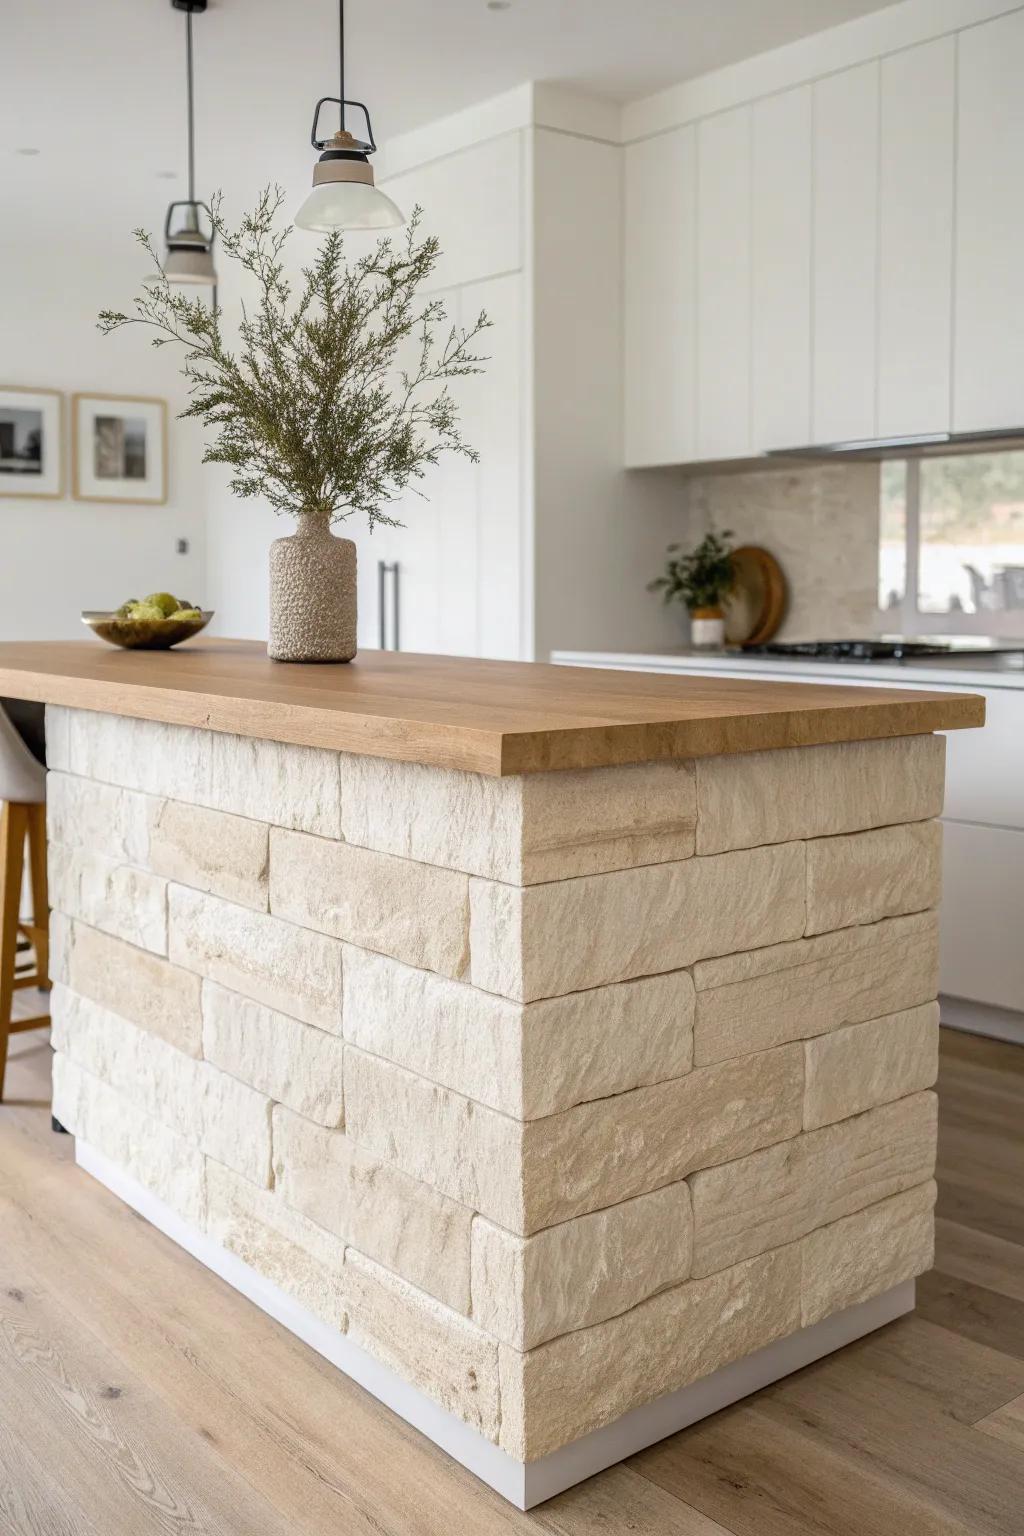
For a seriously sculptural moment, wrap the island sides in stone veneer and let it be the focal point. I helped with one of these installs, and the trick was planning the corners so the edges looked intentional instead of “stuck on.”
These products might be useful:
- Real Stone Veneer Panels: Achieve that sculptural, high-end look instantly by adhering these textured panels directly to your existing island base.
- Heavy-Duty Construction Adhesive: Ensure your new stone facade stays securely in place for decades with a professional-grade, high-bond adhesive.
- Detailed Tile Saw: Create perfectly intentional corners and seamless edges by using the right cutting tool for precise stone adjustments.
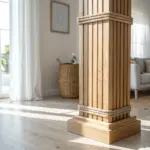
Fluted Wood Wrap
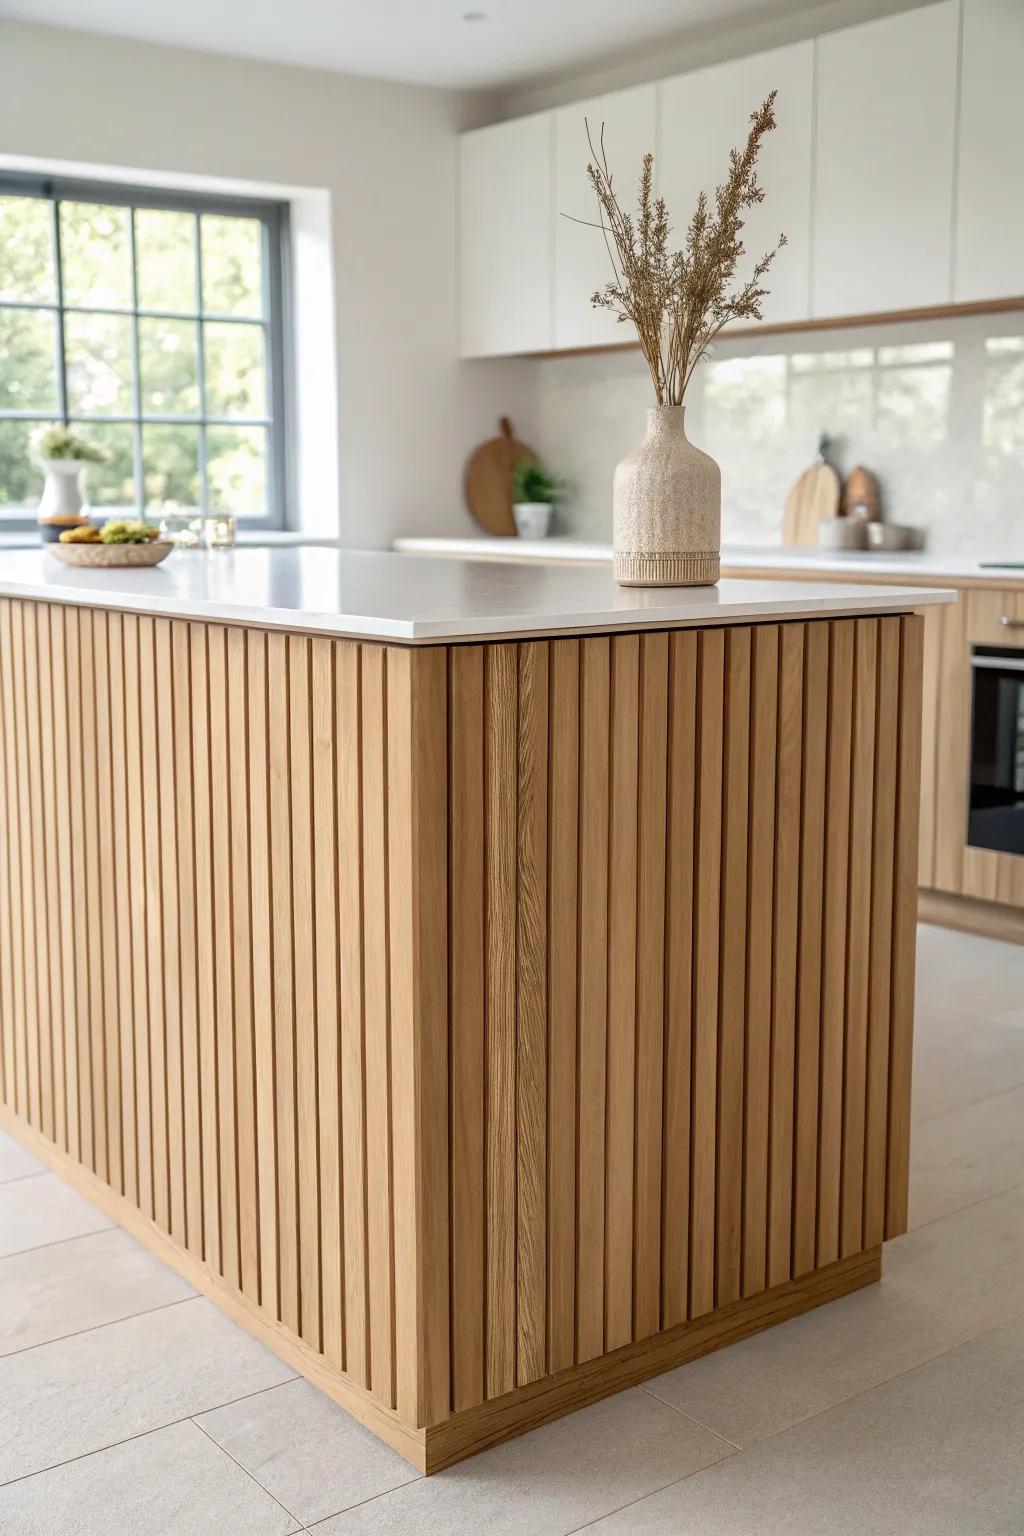
A fluted wood wrap adds that fancy texture without needing a ton of color or décor on top. I’ve used ribbed panels on a basic island box, and the way light hits those grooves makes the whole kitchen feel more layered.
You might like:
- Flexible Fluted Wood Paneling: Transform your island easily with these bendable, textured wood panels that add immediate architectural interest and warmth.
- Construction Adhesive: Ensure a durable, long-lasting installation of your new wood panels with this heavy-duty, quick-grabbing mounting adhesive.
- Natural Wood Stain: Customize your unfinished wood wrap to match existing cabinetry or flooring with a high-quality, protective wood stain.
Wood Wrap With Metal Banding
I love wrapping an island in wood and finishing edges with slim metal banding for a subtle industrial touch. I’ve noticed it also helps protect corners from dings, which is huge if your stools and knees are always crashing into the same spots.
Might be a good match:
- Flexible Wood Slat Paneling: Transform your island’s base quickly with these panels to achieve that modern, textured look instantly.
- Matte Black Metal Edge Trim: Install this durable banding to protect vulnerable corners while adding a sleek, industrial finish to edges.
- Heavy Duty Construction Adhesive: Secure your wood panels and metal trim firmly in place for a long-lasting, professional-grade renovation.
Corrugated Metal Wrap
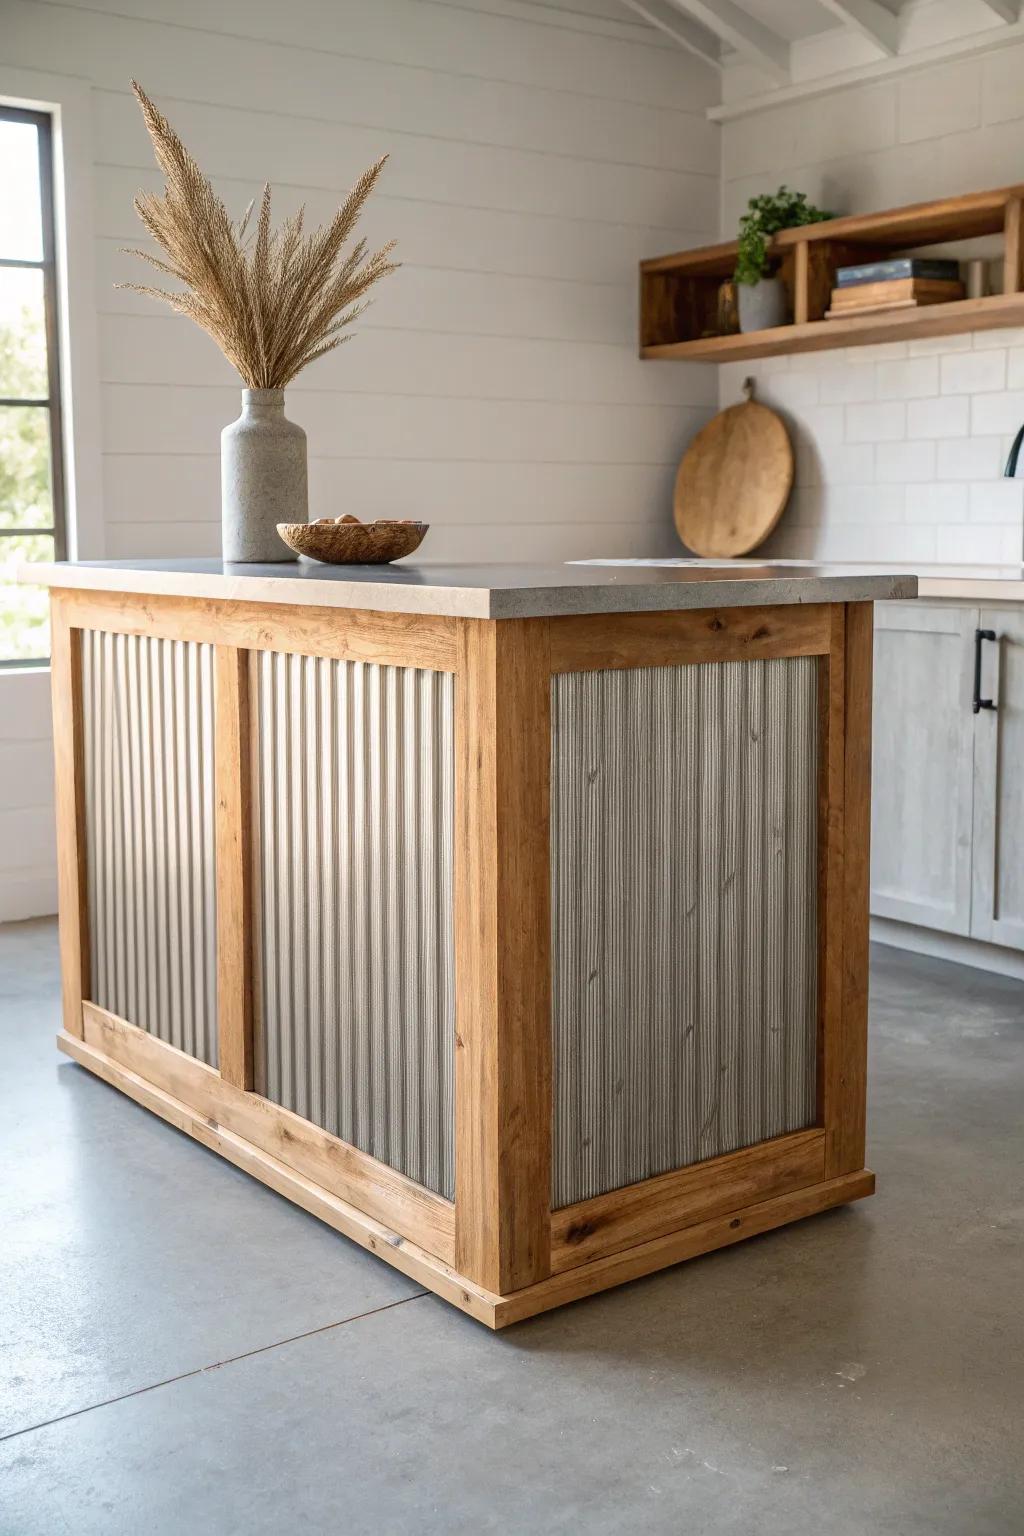
For a farmhouse twist, wrap the island back in corrugated metal framed with wood trim so it looks built-in and intentional. I tried this on a rustic makeover, and it was surprisingly forgiving—tiny dents just add character.
A few helpful options:
- Galvanized Corrugated Metal Panels: Secure that authentic farmhouse look by installing durable metal sheets that add instant rustic texture to your island.
- General Purpose Construction Adhesive: Ensure a strong, lasting hold for your metal panels and wood trim without relying solely on visible nails.
- Unfinished Wood Lumber Boards: Frame your metal panels with raw wood boards to create that custom, built-in appearance shown in the inspiration.
Cane-Inset Panel Wrap
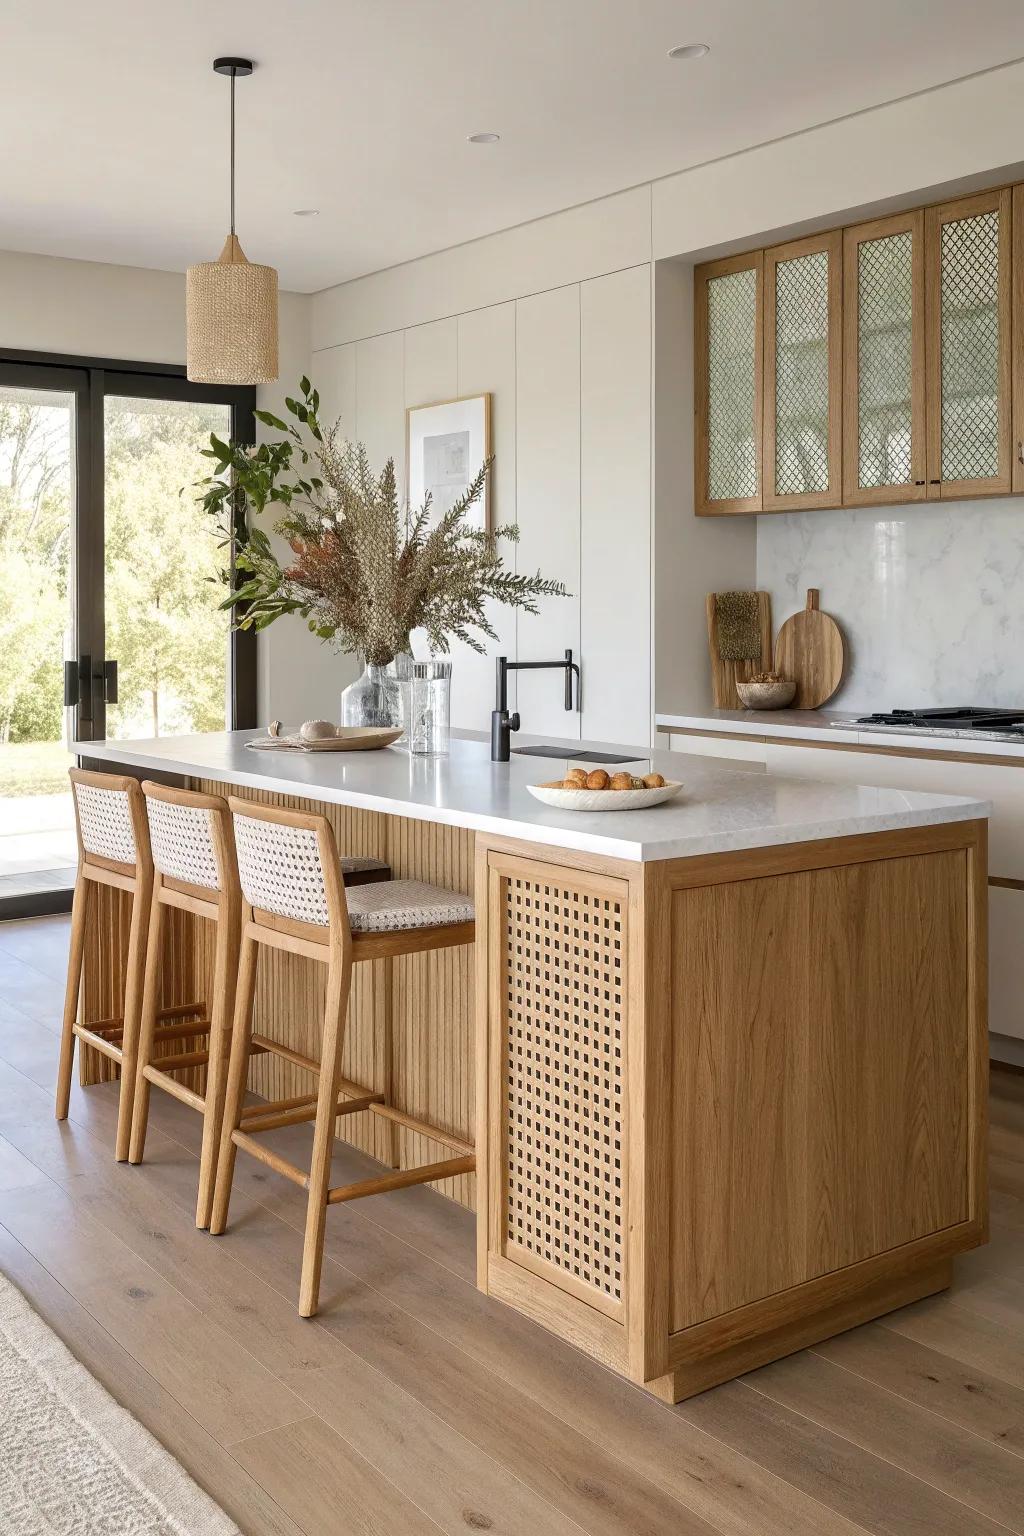
Wrapping an island with framed panels and cane webbing inserts gives airy texture that feels vintage and fresh at the same time. I’ve used this on the seating side, and it makes the island look lighter without losing that custom detail.
May just do the trick:
- Natural Rattan Cane Webbing Roll: Use flexible natural rattan sheets to create custom inset panels that add airy texture to cabinetry.
- Unfinished Wood Molding Strips: Frame your cane inserts neatly with simple wood trim to achieve that professional, built-in joinery look.
- Heavy Duty Staple Gun Kit: Secure your webbing and trim effectively with a reliable staple gun for a durable DIY finish.
Open-Shelf Wrap Section
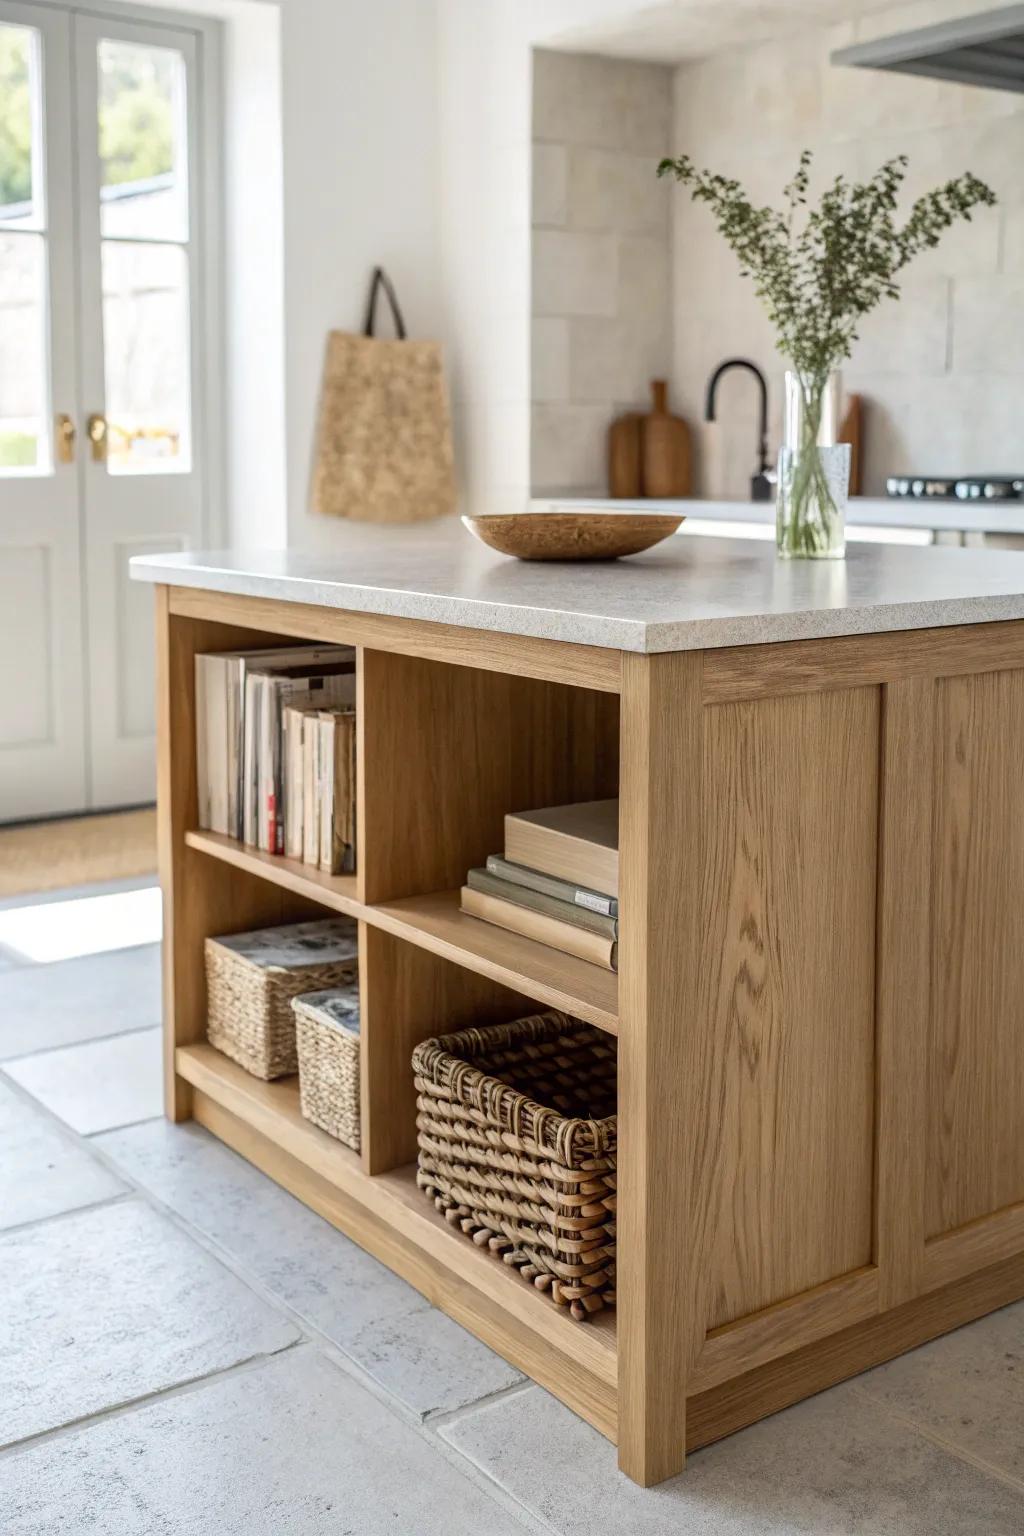
Instead of a solid wrap everywhere, I sometimes build a wrap that includes one section of open shelving on the end for cookbooks or baskets. I’ve done it in small kitchens, and it adds personality while keeping the main panels clean and cohesive.
Check if these fit your needs:
- Woven Seagrass Storage Baskets: Organize pantry items or linens neatly on open shelves while adding natural texture to your space.
- Decorative Wooden Dough Bowl: Use this on the countertop as a rustic catch-all for fruits, keys, or decorative items.
- Minimalist Bookends: Keep your favorite cookbooks upright and accessible on open shelving without creating visual clutter.
Removable Test Wrap
If you’re nervous about committing, try a removable island wrap by adding a protective layer first, then attaching thin panels so it can come off later. I’ve used this “try it first” method for texture trends, and it saved me from living with a choice I didn’t love.
Check these products out:
- Self-Adhesive Wood Contact Paper: Transform your island’s surface instantly with this peel-and-stick option that mimics natural wood grain for a fresh, temporary update.
- Thin Flexible Wood Veneer Sheets: Attach these lightweight, real wood sheets over a protective base to test authentic textures without permanent structural changes.
- Double-Sided Removable Mounting Tape: Secure your temporary panels or wraps firmly in place while ensuring you can remove them later without damaging surfaces.
Charred Wood Statement Wrap
For a real jaw-dropper, wrap the island in charred wood and seal it well so it’s smooth and wipeable. I’ve done this once as an accent island, and that deep black grain looks unreal under warm pendant lighting.
Give these a look:
- Black Wood Peel and Stick Wallpaper: Transform your island instantly with self-adhesive film simulating charred grain. Apply carefully for a quick, mess-free update.
- Matte Polyurethane Sealer: Protect your dark wood surface from spills and scratches. Apply this finish to ensure a durable, wipeable island.
- Black Wood Stain: Achieve that deep, charred aesthetic on plain wood paneling. Brush on evenly to create a dramatic, rich foundation.


