
A Rustic Sweet 16 can feel equal parts cozy countryside and totally elevated party—if you let wood do the heavy lifting. I’m sharing my favorite ideas I’ve built and styled in my own shop, all centered on reclaimed wood backdrops and warm, celebratory details.
Balloon Garland on a Wood Frame
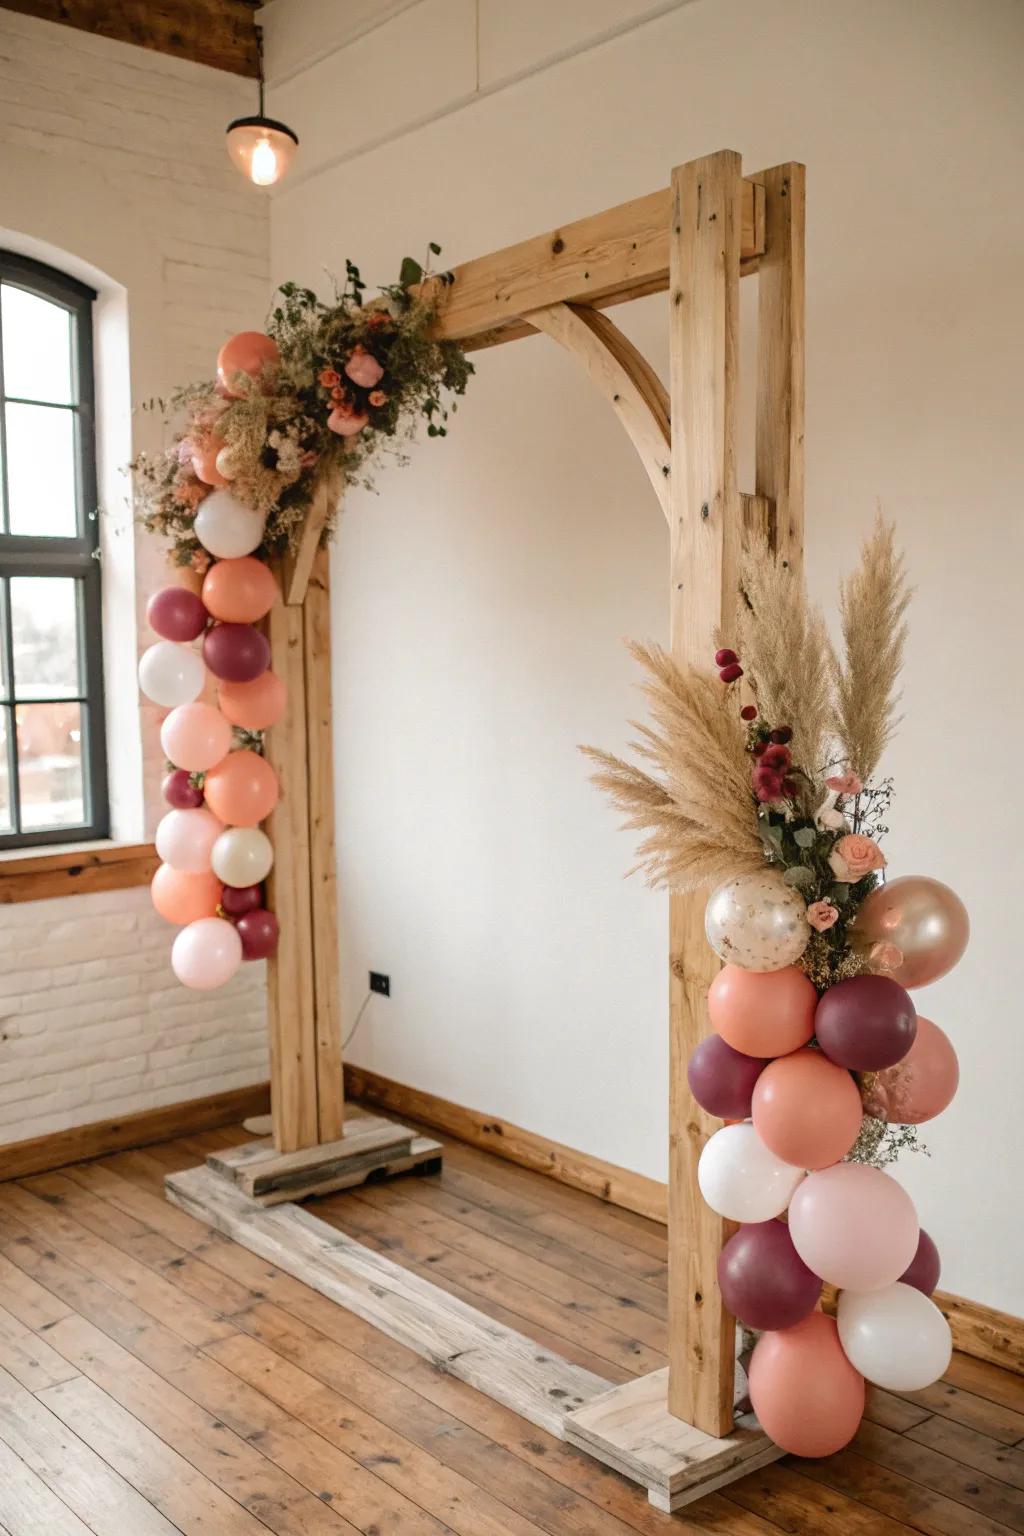
Instead of attaching balloons to random spots, I build a simple wood frame so the balloon garland has structure for the Sweet 16 photos. I’ve reused the same frame for multiple parties—just swap colors and florals.
Explore these options:
- DIY Balloon Arch Kit with Pump: Create professional-looking displays easily by using a complete kit with balloons, strip tape, and a convenient pump.
- Wooden Wedding Arch Stand: Anchor your sweet 16 decorations with a sturdy, rustic wooden backdrop stand that creates a perfect photo frame.
- Dried Pampas Grass Decor: Add texture and a boho-chic vibe to your arrangement by tucking these natural, fluffy stems between balloons.

Pallet Photo Backdrop Wall
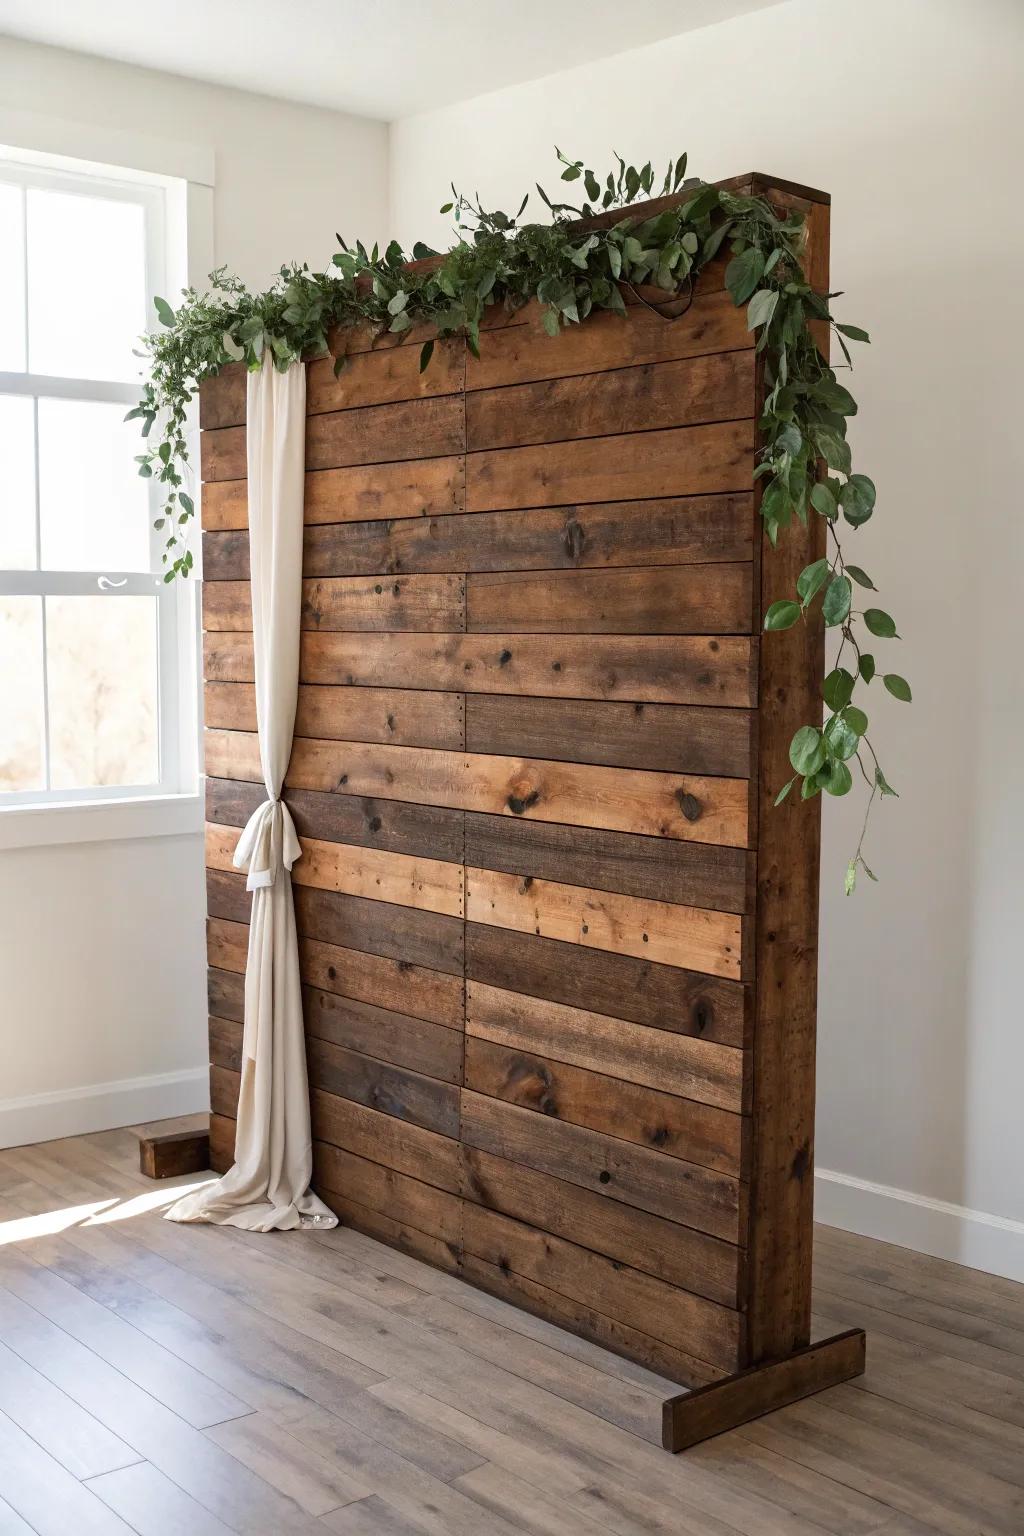
For a Rustic Sweet 16, I love building a quick pallet backdrop and staining it dark so photos pop. I’ve found it instantly turns any corner into a “main stage” once you add a little greenery and soft decor.
You might give these a try:
- Dark Wood Stain: Give your raw wood pallets that rich, deep rustic finish to make your photo subject stand out.
- Faux Eucalyptus Garland: Drape this lush, realistic greenery over the top to soften the hard edges and add natural charm.
- Sheer Ivory Fabric Draping: Add a touch of elegance by casually tying this soft fabric to the side for beautiful contrast.
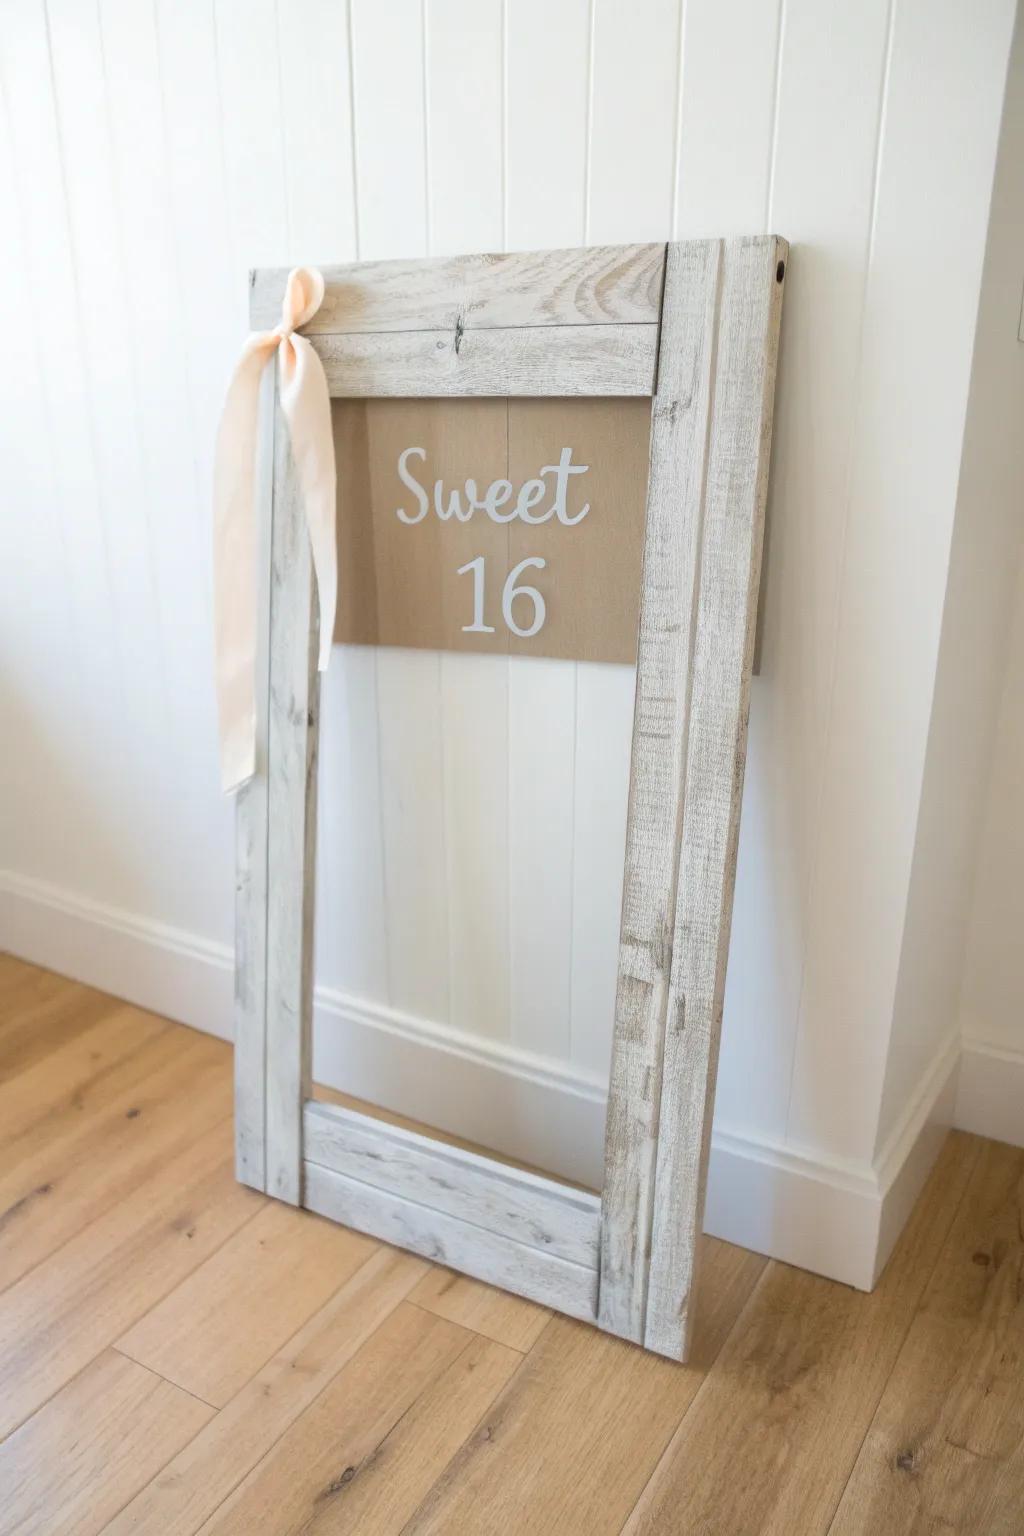
Hand-Painted Sweet 16 Welcome Sign
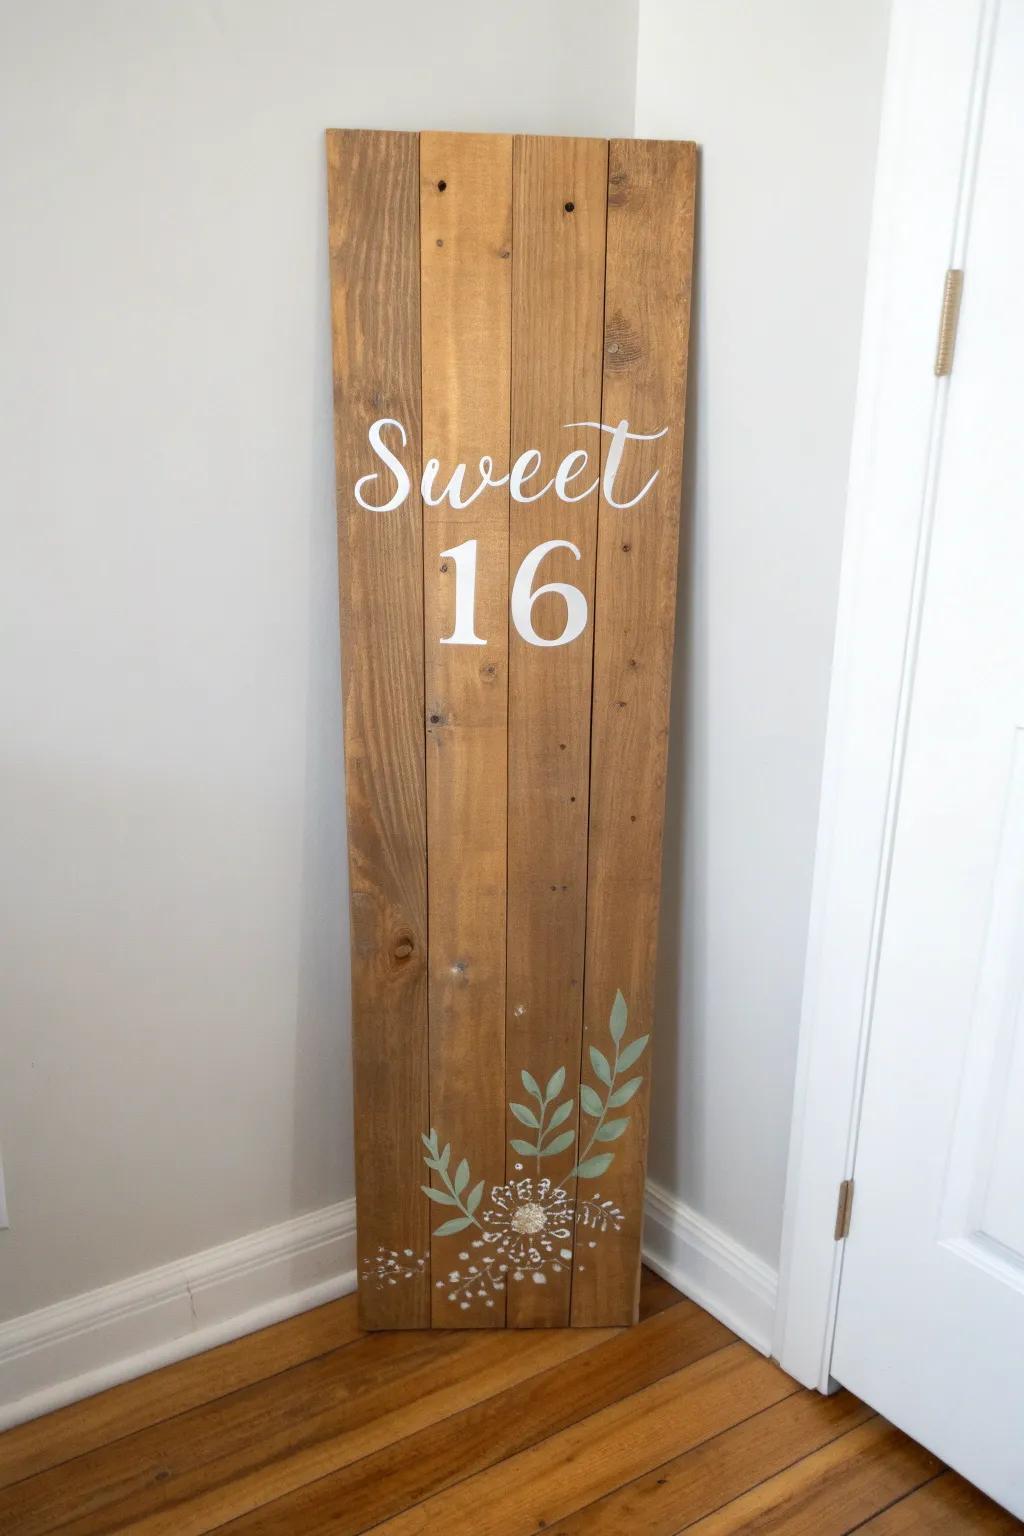
I always make a big wood welcome sign that literally says Sweet 16 so nobody misses what you’re celebrating. In my workshop, I like sanding the edges rough so it feels old and charming, not too perfect.
Items that may come in handy:
- Unfinished Wooden Planks for Crafts: Start your project with the perfect base; choose quality wood planks ready for your creative touch.
- General Purpose Sanding Sponge: Achieve that charming, distressed rustic look by manually roughing up the edges of your wooden sign.
- White Acrylic Paint Markers: Easily create beautiful script lettering and detailed floral designs with precise, opaque white paint pens.
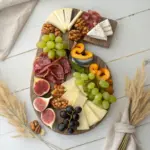
Dessert Table With Wooden Risers
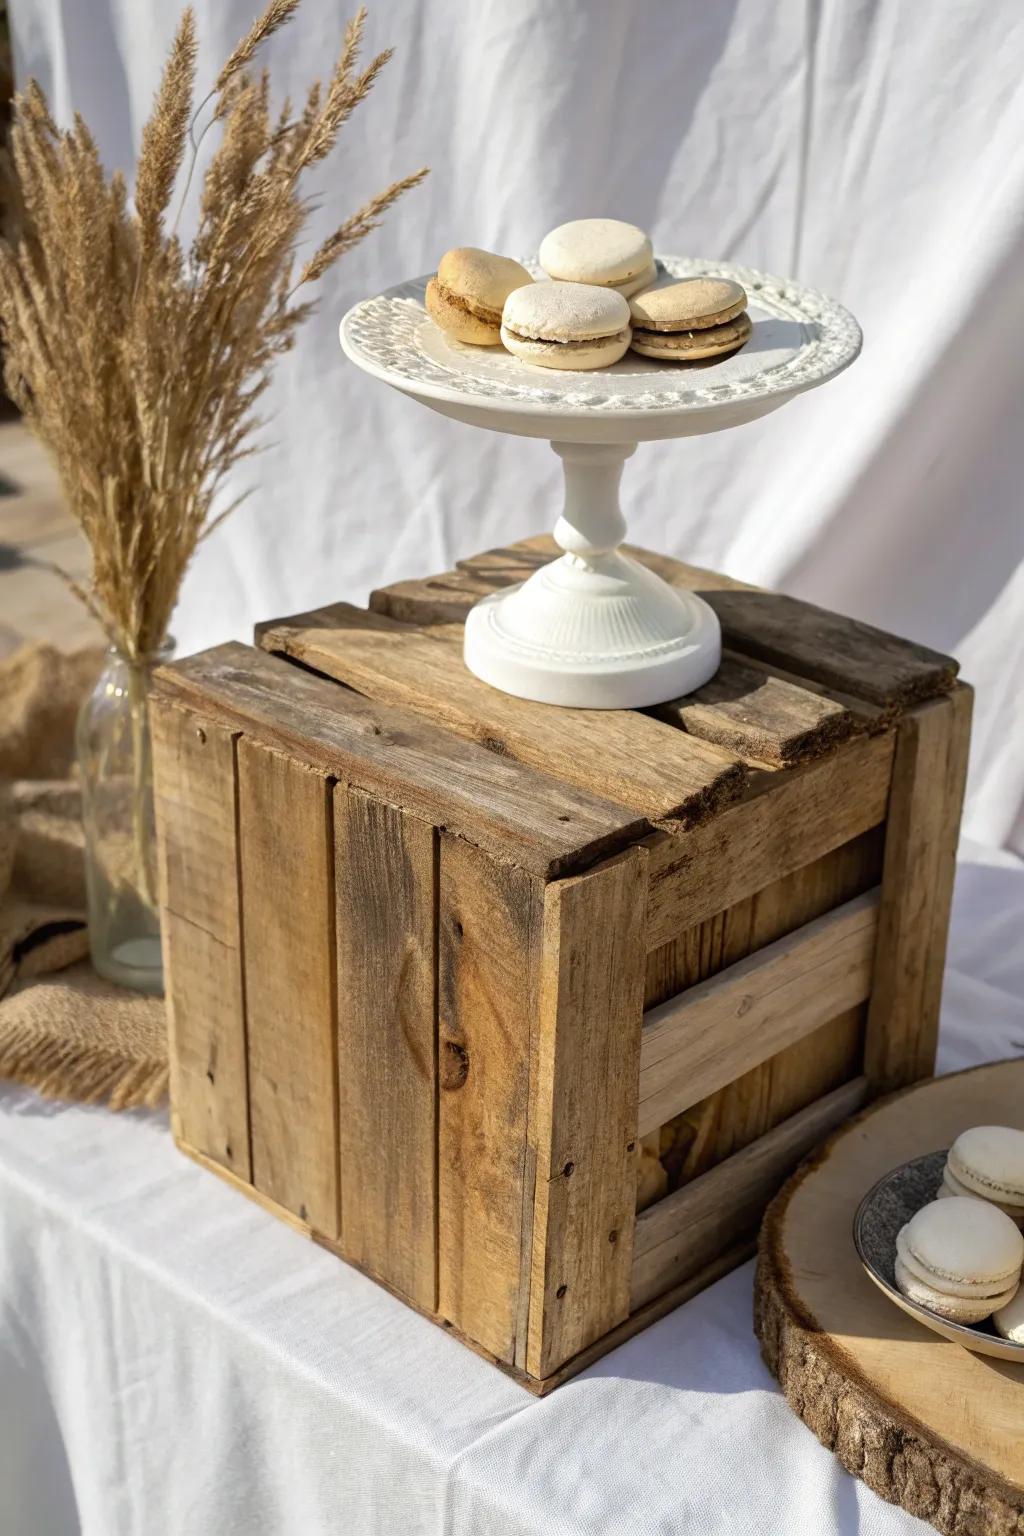
A Sweet 16 dessert table looks instantly rustic when I stack treats on wooden crate risers and thick scrap-wood slabs. I’ve done this with mismatched boards, and the varied grain makes everything look styled on purpose.
These products might help:
- Set of Rustic Wooden Crates: Create instant height and visual interest by stacking these sturdy, stackable crates for your rustic dessert display.
- Ceramic or Metal Cake Stand: Elevate your favorite treats with a classic white pedestal stand that contrasts beautifully against rough, natural wood.
- Natural Dried Pampas Grass: Add soft texture and height to your table styling by arranging these stems in simple glass vases.
Oversized Wooden “16” Numbers
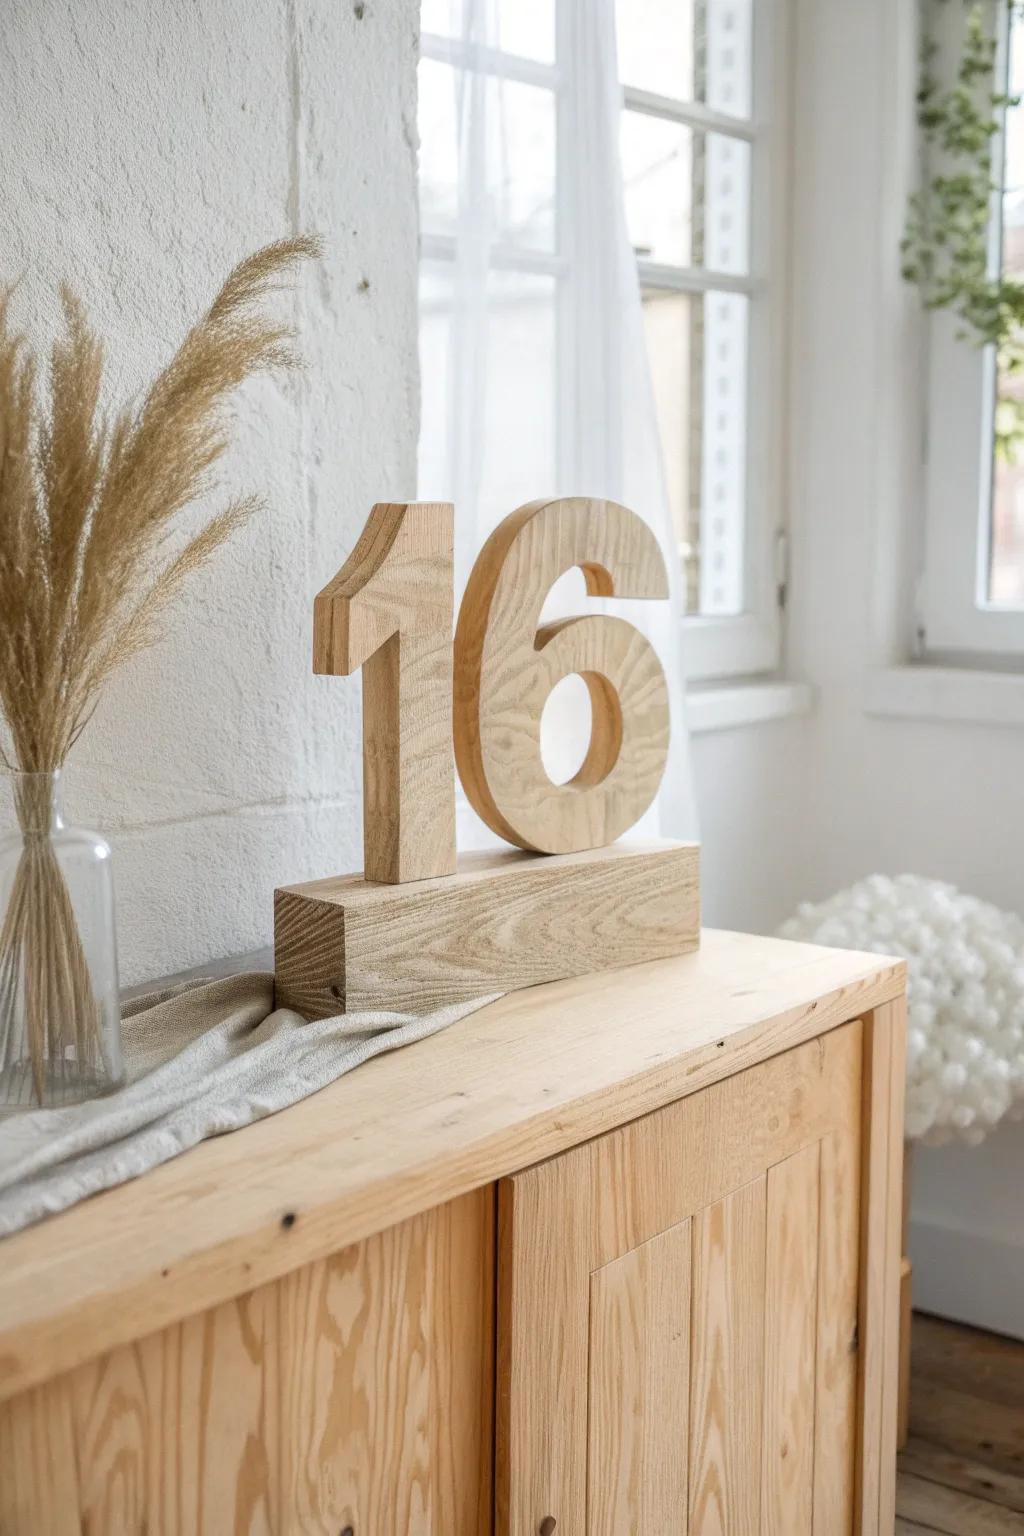
Cutting big wooden 16 numbers from plywood is one of my favorite Rustic Sweet 16 statements. I’ve stained them, whitewashed them, even rubbed on a little wax, and they always look custom.
Check these products out:
- Freestanding Large Wooden Numbers: Find ready-to-finish freestanding numbers to save cutting time while achieving that bold, rustic statement piece effortlessly.
- Natural Wood Stain: Apply a natural or oak-colored wood stain to bring out the grain pattern and enhance rustic warmth.
- Dried Pampas Grass: Complete your display by arranging fluffy dried pampas grass nearby for soft texture and boho-rustic charm.
Barn-Door Dessert Bar Look
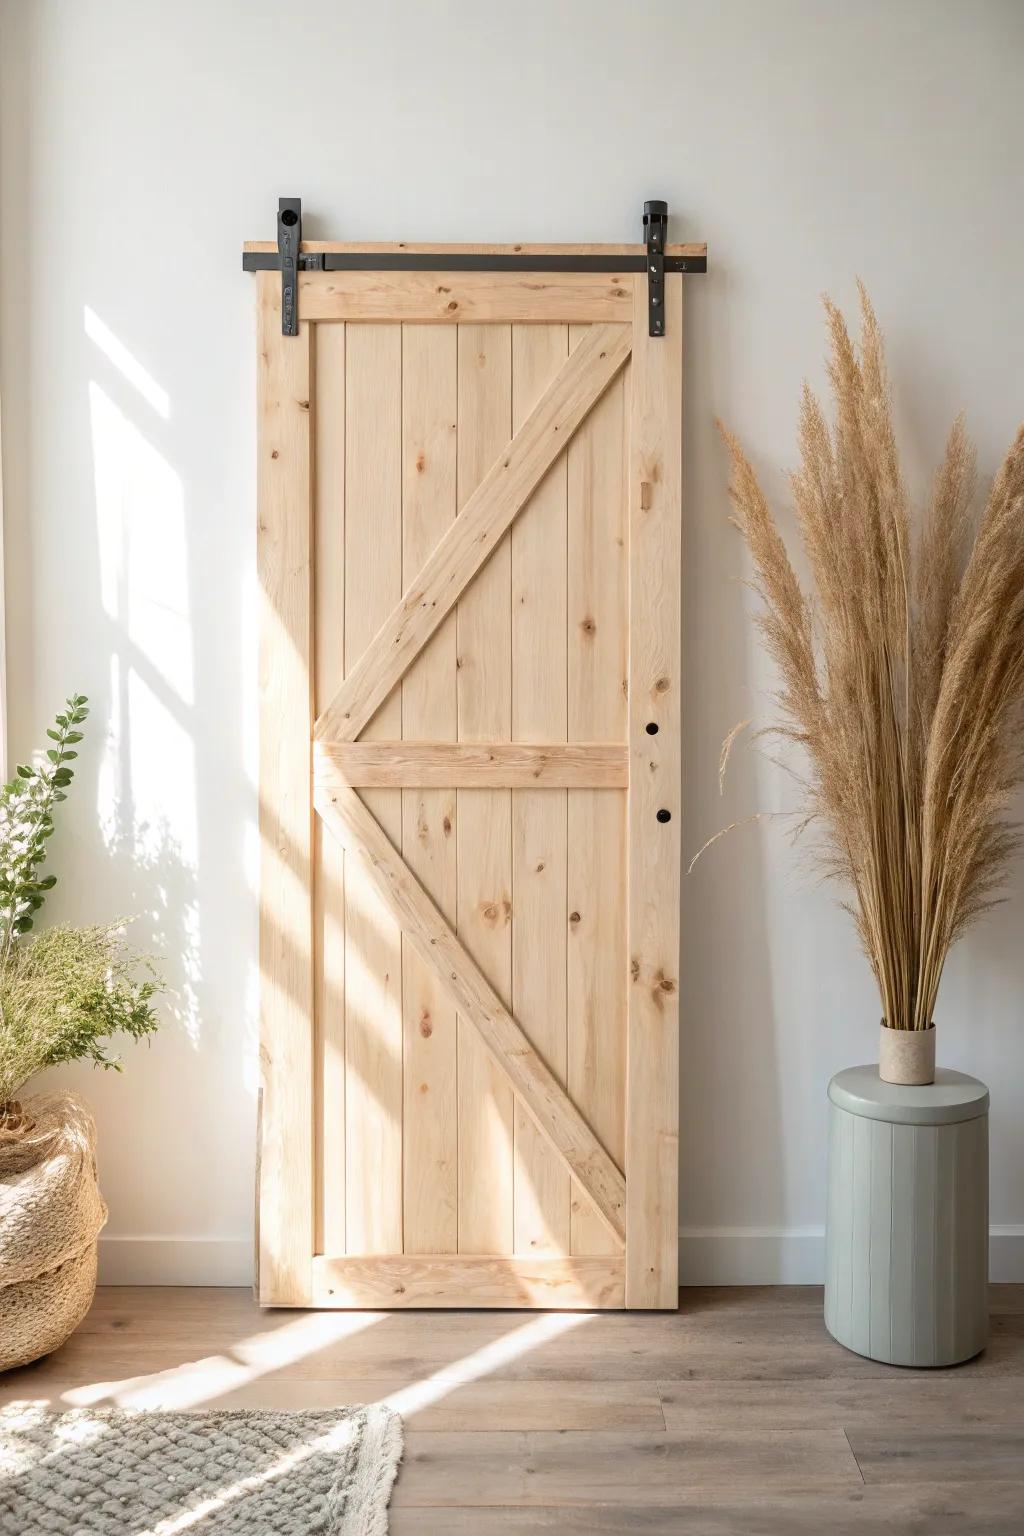
If you can borrow or build a faux barn door, it makes the Sweet 16 dessert area feel like a farmhouse feature wall. I’ve made a lightweight version from a sheet of plywood and trim so it’s easy to move and store.
Check if these fit your needs:
- Sliding Barn Door Hardware Kit: Creating a professional look starts here; easily mount your custom door panel with this sturdy hardware track system.
- Unfinished Pine Barn Door Slab: Save time on construction by using a pre-made, unfinished wood door ready for your custom stain or paint.
- Tall Natural Dried Pampas Grass: Complete the rustic aesthetic by placing tall, fluffy dried grass in a vase alongside your new farmhouse backdrop.
Low Boho Picnic Tables
For a relaxed Sweet 16, I’ve built low wooden picnic tables and styled them with rugs and cushions for that cozy hangout vibe. I keep the design super simple—straight boards and sturdy legs—so it’s beginner-friendly woodworking.
Might be a good match:
- Large Vintage Area Rug: Style your picnic base with a warm, vintage-style area rug to define the space and add cozy texture.
- Decorative Floor Cushions & Pillows: Invite guests to relax by scattering soft floor cushions and textured throw pillows for comfortable low seating.
- Clear Glass Bottle Vases: Add a touch of simple elegance by arranging fresh wildflowers in classic clear glass bottles or vases.
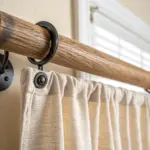
String Lights Across Wood Beams
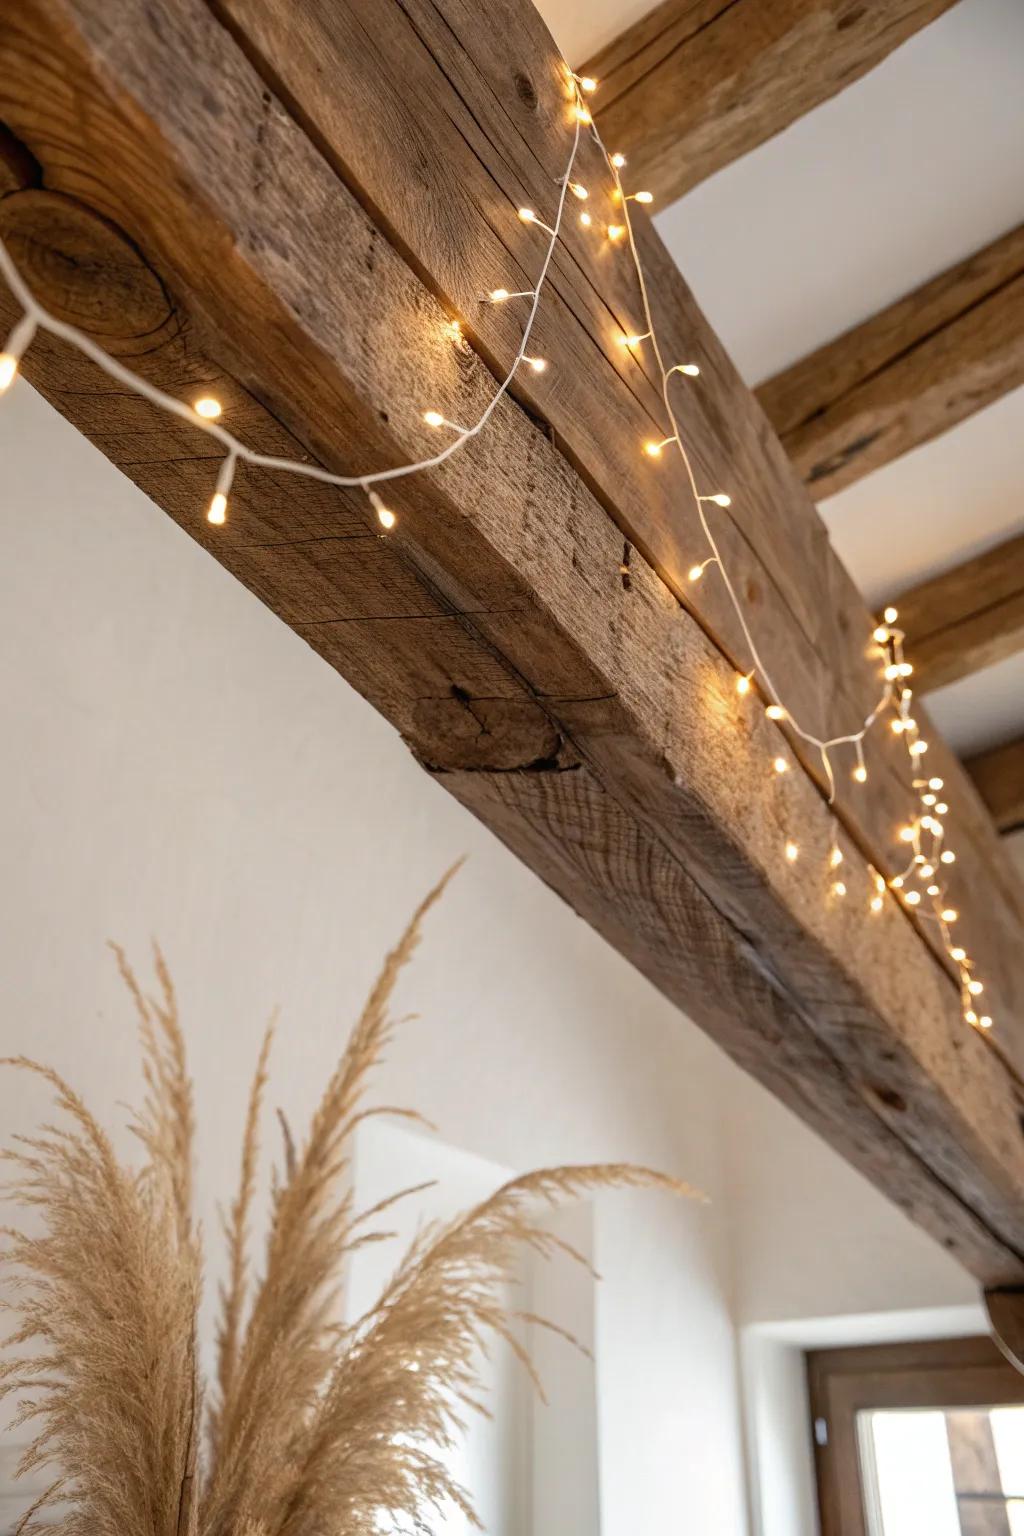
Warm string lights draped over wood beams (or a DIY timber frame) instantly soften a Rustic Sweet 16 space. I’ve learned that slightly dim lighting makes wood grain look richer and more photogenic.
Some handy options:
- Warm White Fairy String Lights: Drape these delicate lights over beams to instantly create a cozy, magical glow for your party photos.
- Natural Dried Pampas Grass: Add these fluffy stems to floor vases to perfectly complement rustic wood textures and soft party lighting.
- Command Decorating Clips: Use these clear hooks to easily secure your lights to wooden beams without causing any permanent damage.
Memory Ladder Photo Display
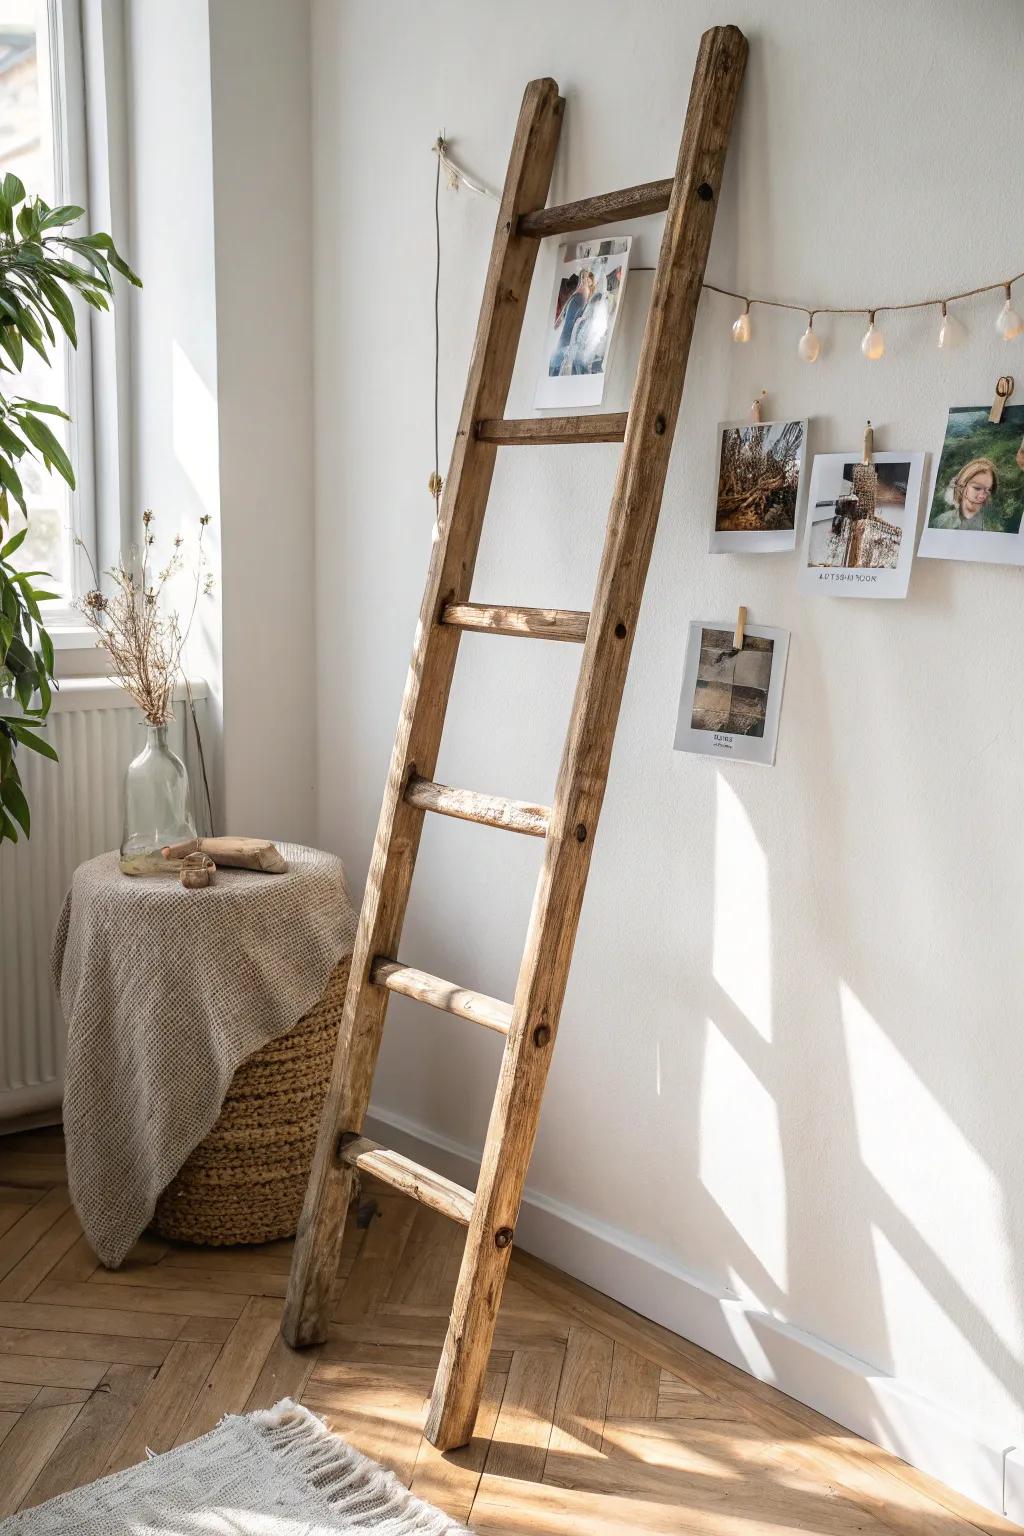
I like propping up a distressed wood ladder and clipping photos from childhood to now for a sentimental Sweet 16 moment. I’ve built ladders from scrap 2x2s, and it’s always a crowd magnet.
Useful items to consider:
- Rustic Wooden Blanket Ladder: Create the perfect foundation for your photo display by leaning this charming, vintage-style wooden ladder against your wall.
- Mini Wooden Clothespins: Secure your favorite childhood memories gently to the ladder rungs or string with these small, rustic wooden clips.
- Jute Twine or Fairy Light String: Weave this natural textured twine or lighted string between rungs to easily hang multiple photos in rows.
Direction Signpost to Party Zones
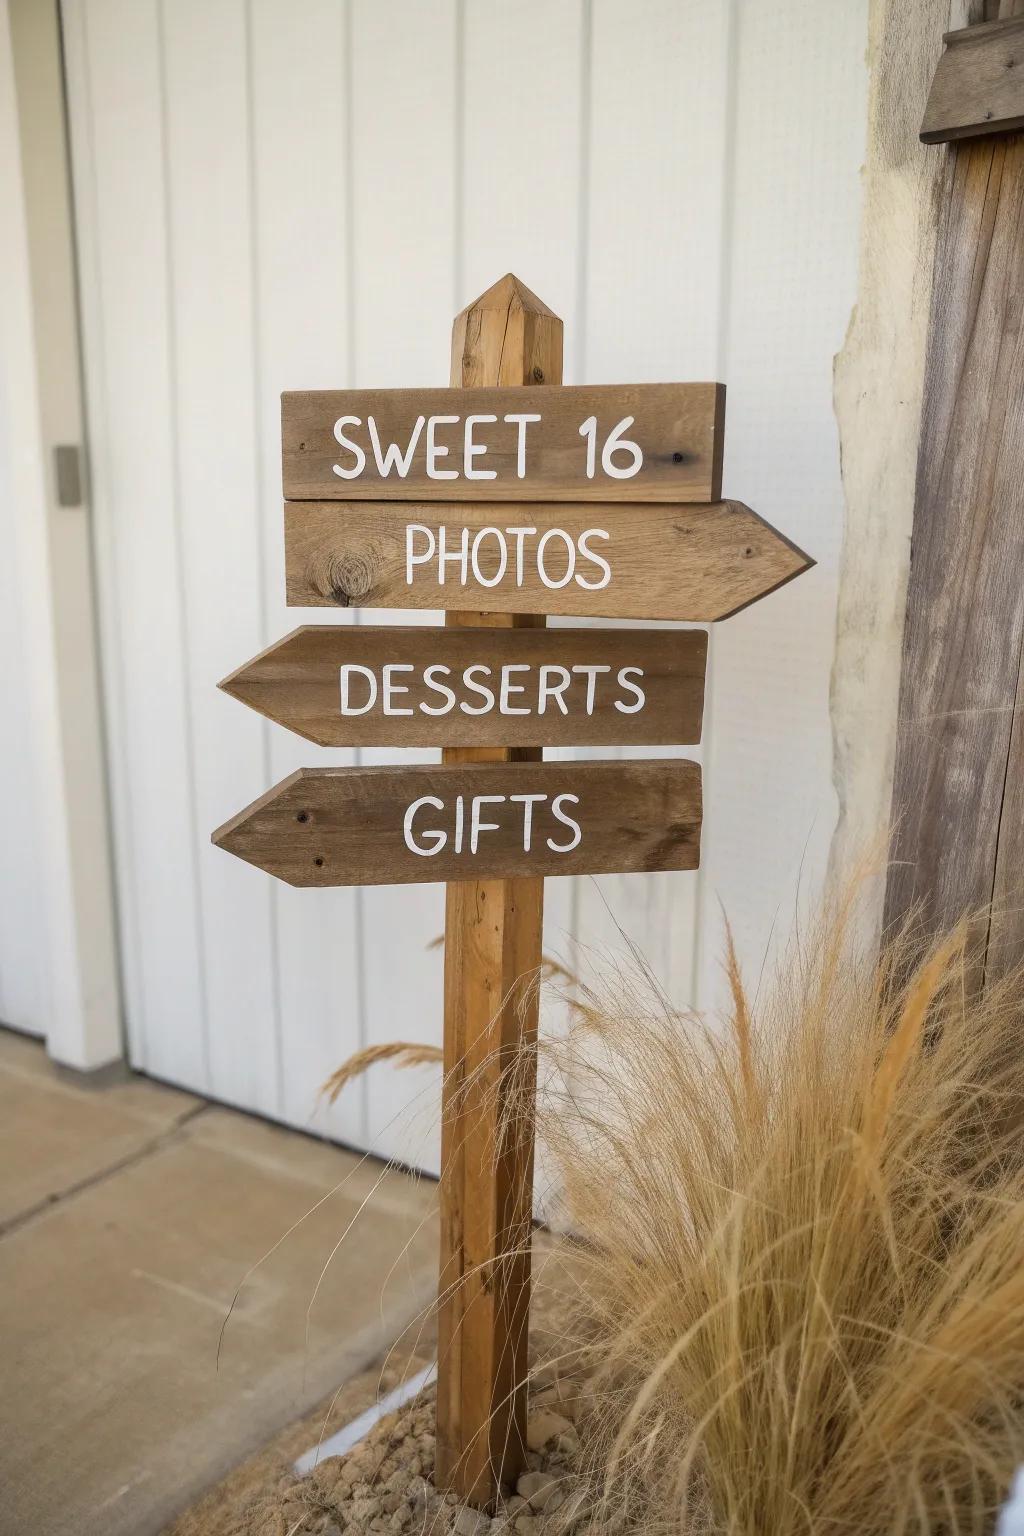
A rustic signpost with arrows—“Sweet 16 Photos,” “Desserts,” “Gifts”—is such an easy win, and I make mine from reclaimed fence boards. I’ve noticed guests actually use it, and it keeps the party flow feeling smooth.
Products that could assist:
- Weathered Wood Arrow Signs: Create your directional signs easily with pre-cut wooden arrows ready for you to customize and mount.
- White Paint Marker Pens: Hand-letter your signs clearly with these markers that work perfectly on rough, dark wooden surfaces.
- Wooden Garden Stake Post: Anchor your directional signs firmly into the ground with a sturdy, pointed wooden garden stake.
Sweet 16 Guestbook Wood Slice
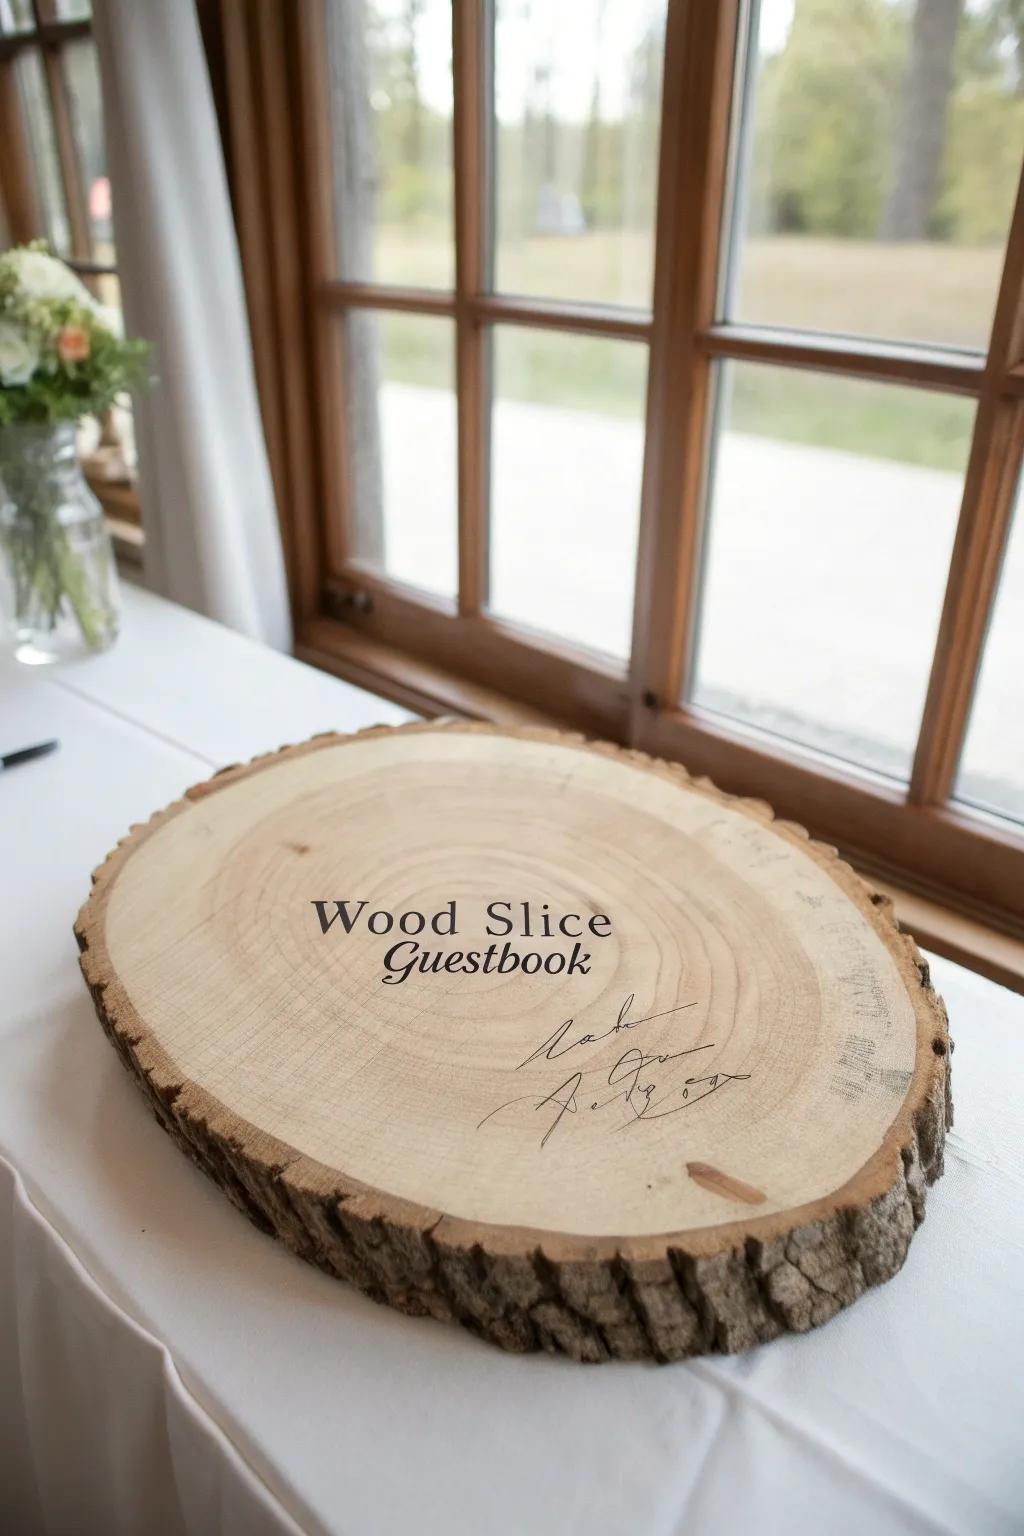
Instead of a paper book, I set out a giant wood slice guestbook and have everyone sign around the edge for the Sweet 16 keepsake. I’ve sealed mine afterward, and it becomes wall art that still feels rustic.
Possibly helpful picks:
- Large Round Wood Slice: Choose a spacious, natural wood slice with bark edges to create a unique canvas for heartfelt messages.
- Permanent Fine-Tip Markers: Ensure guest signatures stay crisp and legible on wood grain by using high-quality, non-bleeding permanent markers.
- Clear Gloss Wood Sealer: Preserve your keepsake for years to come by applying a protective clear coat over the finished signatures.
DIY Wooden Treat Board Wall
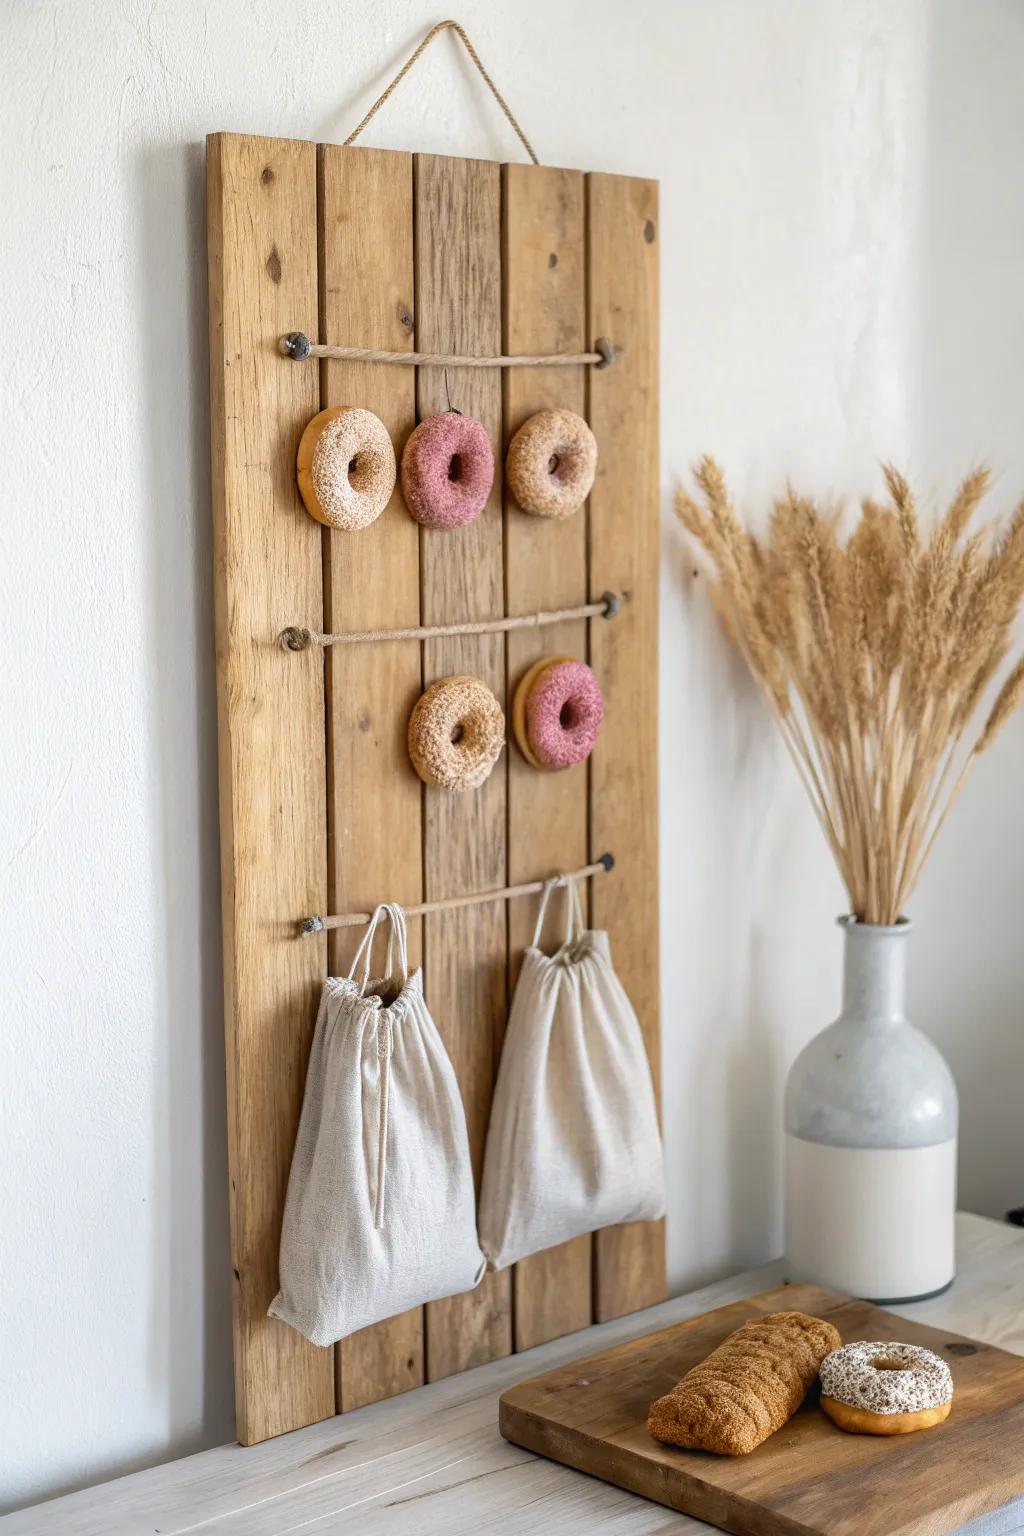
For a fun Rustic Sweet 16 snack moment, I mount a big plank and add pegs to hold treat bags, donuts, or little favors like a wood treat wall. I’ve built it with basic tools, and it photographs like a styled installation.
A few helpful options:
- Wooden Dowel Rods: Use these versatile rods as sturdy pegs to organize your treats and create a beautiful display.
- Cotton Drawstring Bags: Fill these rustic pouches with party favors or candy for an easy, charming grab-and-go gift option.
- Jute Twine Rope: Hang your board securely or add decorative rustic accents to your treat wall with this durable cord.
Florals in Rustic Wood Boxes
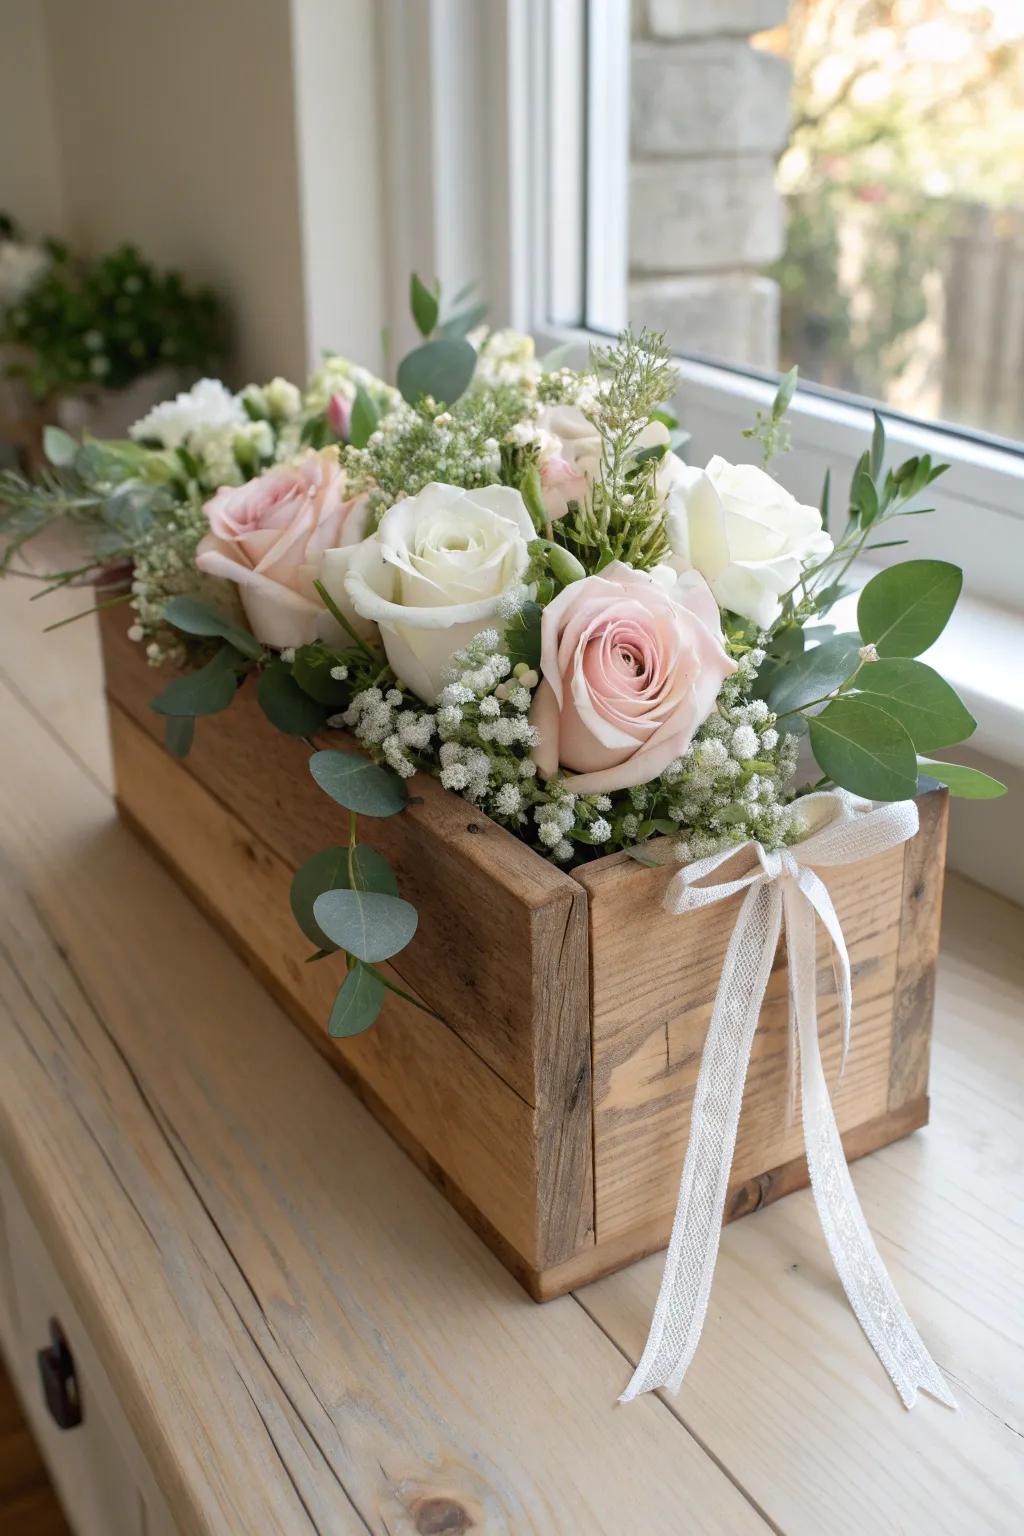
I make simple wood planter boxes as centerpieces and fill them with flowers and greens for a sweet, grounded Sweet 16 look. The best part is I’ve reused the boxes later as actual planters or shelf storage.
Some ideas to consider:
- Rectangular Wooden Planter Boxes: Choose these unfinished or rustic-style wooden boxes as the perfect sturdy base for your charming floral centerpieces.
- Green Floral Foam Blocks: Use these essential foam blocks inside the box to keep your fresh flowers hydrated and perfectly positioned all night.
- Vintage Lace Ribbon Spools: Tie a simple bow with this delicate lace ribbon to add a soft, elegant touch to the rustic wood.
Polaroid-Style Photo Booth With Shiplap
I’ve built a faux shiplap photo booth frame and lettered Sweet 16 across the top, and it always steals the show. When you keep the wood matte and lightly distressed, every outfit and prop looks intentional against it.
Possibly handy products:
- Distressed Wood Peel-and-Stick Wallpaper: Create that authentic shiplap look quickly by wrapping a simple cardboard or foam frame with this textured adhesive paper.
- Large Foam Board Sheets: Construct the lightweight base of your photo frame easily using these sturdy sheets before applying your wood finish.
- White Script Letter Stickers: Add the perfect ‘Sweet 16’ headline to your frame with these elegant, ready-to-use adhesive vinyl decals.
Fire-Pit S’mores Table With Stump Seats
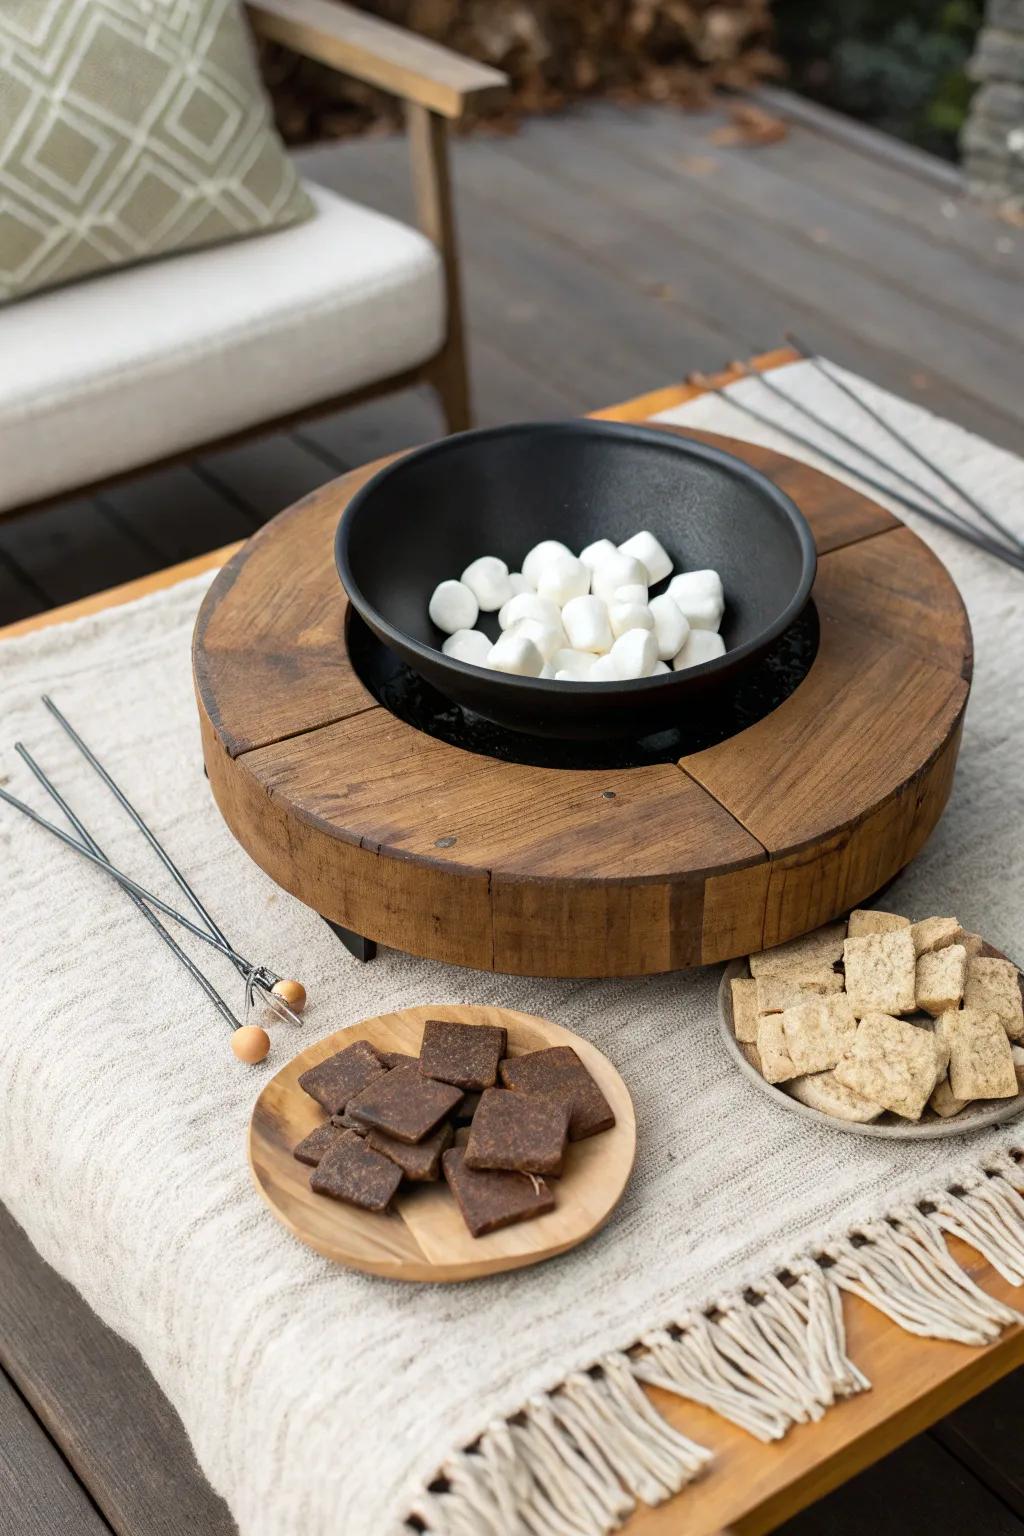
A backyard Rustic Sweet 16 gets extra cozy with a s’mores station on a thick wood table and log stump seating around it. I’ve sanded the stumps smooth so they’re comfy, but I leave the bark edge for that woodland feel.
A few suggestions:
- Tabletop Fire Bowl: Create a safe, contained flame perfect for roasting marshmallows right on your table without the campfire smoke.
- Wooden Serving Platters: Display your graham crackers and chocolate on natural wood plates to perfectly match your rustic party theme.
- Marshmallow Roasting Sticks: Keep guests safe while roasting with extendable skewers that are easy to handle and simple to clean.
Mini DIY Workshop Party Favor Station
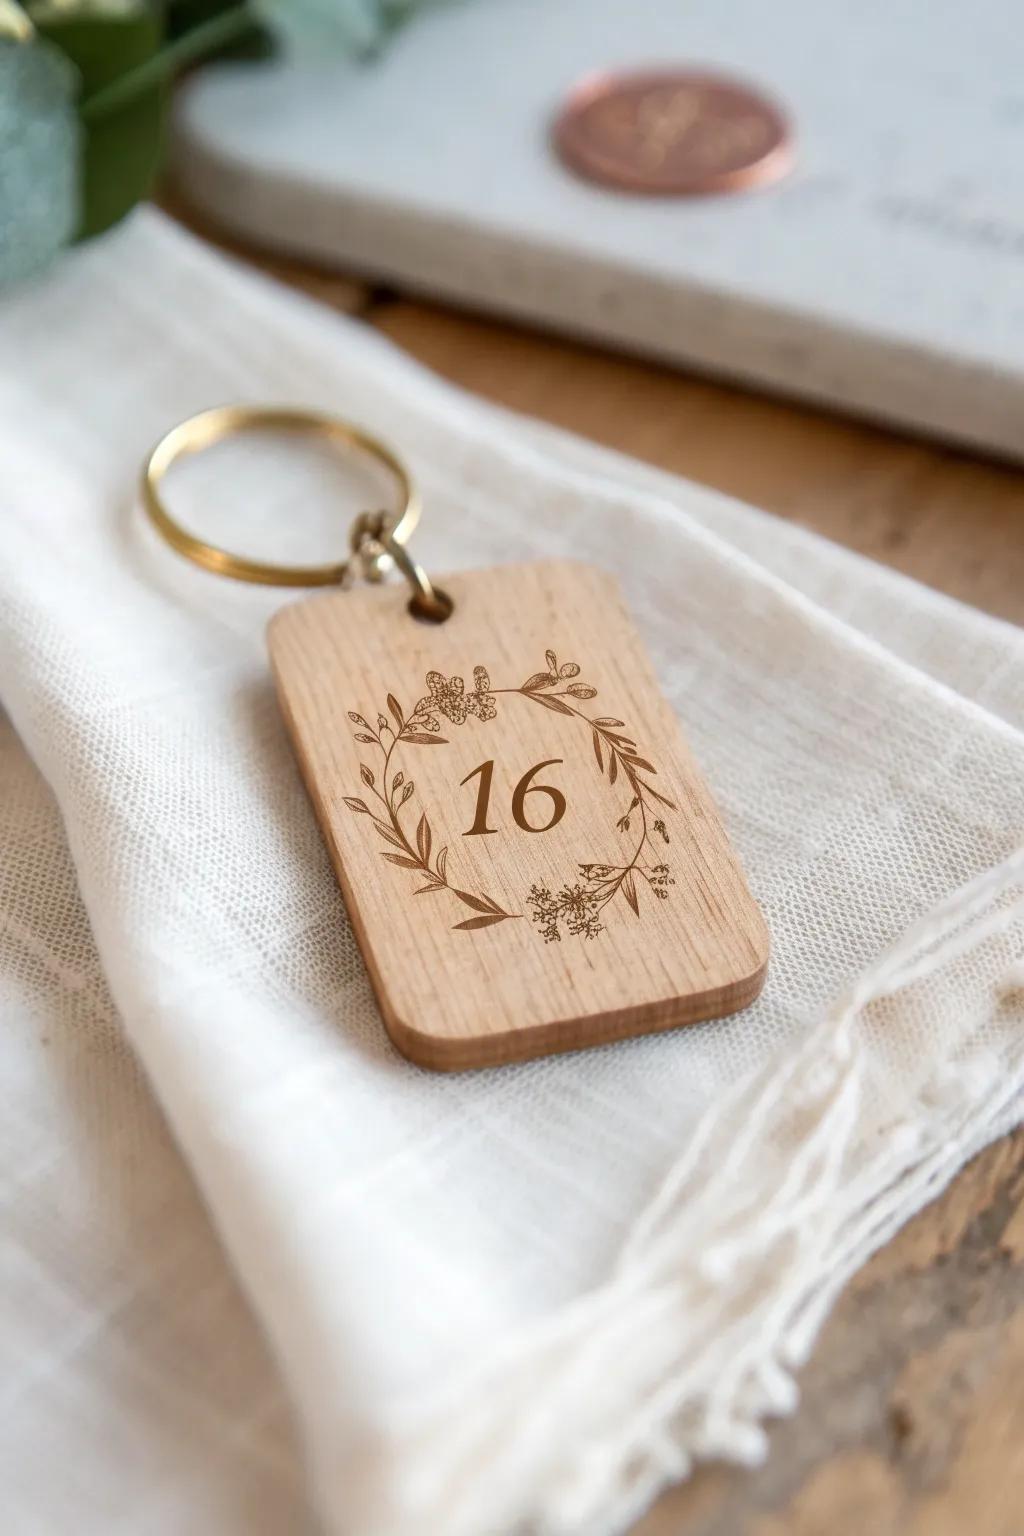
For an interactive Rustic Sweet 16, I’ve set up a supervised station where friends stain and stamp tiny wood tag keychains as favors. It’s surprisingly calming, and everyone leaves with something they made themselves.
These products might be useful:
- Blank Wooden Keychains: Start your crafting station with these blank wooden tags, ready for your guests to personalize and design.
- Botanical Rubber Stamps: Provide beautiful floral and leafy designs for guests to stamp onto their keychains for that rustic look.
- Mini Ink Pad Set: Offer a variety of earthy ink colors to help make the stamped designs pop on the natural wood.
Hidden-Message Pallet Wall Reveal
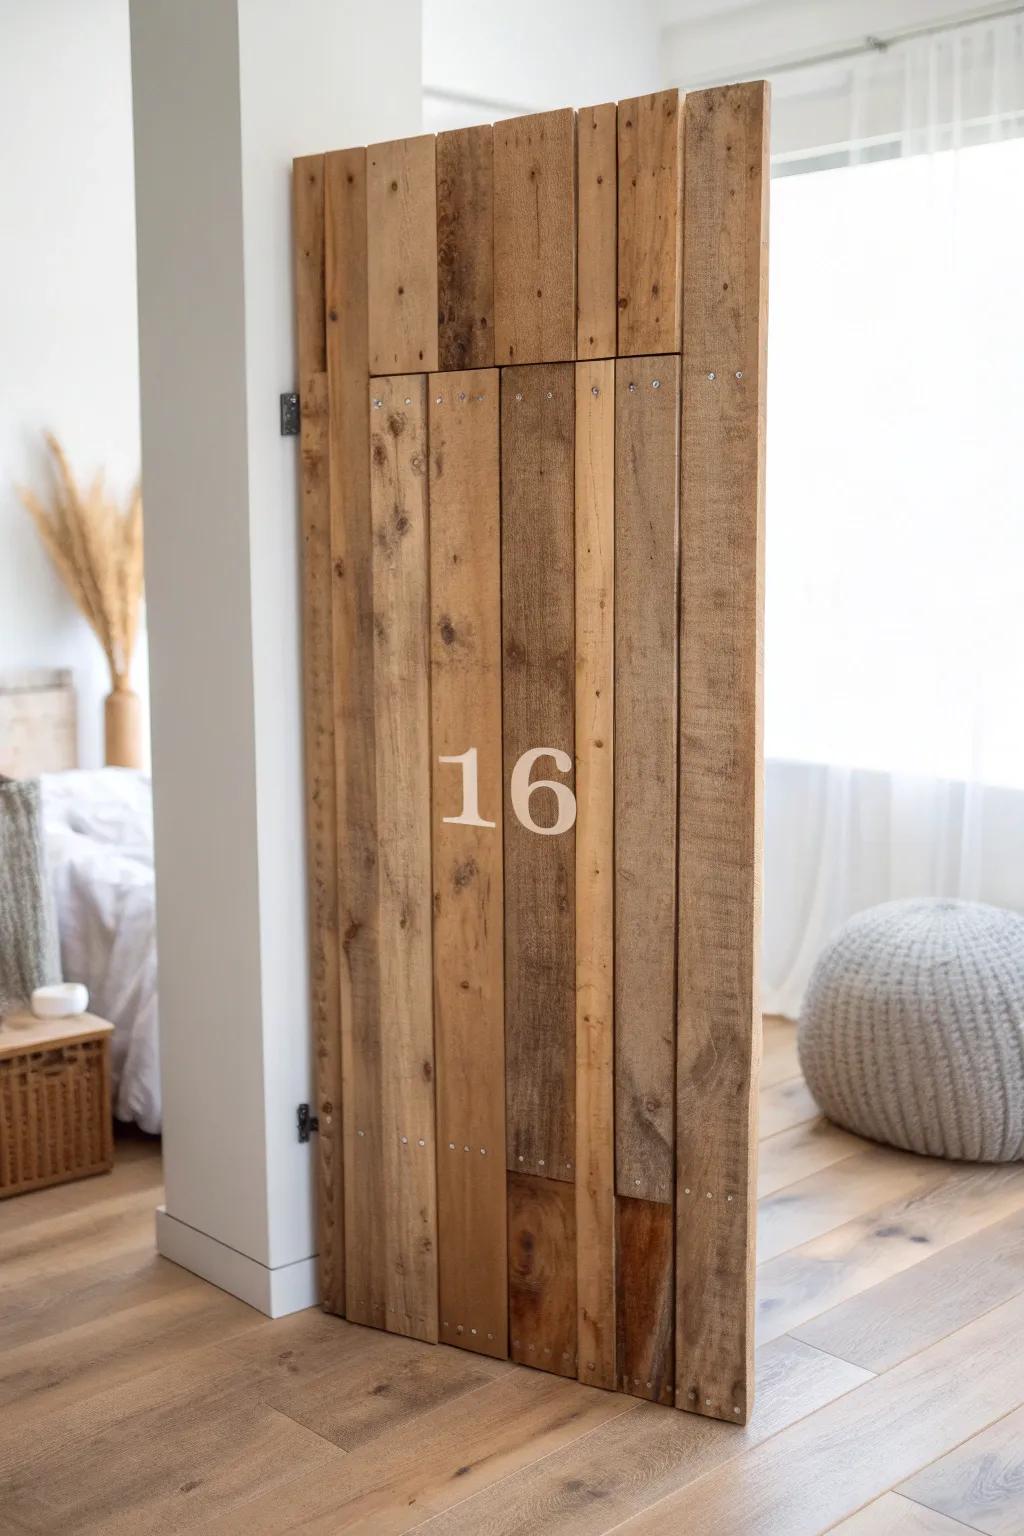
My biggest wow-factor Sweet 16 build was a pallet wall with a hidden message revealed by turning a few boards—like a secret “16” or a nickname tucked inside. It sounds extra, but I’ve pulled it off with simple hinges and a little planning, and guests lose their minds when it flips open.
You might like:
- Small Black Butt Hinges: Use these discreet hinges to create the flipping mechanism for your hidden message boards easily.
- White Chalk Paint or Stencil Paint: Apply crisp, visible numbers or names onto the rustic wood surface for a professional finish.
- Reclaimed Wood Planks or Pallet Boards: Building from scratch? Grab these authentic-looking boards to skip the pallet sourcing and sanding hard work.


